KEY CONCEPTS
Site Selection
Performance of a biopsy that will yield accurate and relevant histologic information depends upon the selection of an appropriate lesion or site within a lesion (Table 146.1).
The anticipated depth of the lesion to be biopsied must also be considered. A superficial lesion, e.g. an actinic keratosis versus squamous cell carcinoma in situ, can be assessed via a thinner horizontal biopsy that extends to the papillary dermis. On the other hand, accurate diagnosis of a subcutaneous nodule, e.g. panniculitis versus polyarteritis nodosa, requires a biopsy that extends into the deeper portions of the subcutaneous fat. Occasionally, fascia must be obtained, e.g. morphea profunda versus eosinophilic fasciitis. Disorders that primarily affect the collagen and elastic fibers within the dermis may have subtle histologic findings (e.g. atrophoderma of Pasini and Pierini) and longitudinally sectioned wedge biopsies that include both the affected area as well as adjacent normal-appearing skin prove most helpful.
Biopsy Technique Selection
Seven major methods are employed to biopsy skin: curettage, snip or scissors biopsy, shave biopsy, saucerization biopsy, punch biopsy, incisional biopsy, and excision in toto (Table 146.2). Depending upon the type of lesion and its size, several of these procedures are also curative, especially excision in toto. However, these methods differ with regard to the quality and quantity of skin obtained. Lesional characteristics and operator experience are factors that influence the choice of a particular procedure.
Curettage is frequently used to remove clinically benign epidermal lesions such as verrucae or seborrheic keratoses as well as actinic keratoses (AKs) and basal cell carcinomas (BCCs), especially the super-ficial type. The curettings can also be used to confirm the clinical diagnosis, but histologic interpretation may prove challenging if the tissue specimen is fragmented and its orientation becomes problematic. Snip or scissors biopsy is an efficient technique for assessing pedunculated lesions as well as removing benign growths (e.g. acrochordons, filiform warts).
The shave biopsy usually provides a specimen consisting of epidermis, papillary dermis, and sometimes reticular dermis (particularly in elevated lesions). It is a popular biopsy technique for recontouring papular, clinically benign lesions (e.g. irritated or unwanted compound and dermal melanocytic nevi, fibrous papules of the nose) where histologic confirmation is desired. Shave biopsy is also a useful procedure for diagnosing superficial carcinomas, e.g. nodular and superficial BCCs, squamous cell carcinoma (SCC) in situ, and lentigo maligna. However, for lentigo maligna, palpation beforehand to exclude induration and a possible desmoplastic component is recommended.
When tissue is procured via a saucerization procedure, the depth of the biopsy specimen is intentionally deeper due to angulation of the blade. This technique is often used to biopsy melanocytic nevi with atypical features when the differential diagnosis includes a thin melanoma. Its advantage is that it allows histologic examination of the entire lesion or a large portion of the lesion, which increases diagnostic accuracy (as compared to partial punch biopsy). Saucerization is also performed to confirm the clinical diagnosis of minimally invasive SCC or keratoacanthoma and to distinguish the former from a hypertrophic AK.
The punch biopsy supplies a cylindrical to conically shaped specimen consisting of epidermis, dermis, and sometimes subcutaneous fat. The volume of tissue sampled correlates with the size of the punch biopsy instrument. The diameter of the metal “barrel” can vary from 2 to 8 mm; the wider the diameter, the greater the likelihood of obtaining subcutaneous fat. However, the thickness of the dermis must be kept in mind in addition to the amount of subcutaneous fat required to address possible clinical diagnoses. Punch biopsies are particularly helpful for examining processes within the dermis such as tumors or inflammation (see Table 146.2). In the case of tumors, sampling a majority of the lesion is desirable, so that for large-sized tumors, multiple punch biopsies may be required.
The incisional biopsy removes a wedge of tissue from the center or edge of a lesion (see Site Selection) and is the best option for obtaining deep subcutaneous fat or fascia for histologic examination. It is also used to sample a significant portion of large-sized tumors. Excision in toto removes the entire lesion and includes epidermis, dermis, and subcutaneous fat. For these reasons, it is often utilized when the leading clinical diagnosis is invasive cutaneous melanoma.
Specimen Handling
Transportation of the biopsy specimen to the laboratory differs according to the processing and type of examination required. Most specimens are placed in formalin, but, occasionally, special carrier media are necessary (Table 146.3). Fresh tissue specimens are sent on saline-moistened gauze and promptly delivered to the laboratory; the laboratory must be in reasonable proximity and have the capability of quickly processing the tissue. Occasionally, fresh or frozen tissue is sent overnight with cold packs or on dry ice, respectively, to a more distant laboratory (see Fig. 76.10). When handling small or thin biopsy specimens, it is important to confirm that they are clearly within the formalin solution and not adhering to the upper portions of the container or lid to prevent desiccation artifact.
A protocol must be established within the clinician’s practice to ensure that specimens and results are appropriately tracked and assigned to the correct patient. Immediately after the biopsy specimen has been obtained, it should be placed in a container prelabeled with the patient’s name and other identifying information. If multiple biopsies are to be performed, pre-labeling the containers alphabetically and with the respective sites avoids confusion. A specimen log book (Table 146.4) ensures notification of the results to the patient and disposition of recommended care.
Patient Preparation
A discussion of the reason(s) to do the biopsy, the site to be biopsied, and the technique to be used can be brief and to the point. Informed consent requires a discussion of the major risks, which include bleeding, discomfort, infection, and scarring (see Ch. 151). Bleeding can usually be controlled by firm pressure at the site of the wound, but may require more aggressive forms of hemostasis. Discomfort is usually minimal, although some sites such as the forehead, fingers, and feet may throb.
Infection is unusual. Except when the area to be biopsied is already infected or the site is mucosal, the skin can be prepared by application of an antiseptic agent and the procedure is then considered to be a clean procedure. For clean procedures of non-mucosal, non-infected sites, preoperative prophylactic antibiotics are currently not recommended, even in patients with artificial valves or joints (with the possible exception of sites at high risk of infection, e.g. groin, during
the first 2 years after joint placement). The overall goal is a reduction in the emergence of antibiotic-resistant bacteria and in one study, for example, preoperative prophylactic antibiotics increased nasal carriage of methicillin-resistant Staphylococcus aureus. Tables 151.2 and 151.3 review the guidelines for antibiotic prophylaxis as well as regimens for both oral and non-oral sites. If preoperative antibiotics are given, they are administered within a 2-hour window before the incision; there is debate as to whether or not a second dose is administered 6 hours later and under which circumstances antibiotics should be continued for 48–72 hours. When pretreated with a 5-day regimen of intranasal mupirocin ointment (twice daily) and a total body wash with chlorhexidine soap (daily avoiding the eyes and ears), nasal carriers of S. aureus were observed to have fewer postoperative infections.
Most patients are primarily interested in discussing whether or not there will be visible scarring. This is best predicted by the type of biopsy to be performed and the anatomic site. Generally, patients can be reassured that small biopsies may be done without grossly noticeable permanent “marks”.
Many patients are anxious about the needle sticks required for administration of the local anesthesia and the pain of the procedure. The patient’s cooperation is easily obtained in an organized and peaceful environment
with a calm and reassuring staff. A well-informed, comfortable patient in a supine position will tolerate the procedure without difficulty.
Site Preparation and Anesthesia
Effective site preparation is most efficient if a standard clinical protocol has been established (Table 146.5). Marking and photographing the site, cleansing the skin (Table 146.6), and draping are important procedures prior to the instillation of local anesthesia. Local anesthesia is adequate for all skin biopsies and is reviewed in detail in Chapter 143.
When the local anesthetic agent is instilled into a deep compartment (i.e. subcutaneous fat; Fig. 146.1A), 5 to 10 minutes is required for anesthesia to develop on the surface of the skin. Gentle massage of the site may assist in spreading the agent subepidermally and achieving good anesthesia. Injection of the agent superficially, creating an edematous wheal, has immediate efficacy but is more painful (Fig. 146.1B). Since a punch or shave biopsy requires very little agent and therefore a very short injection time, superficial instillation is the technique often used. In addition, a wheal is helpful prior to a shave biopsy as the lesion is further elevated from the plane of the surrounding skin. Of note,
since epinephrine (adrenaline) requires up to 15 minutes to produce maximal vasoconstriction and thereby minimize bleeding, lidocaine without epinephrine is sufficient for an immediate biopsy. Regardless of other considerations, it is critical to have the local anesthesia in the compartment that is to be biopsied, i.e. a superficial wheal may be entirely adequate as anesthesia for a shave biopsy but will not suffice for an incisional wedge biopsy that extends into the subcutaneous fat.
Hemostasis
All biopsy procedures require attention to hemostasis of the wound bed (Table 146.7; see Table 151.5). While styptics and absorbable hemostatic sponges are used for those wounds healing by second intention, suturing provides sufficient hemostasis for punch biopsy sites. Wounds created during an incisional biopsy or excision in toto may require electrocoagulation for hemostasis before closure (see Ch. 140). The endpoint is no active bleeding in the wound bed. Bleeding within the dermis in the sides of the wound can be controlled by suturing and does not need cautery. At times, to produce hemostasis, a large actively bleeding vessel may need to be identified, grasped with a hemostat, and tied off with an absorbable suture and a figure-of-eight suture (Fig. 146.2).
Wound Closure
Closure of wounds created by a biopsy procedure may occur by either second or primary intention healing. Second intention healing repairs wounds by the processes of granulation tissue formation, epidermal cell migration, and contraction (see Ch. 141). These processes occur simultaneously, beginning within the first few days after surgery and continuing until the wound has completely re-epithelialized. For the remainder of the patient’s life, maturation of the scar occurs, with gradual improvement in color, texture, and contour. Indications, disadvantages, and contraindications for second intention healing are outlined in Table 146.8.
Closure of the wound via suturing is regarded as primary intention healing. The same processes of granulation tissue formation, epithelial migration, and contraction occur; however, they are significantly reduced, because the sides of the wound are already apposed. Processes related to fibroblast activity and collagen deposition play a more important role in primary intention healing, allowing adequate tensile strength to develop to keep the wound closed. These scars also undergo maturation throughout the remainder of the patient’s life. Both second and primary intention healing are promoted by appropriate wound care and dressings.
For primary intention healing, wounds may be closed either by placement of a simple full-thickness suture or by layered closure. In a layered closure, subepidermal buried sutures appose subcutaneous and dermal tissue, provide alignment of the wound edges, set up the wound edges for eversion, and assist with hemostasis by occluding any vessels bleeding within the edge of the wound. In addition, the subepidermal sutures supply strength to handle tension within the closure. Although subepidermal sutures are generally absorbable, they remain intact within the tissue for 8 to 12 weeks, the period during which the scar is slowly acquiring tensile strength. As a result, they prevent dehiscence and spread of the scar. Epidermal or skin sutures appose the epidermal edges and complete eversion. They can also correct minor degrees of misalignment in the closure. Satisfying these objectives via conscious placement of sutures improves the function and appearance of the scar.
Knotting is the means for stabilizing the placement of the suture, usually produced with an instrument tie (Fig. 146.3). The first throw of the knot is started by pulling the long end of the suture tight with the fingers of the non-dominant hand and looping it around the needle holder once or twice. The needle holder then grasps the short end and pulls it through the loops. The loops are pulled across the wound so that they lie flat. These steps are then repeated to produce the second throw of the knot, but this time with the loop in the opposite direction around the needle holder. When this second loop is pulled across the wound, a square knot is created. Depending on the memory and thickness of
the suture material (see Ch. 144), three to six throws may be required to properly secure the knot. Care is taken to ensure that the knot lies flat without significant tension or tightness. Sometimes, a loose loop is left in the second throw, to allow the suture to adjust to any wound swelling that may develop.
Sutures commonly used for subepidermal placement are composed of synthetic absorbable materials such as braided polyglactin (Vicryl®) or monofilament polydioxanone (PDS®). The interrupted buried dermal suture (Fig. 146.4A) is designed such that the suture is in the dermis and fat and the knot is inverted (buried). The needle enters the under-mined deep surface of the wound (not the sidewall) and passes up into the dermis. After crossing the wound, it enters the opposite side of the wound at the same level in the dermis and then exits the deep surface. The knot is then tied and the ends of the suture cut. When the suture material is released, the knot settles within the deep portion of the wound, minimizing tissue reaction to the suture and extrusion through the wound. Enough buried dermal sutures are placed such that tension is eliminated and the deep tissues are completely apposed. In order to facilitate eversion, this basic suture may be modified, creating a buried vertical mattress suture. The suture is nearest to the skin surface (within the superficial dermis) at a point 3–4 mm lateral to the wound edge, and then it exits the wound deeper in the dermis (Fig. 146.4B). A very subtle dimple may be appreciated above the suture where it lies superficially in the dermis.
On occasion, a running dermal suture is used to close the deep component. This suture is begun similarly to the interrupted buried dermal suture, but, after tying, only the short end of the suture is cut. The needle then draws the suture through the subcutaneous fat and dermis on one side, passing to the other side, and then continuing along the length of the wound. At each step, the suture is pulled tightly to appose the edges. At the end of the wound, the knot is achieved by tying the loose end to the last loop. This suture is only used when there is little tension in the wound, as rupture of the suture material anywhere along the suture line would release the suture for the entire length of the wound, allowing dehiscence or spread of the scar.
Monofilament nylon (Ethilon®) or polypropylene (Prolene®) are commonly used epidermal sutures. The simple interrupted epidermal suture is placed by passing the needle through the epidermis into the superficial dermis in a plane just superior to the buried suture, across the wound, into the dermis on the opposite side and then up through the epidermis (Fig. 146.4C). Eversion is assisted by placing the suture closer to the wound edge but relatively deeper in the wound so that the epidermal surface does not roll. Using the curve of the needle to create the path for the suture also facilitates eversion. If there are no buried sutures, the suture apposes the edges for the full depth of the wound (e.g. for closure of punch biopsies).
The vertical mattress suture (Fig. 146.4D) is sometimes used for wounds in thicker skin where eversion may be difficult and when a single suture apposing the deep and superficial edges is desired. This suture has four points of entry into the skin. It is started by passing the needle through the epidermis 5–8 mm lateral to the wound edge, exiting from the deep portion of the wound. It re-enters the opposite side of the wound in the same deep position, and exits from the epidermis equidistant from the wound edge as the entry point. The needle is reversed and the epidermis is re-entered closer to the wound edge; it is then drawn through the upper dermis before crossing the wound, entering the dermis and finally exiting close to the wound edge. Once tied, the knot is positioned on one side of the wound, not over the line of closure.
A horizontal mattress suture can be used in thinner skin such as the neck or the dorsum of the hand, and it also has four points of entry into the skin. The first two points of entry are the same as in the vertical mattress suture (Fig. 146.4E), but closer to the wound edge (i.e. 3–5 mm). However, after the needle is reversed, the third point of entry
Interrupted buried dermal suture. B Buried vertical mattress suture. C Simple interrupted epidermal suture. D Vertical mattress suture. E Horizontal mattress suture. F Simple running epidermal suture. G Running locked suture. H Running subcuticular suture.
into the epidermis is 3–4 mm from the exit point, on the same side of the wound edge and equidistant from the wound edge. The suture is then drawn through the upper dermis, crosses the wound, enters the opposite sidewall in the same dermal position and finally exits at the same distance from the wound edge, 3–4 mm from the first entry point. This knot, when tied, is also positioned on one side of the wound, not over the line of closure (Video 146.1).
Since sutures of both the vertical mattress and horizontal mattress sutures must be removed within 1–2 weeks (depending upon the site), they are not good sutures to use as the sole means of closure in a wound with tension. Of note, a variant, the running combined simple and vertical mattress suture, also everts well and saves surgical time.
In the presence of buried sutures that have produced even alignment of the epidermal edges, a simple running epidermal suture can be used to complete the closure (Video 146.2). This running suture may be passed via the dermis and the epidermis in a fashion similar to the simple inter-rupted epidermal suture (Fig. 146.4F). In addition, the needle may be passed under the superficial loop of the previous suture, thus creating the running locked suture (Fig. 146.4G). This suture can assist with hemostasis and will not completely unravel if the suture breaks under wound tension. Irrespective of the epidermal suture that is chosen, track marks can appear due to tension, inadequate undermining, and ineffective buried dermal sutures, as well as poor placement of the epidermal sutures.
Alternatively, the suture may be placed entirely within the upper dermis, referred to as a running subcuticular suture (Fig. 146.4H, Video 146.3). This suture is placed with the needle and non-absorbable suture passing in and out of the upper dermis in a plane horizontal to the surface. Two knots are tied, one on each end of the wound, and they are the only visible portions of the suture. A fully buried running subcuticular suture with absorbable suture can also be placed. Running sutures are frequently used to save time, but they can accentuate minor misalignments of the wound edges.
Non-absorbable sutures that pass through to the surface of the skin should be removed as they can cause tissue inflammation and create a less than optimal functional and cosmetic result. To remove a suture, the thread is severed near the knot with either fine-tipped scissors or a #11 blade. The knot is then pulled over the line of closure so that the wound edges are not pulled apart. Sutures on the face are generally removed after 5–7 days, and sutures elsewhere at 10–14 days. If buried dermal sutures are used, the epidermal sutures may be removed at the earlier times. Sometimes, absorbable suture material is used for superficial closures, especially in the simple running epidermal suture, precluding the need for suture removal. Sterile adhesive tapes such as Steri-Strips™ or tissue glue (Dermabond®) are also occasionally used instead of epidermal sutures to avoid the need for suture removal, but they are ineffective in producing eversion and in dealing with tension. When compared to traditional epidermal sutures, adhesive tapes in one study produced an equivalent result in overall scar cosmesis, if subcutaneous closure had been achieved with no tension and there was perfect alignment of the surface. Of note, in another study, no differences in cosmetic outcome were observed when adhesive tapes plus dermal sutures were compared to dermal sutures alone. The use of adhesive tapes after suture removal may, however, reduce the amount of scar spreading when they are left in position for several weeks. Table 146.9 outlines alternatives to sutures for wound closure.
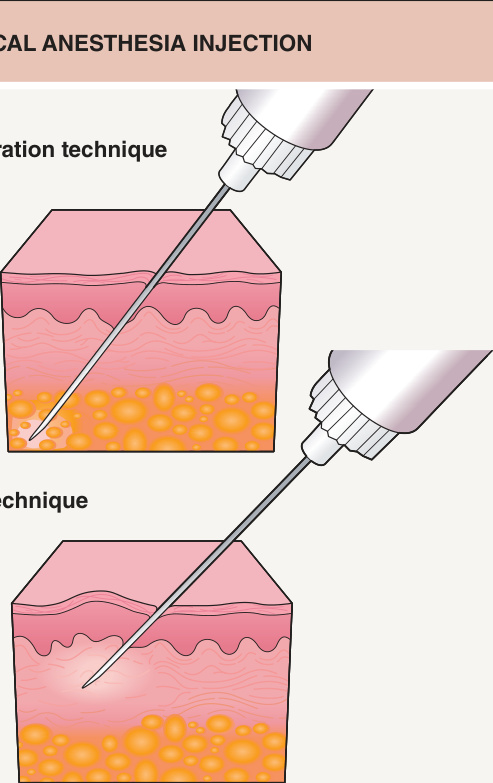
Fig. 146.1 Local anesthesia injection.A Deep infiltration. B Superficial infiltration.
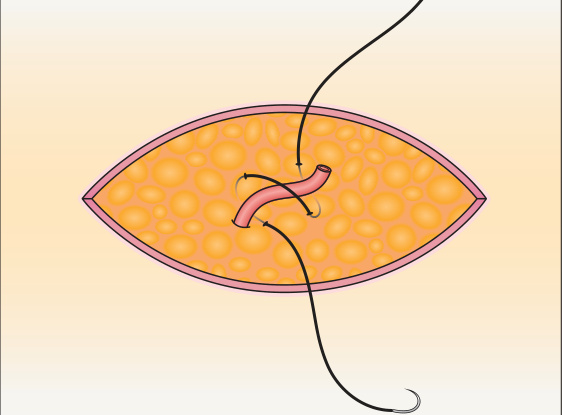
Fig. 146.2 Placement of a figure-of-eight suture for hemostasis prior to knotting.
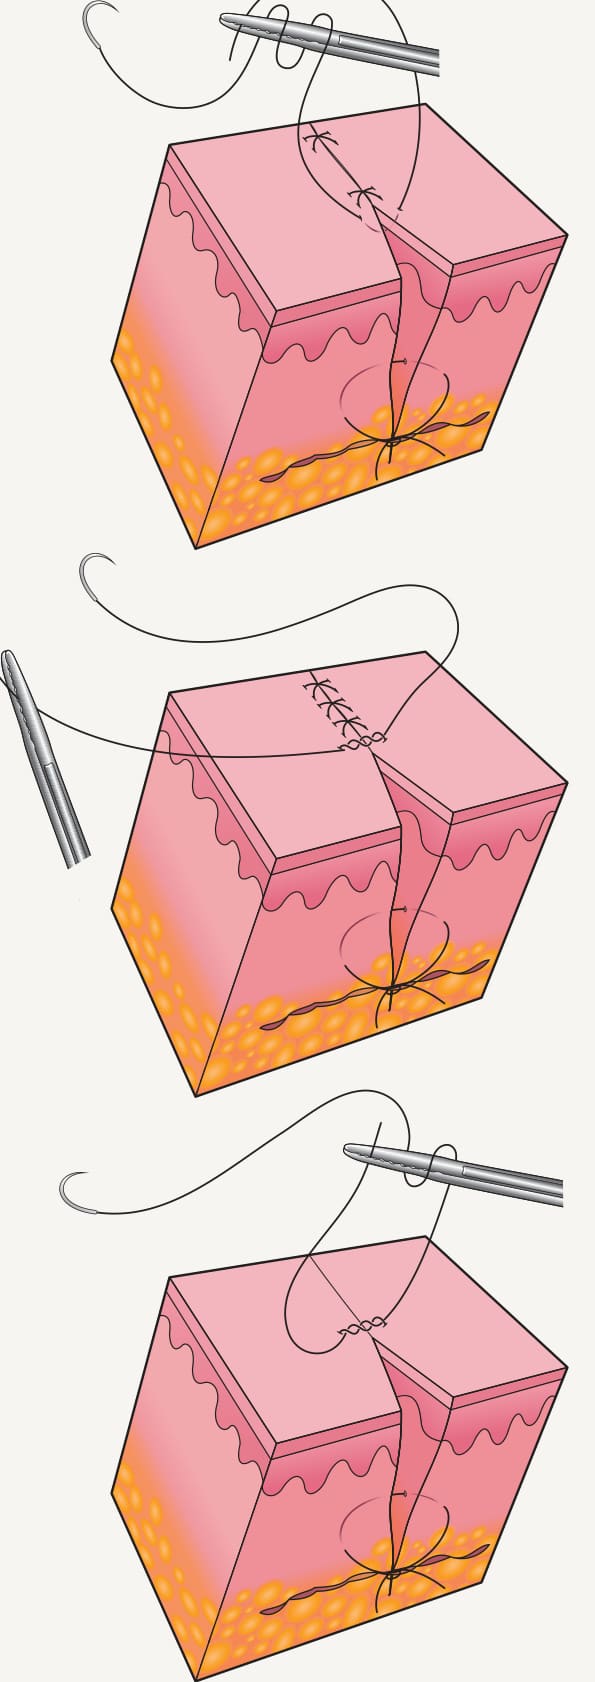
Fig. 146.3 Instrument tie.A The suture is looped around the needle holder, then the needle holder grasps the short end and pulls it through the loops to create a knot. B The suture is drawn over the wound so that the knot lies flat across the wound. C A loop is made around the needle holder in the opposite direction. The needle holder then grabs the short end and pulls it through so that the knot lies flat on the skin surface.
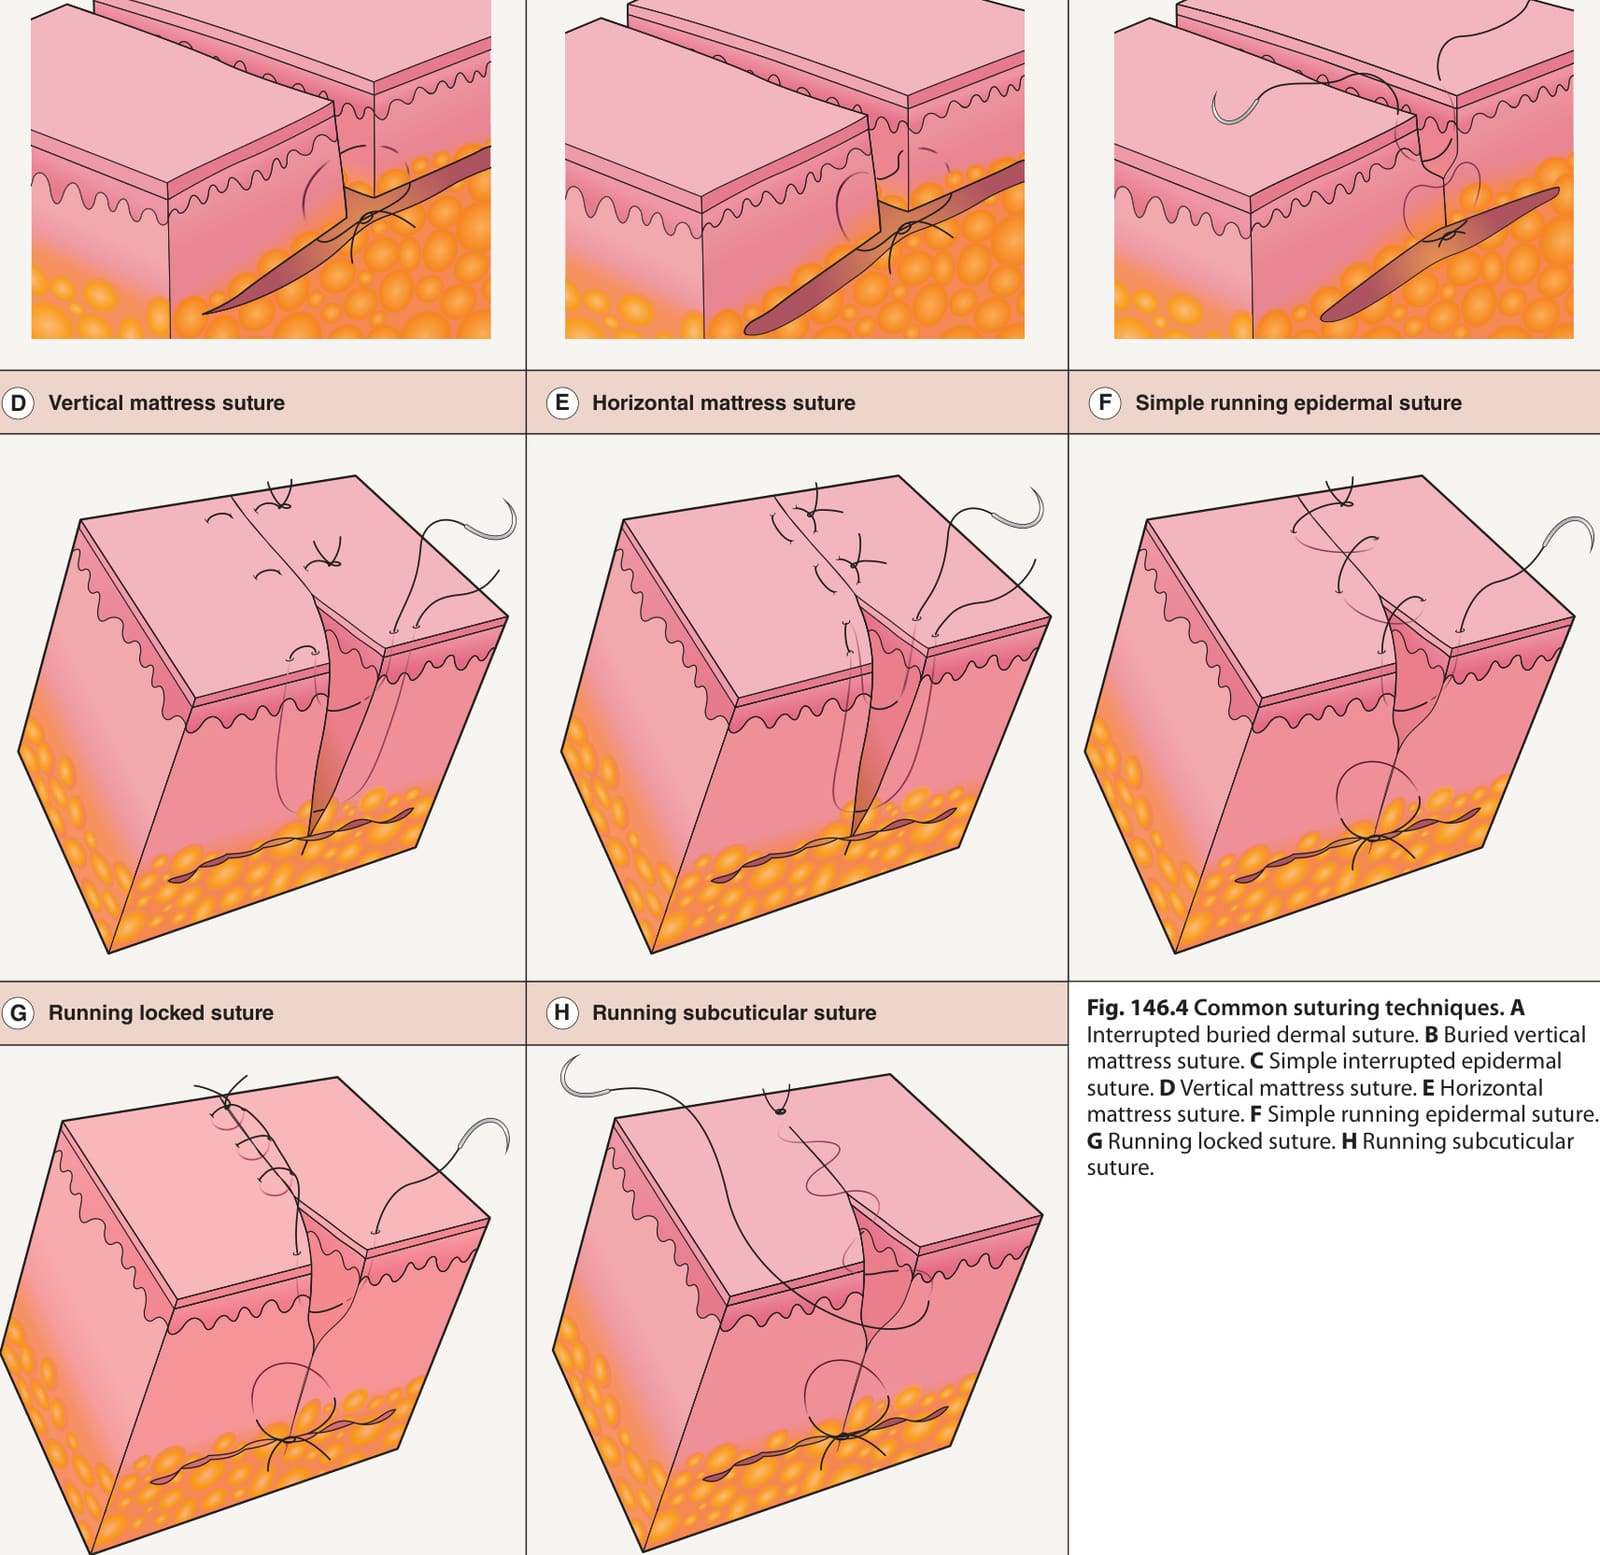
Fig. 146.4 Common suturing techniques.A
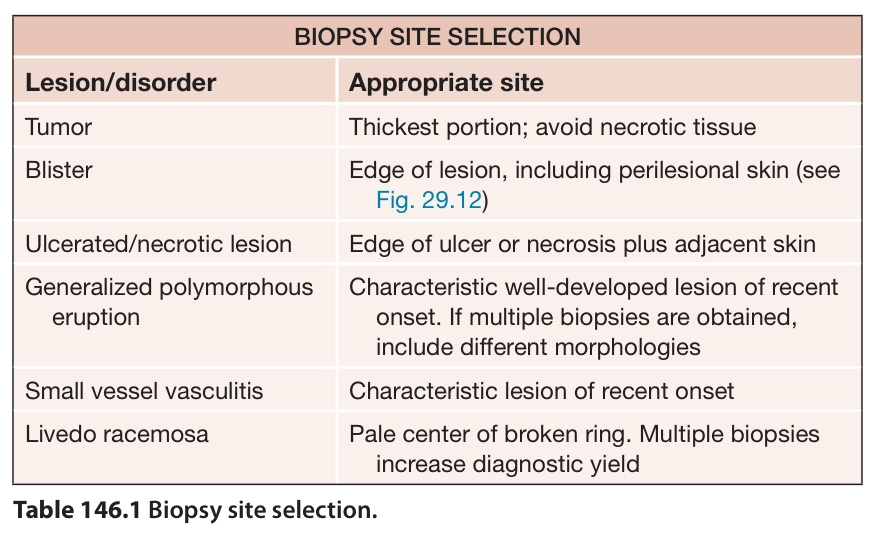
Table 146.1 Biopsy site selection.
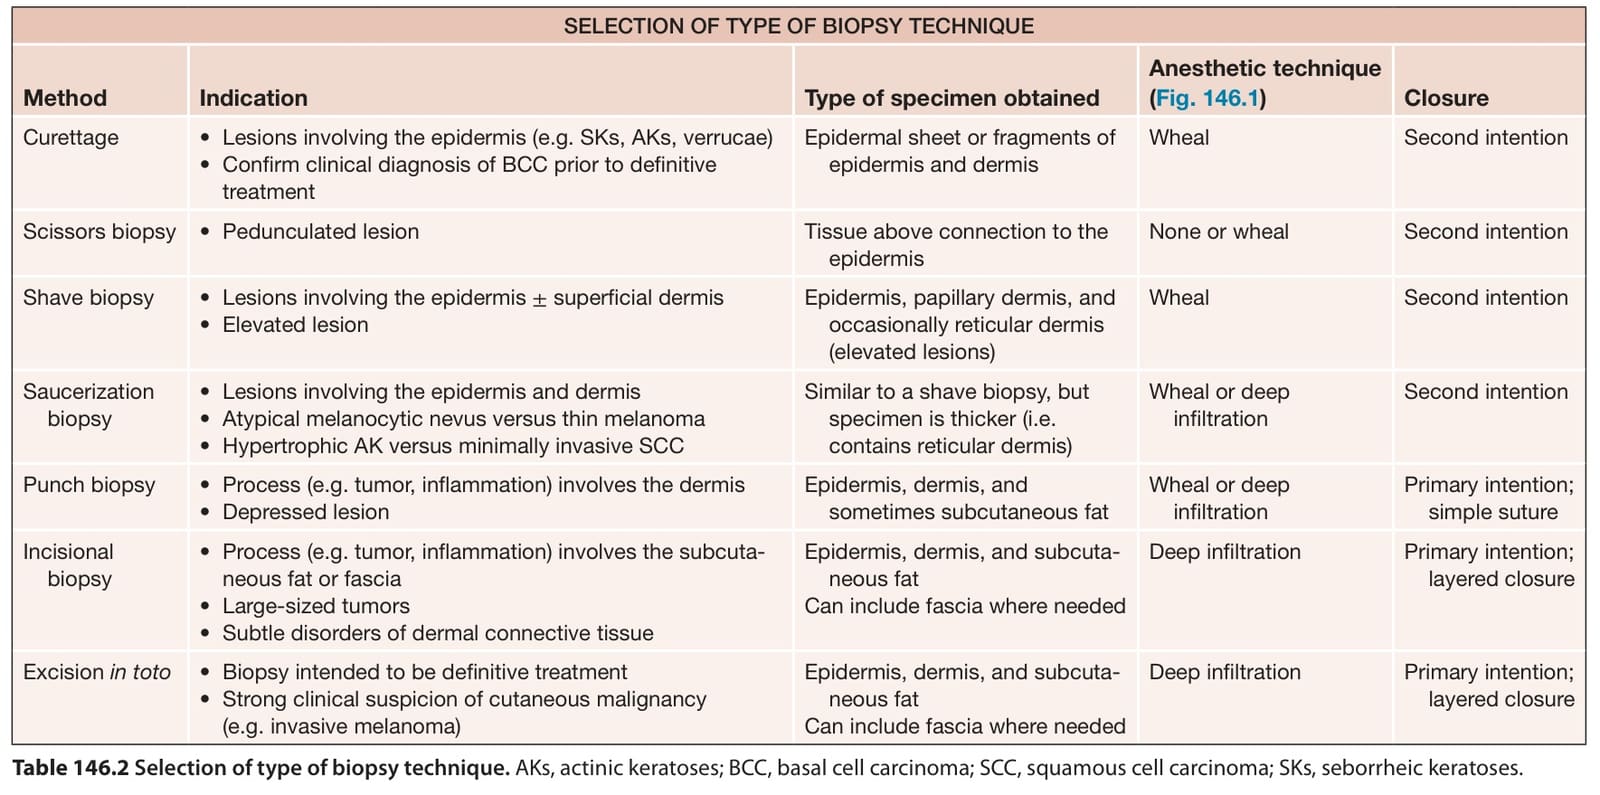
Table 146.2 Selection of type of biopsy technique. AKs, actinic keratoses; BCC, basal cell carcinoma; SCC, squamous cell carcinoma; SKs, seborrheic keratoses.
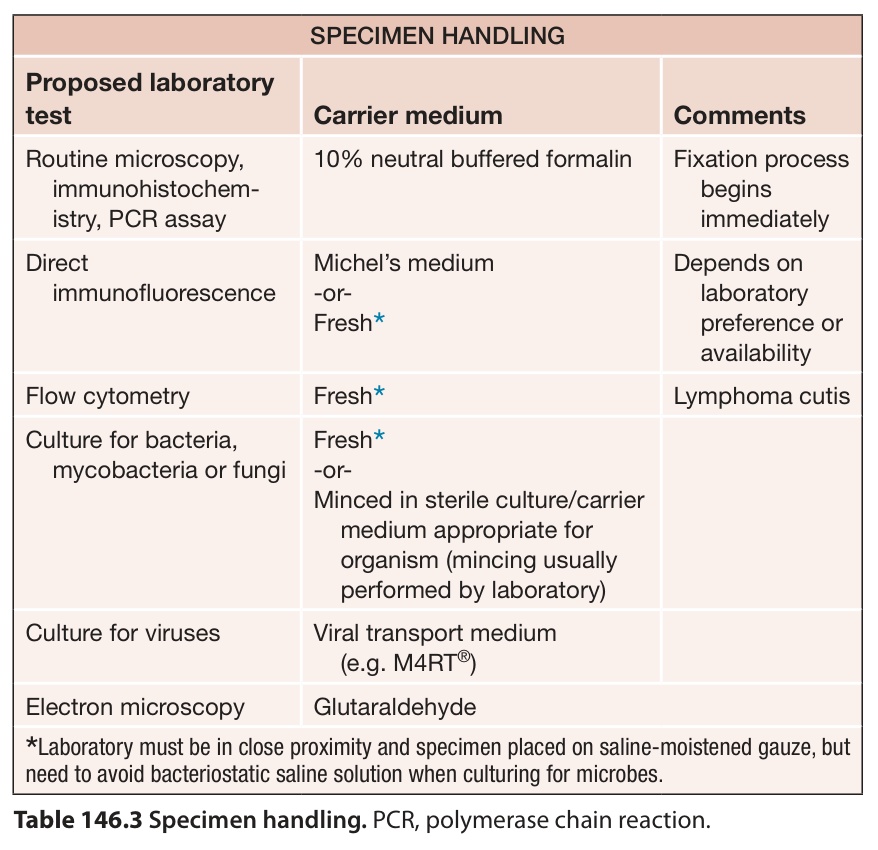
Table 146.3 Specimen handling. PCR, polymerase chain reaction.
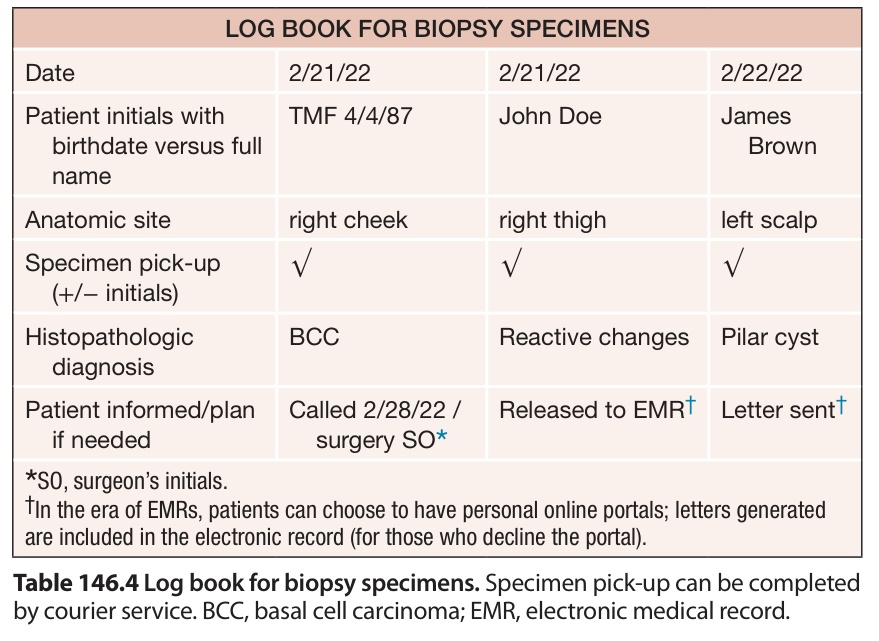
Table 146.4 Log book for biopsy specimens. Specimen pick-up can be completed by courier service. BCC, basal cell carcinoma; EMR, electronic medical record.
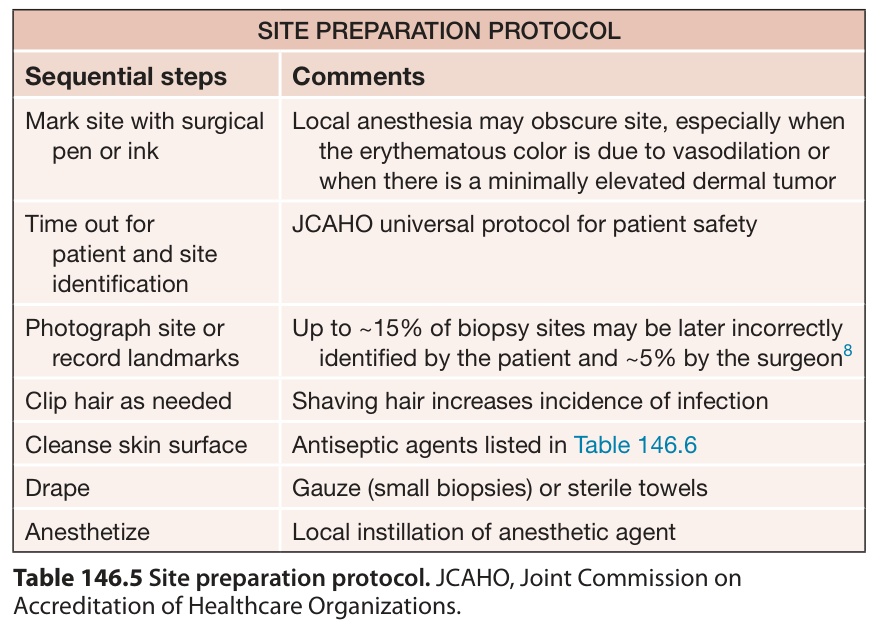
Table 146.5 Site preparation protocol. JCAHO, Joint Commission on Accreditation of Healthcare Organizations.
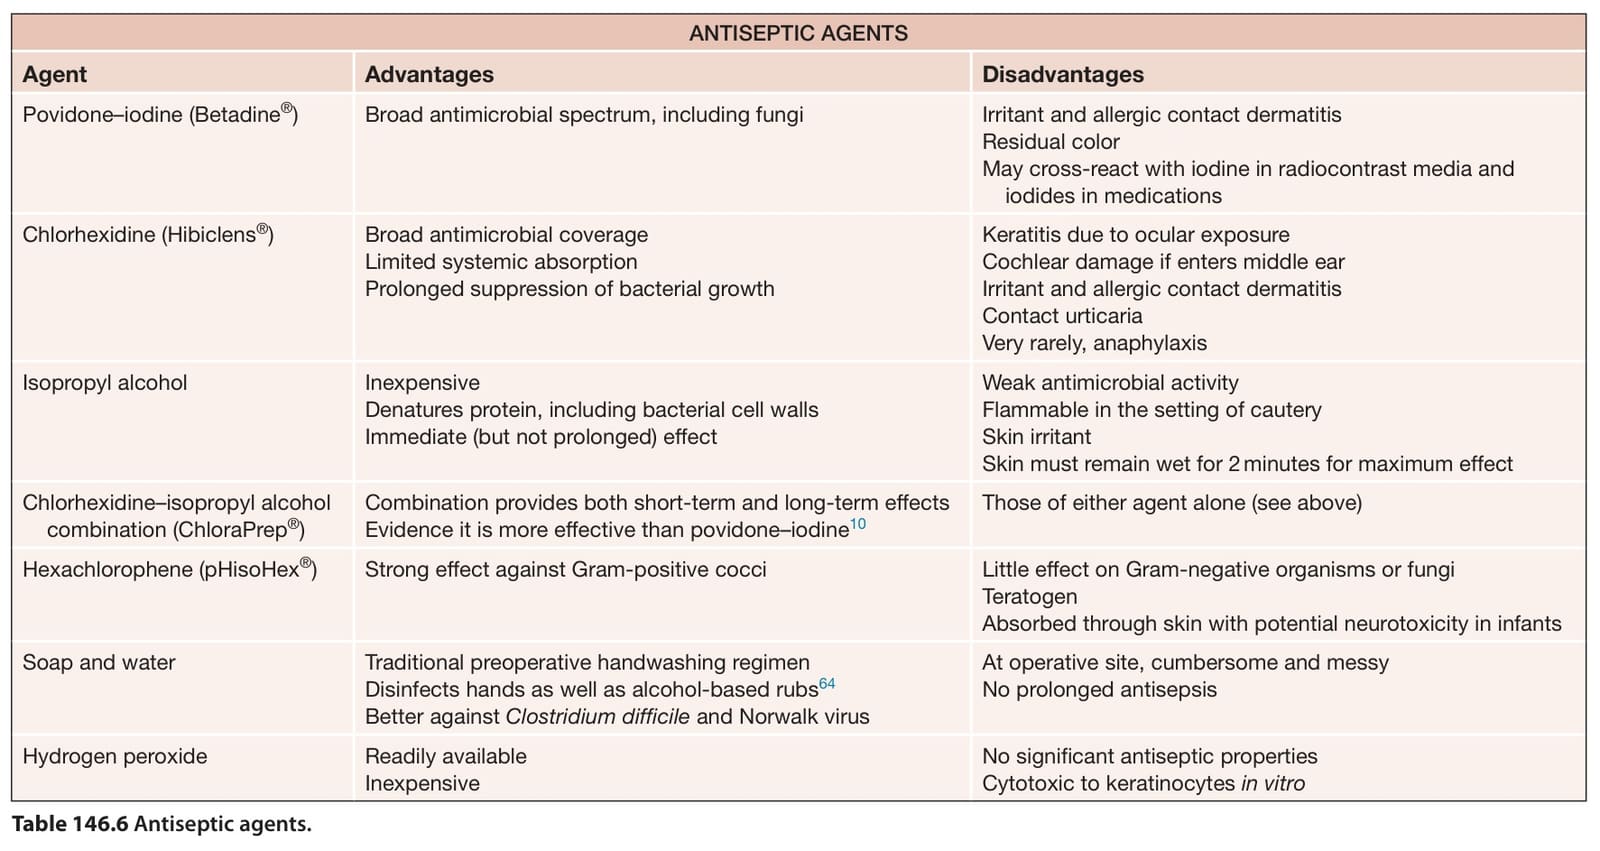
Table 146.6 Antiseptic agents.
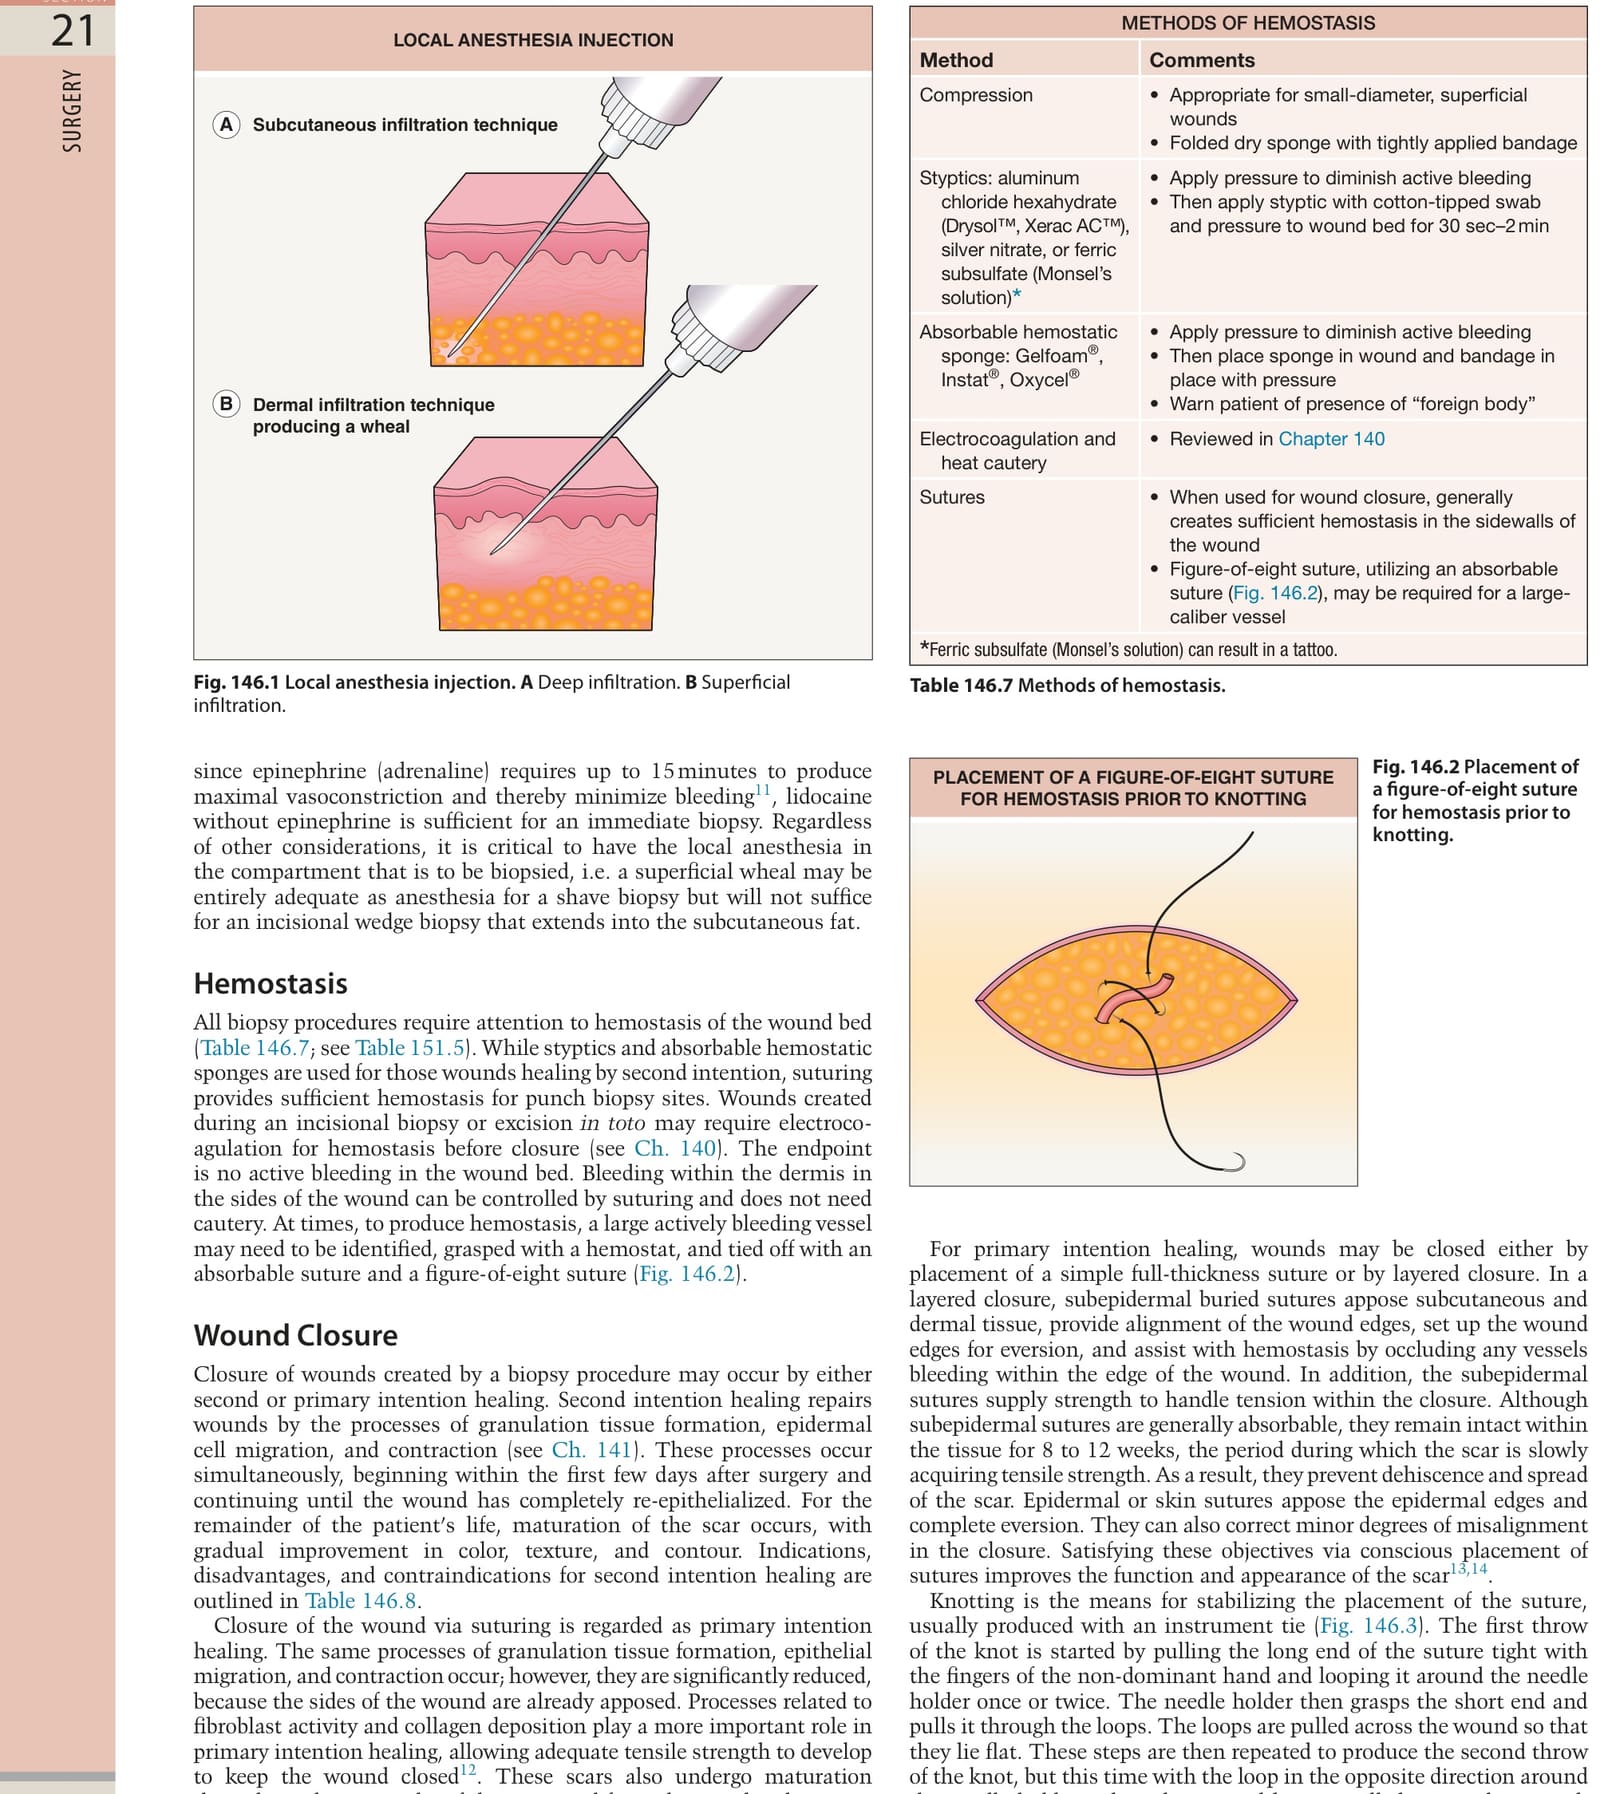
Table 146.7 Methods of hemostasis.
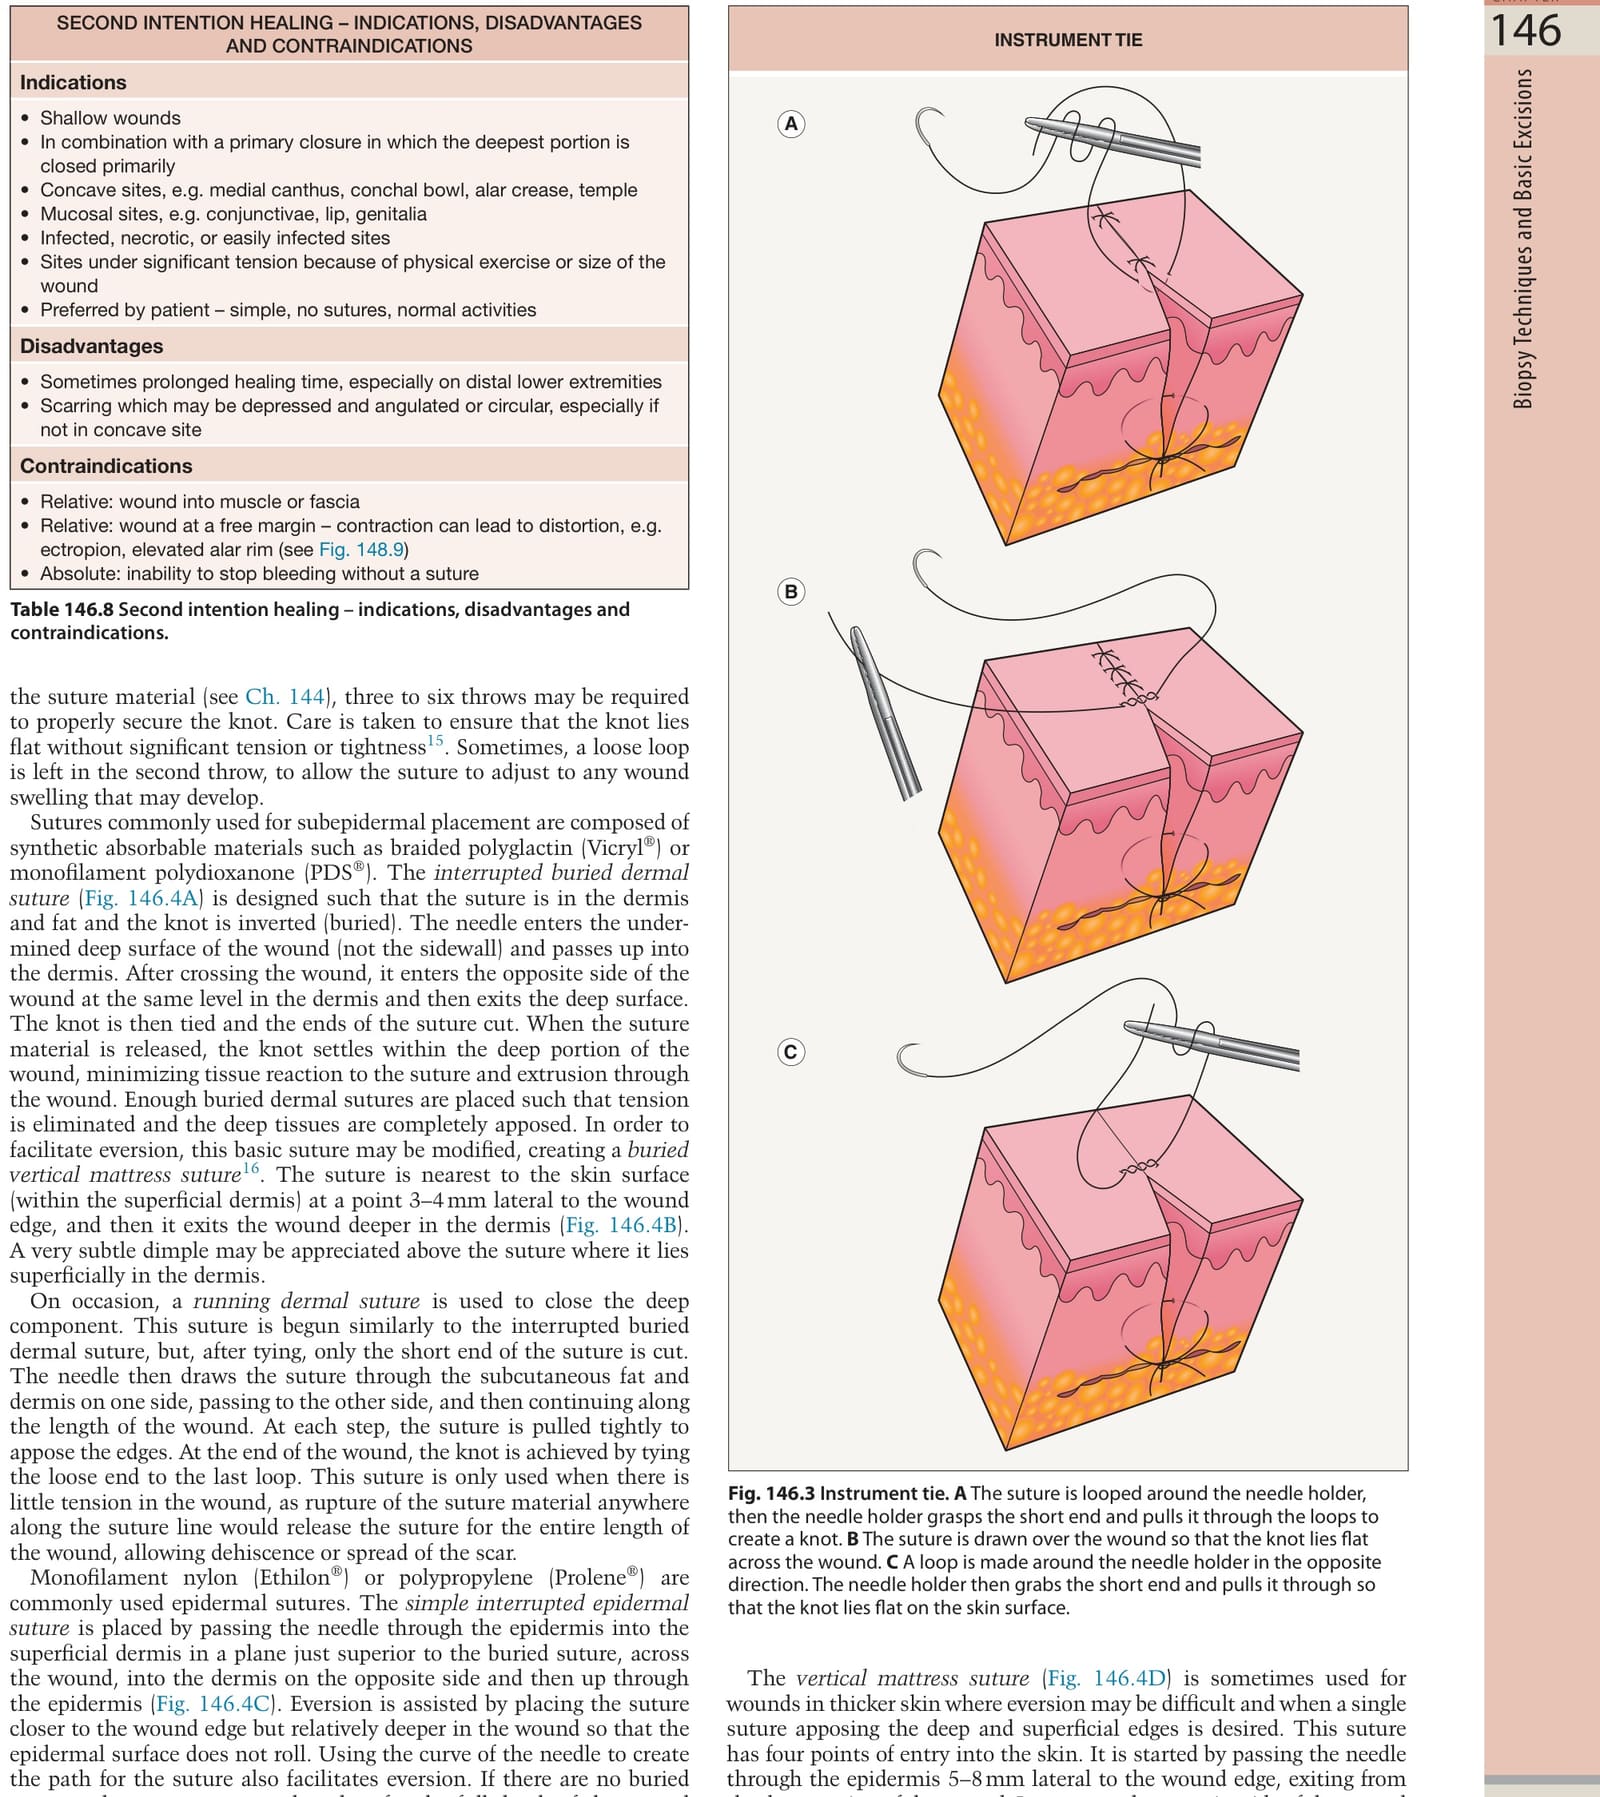
Table 146.8 Second intention healing – indications, disadvantages and contraindications.
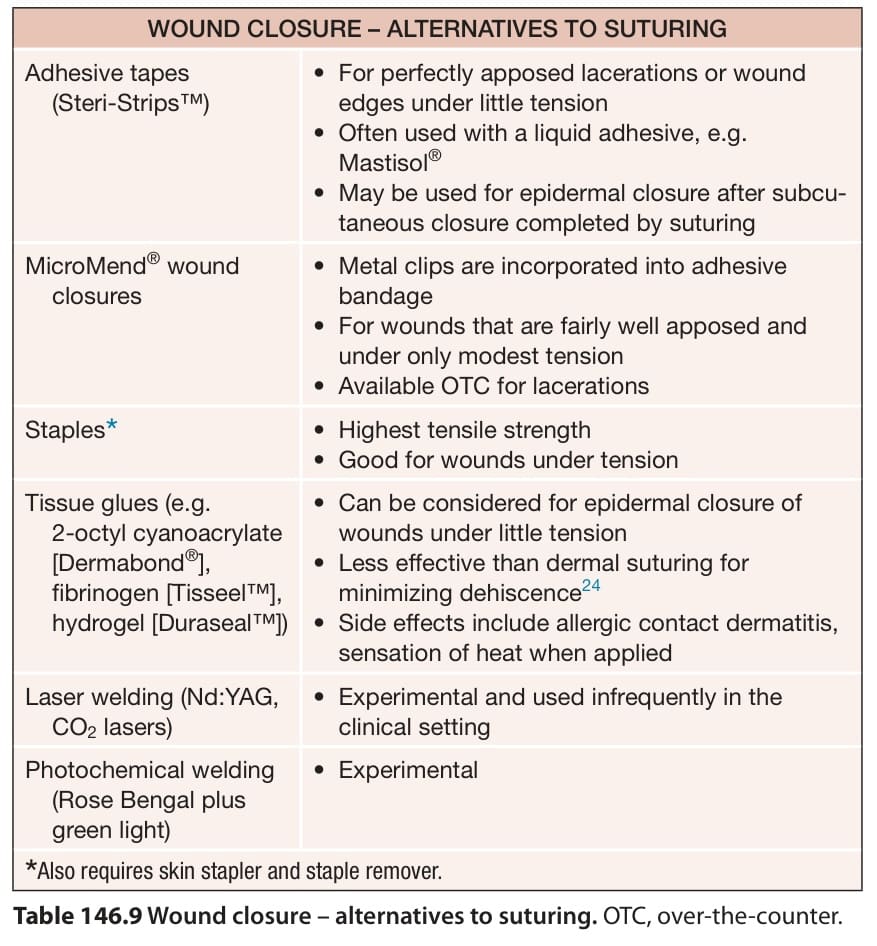
Table 146.9 Wound closure – alternatives to suturing. OTC, over-the-counter.