TECHNIQUES
Curettage
Local anesthesia is achieved by wheal formation (see Fig. 146.1). Depending upon the size and thickness of the lesion, a curette 3–5 mm in diameter is held like a pencil and drawn with pressure across the lesion (if epidermal) or through the lesion (e.g. presumed BCC). With one smooth movement and moderate pressure (as well as opposing traction by the non-dominant hand), an epidermal sheet or ball of tissue may be obtained (Fig. 146.5). In the case of incomplete removal, further fragments may be obtained by repeated curettage. This type of biopsy assumes that healing will be by second intention. Hemostasis may be obtained by a styptic, electrodesiccation, absorbable hemostatic sponge, or pressure. The resulting scar is usually minimal in the case of epidermal lesions or of no significant concern in the case of a BCC, since later definitive treatment will produce the final scar.
Snip or Scissors Biopsy
Pedunculated lesions can be biopsied via a snip or scissors biopsy (Fig. 146.6). Local anesthesia is obtained by wheal formation in the
upper dermis just under the narrow attachment of the lesion to the skin surface. For tumors with a very narrow neck, this type of biopsy can be done quickly without anesthesia. Scissors, usually fine iris scissors or sharp Gradle scissors, are used to separate the lesion from its base at the level of the skin surface. A toothed forceps is often used to handle the tissue. Healing is by second intention, and a styptic, electrodesiccation, absorbable hemostatic sponge, or pressure may be required for hemostasis. Scarring produced by this type of biopsy procedure is a small, subtle, often hypopigmented macule.
Shave Biopsy and Saucerization Biopsy
Shave biopsy is the most commonly used technique for obtaining a skin specimen for histologic examination (Fig. 146.7). A local anesthetic is used to produce a wheal under the lesion so that it is elevated above the plane of the surrounding skin. A #15 blade on a blade handle is used (almost parallel to the skin surface) to cut the specimen from its bed. Alternatively, only the blade without the blade handle is used. Cutaneous surgeons generally hold the blade or the blade handle like a pencil, to facilitate control of small movements. It is helpful to begin on one edge by holding the blade vertically and incising only through the epidermis. The blade is then turned to a horizontal position and a smooth sawing motion is used to complete the removal of the specimen. A good specimen may also be obtained by a single-edged razor blade held in a semi-curved shape.
The goal is a shallow, saucer-shaped defect and a single piece of unfragmented tissue; edges should be smooth. Forceps may be used to hold the specimen while in situ in order to supply traction against the movement of the blade and then to remove the entire specimen and place it in the appropriate container. However, the tissue must be handled gently so that crush artifact does not confuse the microscopic appearance. Toothed, as opposed to smooth or ridged, forceps minimize crushing of the tissue. The specimen should include full-thickness epidermis and superficial dermis. The most common error when first performing shave biopsies is to remove only keratotic debris or the upper portion of the epidermis. The latter is especially true in areas with thick stratum corneum (e.g. palms, soles). Therefore, the dermatologist needs to appreciate the angulation of the blade that is required in order to obtain the full thickness of the epidermis plus some of the superficial dermis. Observation of the wound bed and review of the tissue sections will help refine the skills needed to perform this procedure.
In a saucerization procedure, the depth of the biopsy specimen is intentionally deeper due to the angulation of the blade, which may or may not be attached to a handle (Fig. 146.8). Fat may even be included in the base of the specimen in sites with a thin dermis, but in general the biopsy extends to at least the mid reticular dermis. Both saucerization and shave biopsy sites heal by second intention. As with curettage and snip biopsy, hemostasis is easily obtained with a styptic, electrodesiccation, absorbable hemostatic sponge, and/or pressure. With practice and skill, as well as choosing the appropriate lesion to biopsy in this manner, the resulting mature scar is flat or slightly depressed with slight hypopigmentation.
Punch Biopsy
A punch biopsy is routinely used to sample processes within the mid to deep dermis or depressed lesions. As discussed above, the volume of tissue obtained varies depending upon the diameter of the metal “barrel”. For example, the specimen obtained with a 2 mm punch
biopsy is very small and may not yield sufficient pathologic findings for an accurate diagnosis. In one study, however, where 2 mm punch biopsy specimens (examined by a dermatopathologist) were compared to excisional specimens, an accurate diagnosis (primarily AKs, BCCs, SCCs, inflammatory dermatoses) was made in 79 of 84 cases. For most punch biopsies, an instrument with a 3 to 4 mm diameter is adequate. Occasionally, a 6 or 8 mm punch biopsy is performed to increase the likelihood of obtaining subcutaneous fat. However, as stated previously, the thickness of the dermis and the amount of subcutaneous fat required to establish the diagnosis must be kept in mind.
Disposable punch biopsy instruments are generally used. Reusable stainless steel instruments are available but must be sterilized following each procedure and sharpened frequently. Toothed forceps, scissors, needle holder, and suture material are also required. Local anesthesia is achieved with either superficial or deep infiltration of the agent.
An optimal aesthetic result is obtained when the round punch biopsy instrument is used to produce an oval-shaped defect that can be closed without “dog-ear” formation when sutured into a straight line parallel to the other skin lines in the region. This is accomplished with traction produced by stretching or spreading the skin with the index finger and thumb of one hand in a direction perpendicular to the desired wound closure line; the punch is then pushed into the skin and rotated in one direction with the other hand (Fig. 146.9). Back-and-forth twisting is not recommended as epidermis may be sheared off. Generally, the instrument is pushed and rotated until the subcutaneous plane is reached, as indicated by loss of the resistance encountered while cutting through the dermis. At times, the punch biopsy is utilized to just incise the skin superficially as when the skin is very thin (e.g. on the ear). The punch biopsy instrument is then removed and forceps are used (peripherally at one superficial edge) to gently extricate the specimen from the wound. Scissors may be needed to detach the base of the specimen, which can then be transferred to the appropriate prelabeled container. In the case of fibrotic tumors or disorders, pressure may need to be applied to the surrounding skin to elevate the biopsy specimen.
Although a punch biopsy wound can be left to heal by second intention after achieving hemostasis, the resulting scar may be depressed and takes several weeks to heal. Usually this wound is closed primarily, and the resulting scar is generally white or hypopigmented and has a linear or cruciate configuration. On the trunk or extremities, one or two simple interrupted epidermal sutures of 4–0 nylon or polypropylene monofilament suture achieve closure and hemostasis. On the face, neck, or hands, the resulting scar may be less apparent if 5–0 or 6–0 simple interrupted sutures are utilized. Some physicians use fastabsorbing gut for patients who are unable to return for suture removal. However, it is also reasonable to have the patient return for a face-toface discussion of the biopsy results, since the biopsy is being done to establish a diagnosis and determine a treatment plan. Sutures on the face are removed at 5–7 days, and on the trunk or extremities, at 10–14 days. A pathology report is usually available within 7 days.
Table 146.12 highlights special considerations when performing a punch biopsy on the face.
Incisional Biopsy
Large lesions in which the characteristic pathology is within the dermis or subcutis are often biopsied via an incisional or wedge biopsy
A Diagram. B Punch biopsy instrument rotated into the skin. C The biopsy specimen is gently removed with a skin hook placed peripherally and superficially in order to avoid crush artifact. D Closure of the biopsy wound with a simple epidermal suture. Photographs courtesy Luis Requena, MD.
(Fig. 146.10). The specimen may be entirely lesional or may contain an edge of clinically normal skin, which allows comparison of involved versus uninvolved skin as well as examination for any microscopically apparent early changes at the edge of the lesion. The goal is to obtain a wedge of tissue 3–4 mm wide and as deep as necessary. The tissue should be in one piece for accurate orientation of the specimen during preparation; depending upon the possible diagnoses, longitudinal sectioning may be requested. The length of the wedge varies, but should be long enough to avoid cutaneous cone formation in the final closure.
Local anesthesia is obtained by deep and slow infiltration of the agent. It is advisable to wait 10 to 15 minutes after instillation to allow for complete anesthesia and to obtain the maximal vasoconstrictive effect of epinephrine. With a #15 blade (mounted on a blade handle) held perpendicular to the skin surface, a superficial incision into the epidermis scores one long side of the wedge using a light touch and one long motion, facilitated by traction by the non-dominant hand or an assistant. The second long side is then scored similarly. These lines are then redrawn with the blade held in the same manner but with firm pressure, incising into deep tissue, first one side, then the other. The incision is continued until the desired depth has been reached, usually in one or two more cutting movements. The incision is angled toward the center axis so that deep within the tissue, the two incisions meet and complete the separation of the tissue. A forceps is used to lift the tissue out of the wound. If the tissue is still connected at its base, the blade or tissue scissors may be used to complete the detachment.
Hemostasis is best achieved by point electrocoagulation. Large arterioles may require tying off with absorbable suture. An incisional biopsy wound is generally closed with suturing. In some circumstances, such as a site compromised by necrosis or infection, second intention healing may be the best option, even if it is slow and prolonged (see Table 146.8). Deep interrupted sutures of absorbable suture material, 4–0 or 5–0 in caliber, with the knot inverted are utilized to close the subcutis and the dermis (see Fig. 146.4). The epidermis is then closed with simple interrupted sutures of nylon or polypropylene monofilament. The size of the epidermal suture varies depending upon the site; the face is generally closed with 6–0 suture and other sites by 4–0 or 5–0 suture.
Excisional Biopsy (Excision in toto)
Excision represents the workhorse of dermatologic surgery. The procedure is designed to remove entire lesions for histopathologic examination as well as for surgical cure. Lesions such as a clinically typical BCC or an unsightly or troublesome subepidermal lesion presumed to be benign are commonly biopsied as well as excised in this fashion (Table 146.13). Atypical pigmented lesions highly suspicious for invasive melanoma are typically excised in toto as a biopsy procedure because the degree of atypia and depth of invasion may not be uniform; the excision allows the pathologist to examine the entire lesion and decreases the likelihood of sampling error. In addition, excision is frequently the treatment of choice after the diagnosis of a cutaneous malignancy has been established by a previous biopsy. The excision specimen is again submitted for histologic examination in order to confirm the diagnosis and for comment as to whether the margins of the specimen are clear of tumor. Some surgeons will place a nick or a suture in one edge of the specimen to assist in orientation. Although the basic concepts discussed above with regard to an incisional biopsy also pertain to this procedure, an excision in toto is more complicated because it is intended to be the final definitive procedure. Therefore, margins required for cure, as well as cosmetic and functional challenges with respect to the final scar, must be carefully considered in advance.
Recommended margins for removal of an entire lesion depend on the clinical diagnosis. Most benign lesions can be removed completely by including a 1–2 mm margin of normal-appearing skin around the circumference of the tumor. A small, clinically well-demarcated BCC or SCC is generally, though not always, cured with 4–5 mm margins. Atypical nevi are frequently excised with 3–4 mm margins. While 4 mm may not be required for complete removal of the lesion, it may save some patients from a second procedure since it is standard practice to re-excise a nevus with severe atypia that is still present at the margins microscopically. The suggested margin for melanoma in situ is 5 mm although excision of lentigo maligna may require wider margins. For invasive melanoma, the recommended margin depends on the Breslow depth, e.g. 1 cm margins for tumors ≤1.0 mm in depth (see Ch. 113). The depth of the defect to be created must also be planned in advance. Primary closure is facilitated when the base of the surgical wound lies within subcutaneous fat. In the case of melanomas, the excision should include full-thickness skin and subcutis with fascia often visible at the wound base.
Although an excision is often referred to as an ellipse, the actual shape is fusiform (Fig. 146.11). The optimal geometry of the wound varies depending on the contour of the site and the elasticity and thickness of the skin. The angle at each end of the excision varies from 30 to 75 degrees. In order to minimize standing cone formation, each side of the fusiform shape is three to four times as long as it is
wide. The central axis becomes the line of closure and dictates where the surface scar will be visible. A mature scar should appear as a thin line, although some spreading may be seen on the upper trunk and shoulders. From a cosmetic standpoint, an optimal scar results when the line of closure is placed within major skin folds, superficial skin tension lines, wrinkles, or boundaries between distinct cosmetic units (see Ch. 142). Movement of underlying muscles may distort the line of closure, but this can be predicted in advance and the excision plan adjusted. For hair-bearing areas, the line of closure should follow the normal patterns of hair growth.
The process of excision and repair can be divided into a series of steps (Fig. 146.12, Video 146.4). Local anesthesia is best obtained by injection into the subcutaneous tissue. The planned excision, which is delineated with surgical marking dye prior to injection, is ringed by the anesthetic agent, with the needle pointed outward to include the area needed for undermining. After ensuring that anesthesia has developed, the site is cleansed and draped with sterile towels or drapes. The excision is begun by stabilizing the site either with the non-dominant hand or by an assistant. As with an incisional biopsy, the epidermis is scored on both sides by drawing lightly with a #15 blade (mounted on a blade handle) along the lines chosen to create the fusiform shape. With continued traction, the incision is completed to the base of the wound by drawing the blade with increased pressure. Unlike with the incisional biopsy, the blade is held vertically throughout the procedure so that the edges of the wound are perpendicular to the skin surface, not angled inward to create a wedge. Completing the incision in one to two strokes after scoring minimizes ragged edges. Care is taken at both apical angles to completely incise to the same depth as that reached at the center of the wound. When the fusiform incision is complete, to either the level of the subcutaneous fat or the fascial plane, the specimen sits up from its base like an island. The specimen is then dissected from the base of the wound using scissors or a blade and the specimen is transferred to the appropriate container. The end result of the excision is a fusiform-shaped wound with vertical sides and a flat even base consisting of subcutaneous fat or fascia. Hemostasis is achieved by electrocoagulation.
The remainder of the procedure deals with the creation of a cosmetically acceptable and functional closure. In order to free tissue for movement into the wound, undermining is performed at the edges of the wound with either scissors or a scalpel. A favorite technique is to use scissors with rounded tips for insertion and then spreading of the tissue to produce blunt dissection in the plane of undermining, a procedure advocated because of the belief that it is less likely to cut arteries or nerves. Using the same scissors, but with a snipping or cutting motion to sharply dissect, is also safe and more effective in generating a smooth, less ragged unit of skin. Sometimes, the two techniques are combined, with spreading followed by snipping of the intervening tethering strands. Undermining can also be done with a blade, sweeping horizontally from the depth of the wound into the surrounding tissues. Regardless of the technique chosen, good exposure and visualization is achieved by maintaining adequate hemostasis as the dissection proceeds, with undermining done in a controlled fashion. Tactile confirmation of the position of the tips of the scissors is also helpful.
In order to fill the defect with skin that matches with regard to thickness, the level of undermining is almost always at the same depth as the base of the wound, i.e. within the subcutaneous fat or at the fascial plane. Rarely, when there are superficially located arteries and nerves to be avoided, the plane of undermining is more superficial than the base of the wound. The use of curved scissors with the tips pointed upwards may facilitate staying in the appropriate plane.
The goals of undermining are to mobilize a unit of skin to be moved into the defect in order to reduce wound closure tension, to allow proper wound edge eversion, and to provide a wide area for distribution of redundant tissue over the base of the wound (see Fig. 147.1). Undermining around the entire wound to a distance that is at least the diameter of the wound may be required to meet these goals. When little undermining is done, apposed wound edges are pulled inward and redundant tissue bunches up in the wound bed. This redundant tissue has a force and mass that may apply pressure to the healing wound and produce a wide atrophic scar (Fig. 146.13). During closure, wide under-mining disperses the redundant tissue over a large area of wound bed. It may also serve to create a plate-like horizontal scar that distributes the forces of contraction and stabilizes the final result (see Fig. 147.2). Undermining must include the apical angles, where it facilitates the rotation that occurs as the two sides of the fusiform shape are brought together. The adequacy of the width of undermining can be tested either by picking up both wound edges with toothed forceps or skin hooks and opposing them or by placing a large temporary suture. The temporary suture may also supply some intraoperative tissue expansion that will facilitate closure. Braided polyester (e.g. Ethibond®) suture is commonly used for this purpose since it is soft and will not cut through tissue. If, with these tests, the wound edges cannot be draped easily for closure, undermining can be extended.
Once undermining is adequate and after again ensuring that the wound is dry, subcutaneous and epidermal sutures are placed to complete the closure. As with the incisional biopsy, deep interrupted sutures of absorbable suture material (4–0 or 5–0 in caliber, with the knot inverted) close the subcutis and the dermis. If the wound is thick or under tension, optimal closure may entail two layers of subcutaneous sutures. The epidermis is then closed with simple interrupted or running sutures with a smaller caliber. For a fusiform excision in toto, the end result of the procedure is a straight or curved line of closure that has the wound edges completely apposed and everted. The line of closure sits above the surrounding skin, sometimes described as having the appearance of the ridge line of a tent or a mountain range. The healing of a tensionless everted wound edge results in a flat, hairline scar.
Cutaneous Cone (Dog-Ear) Repair
Closure of a fusiform excision may create cutaneous cones, i.e. tissue redundancies that distort the normal contour of the skin at the apical angles. These cutaneous cones are also referred to as “dog-ears” and may consist of standing cones, lying cones, inverted cones, or protruding cones. Inverted cones can be the most difficult to diagnose, as the appearance is that of a subtle dimple rather than a protrusion. Regardless of their subtle nature, these redundancies will distort the final scar unless they are repaired. Cutaneous cones are also produced by tissue movement during flap closures.
Standing cones primarily result from geometric factors (Fig. 146.14). They may appear in closures of fusiform excisions (with sides of equal length) when the sides are of insufficient length compared to the width of the excision. The resulting apical angles are too wide to rotate in and maintain a flat contour to the skin surface. For this reason, linear closure of a circle, an oval, or an ellipse will always create standing cones. Also, cutaneous cones always form during closure of fusiform shapes that have sides of unequal length; redundant tissue becomes apparent on the longer side. Notably, when an excision is performed on a convex surface, standing cones may occur despite seemingly small apical angles. With suture placement, collagen bundles are pulled together and act as rigid rods that will not lie flat on a curved surface.
In addition to geometric forces, protrusions are produced when there is excessive subcutaneous tissue in the base of the wound at the apices (as compared to the center of the wound). A lack of adequate under-mining at the apices will then magnify these protrusions. This process is usually called “boating” or “pseudo dog-ear” formation. It is important to distinguish boating from true standing cone formation because repair
of the former requires removal of the excess subcutaneous tissue and appropriate undermining as opposed to the techniques described below.
Many standing cones are small and can be repaired via a closure that employs the rule of halves (Fig. 146.15). The midpoint of each side is apposed with a suture, bisecting the wound. Each unclosed half is then bisected again and the closure is continued until all tissue has been apposed. For a fusiform shape with unequal sides, repair of standing cones in this manner produces a curved line of closure. The curvature is directly proportional to the size of the dog-ear. If the wound is in a site such as the forehead, which lacks loose tissue to free up and mobilize,
the line of closure may remain straight; however, there will be noticeable gathering on one side of the line and a depressed contour on the opposite side of the line where the skin is thinned as it was stretched to fit.
Simple straight, curvilinear, or angled excisions of standing cones will also restore the desired contour of the site, even though they lengthen the scar (Fig. 146.16). The first step is to close the center portion of the wound with subcutaneous sutures. It is helpful to continue to appose subcutaneous tissue from the center of the wound outward until the standing cones become visible. Epidermal sutures may also need to be placed since any gaping at the center of the wound will underestimate the size of the dog-ears. After undermining, one limb of the standing cone is cut through to the base of the wound along the line that is desired for final closure. Undermining is repeated until the excess tissue can be draped over the cut edge. The new apical angle will lie flat if the limb has been adequately cut and if undermining has been sufficient. The second limb of the standing cone is then addressed by cutting from the wound to the new apical angle. The excess tissue that is removed will be in the shape of a triangle that is referred to as a Burow’s triangle. An alternative method, helpful for novices wanting to create a straight line closure, is bisection of the standing cone, laying each half out along the skin surface and then cutting the two triangles of excess tissue. Closure is then completed with subcutaneous and epidermal sutures.
An M-plasty is a dog-ear repair that shortens the total scar length (Fig. 146.17). Depending upon the site, M-plasty scars may also fit within prominent lines and folds more accurately. This procedure is particularly helpful in sites that are not flat. The first step, as above, is to close the center portion of the wound and adequately undermine the apical angle. Both lateral limbs are cut at an obtuse angle from the end of the wound to about halfway toward the apex of the redundancy. The excess tissue is then draped over the cut edge and an M is now apparent. Cutting from the central tip to the two new apical angles removes two pieces of tissue that are also triangular in shape. The area of these two triangles is equal to the area of the single triangle that would have been removed if a simple excision of the standing cone had been performed. Once the central tip lies in a good position, then a standard closure is performed. If the tip needs to be advanced to approximate the wound edges and fill the defect, a half-buried horizontal mattress suture (also called a tip stitch or three-corner stitch) is used (see Fig. 146.17E). Care must be taken with the three-corner stitch, as necrosis of the tip can occur with too much tension.
A dog-ear may also be displaced to a distant site. After closure of the central portion of the wound, an incision is made perpendicular to the dog-ear to an appropriate site where there is enough redundant tissue such that it can be removed as a triangle (Fig. 146.18). Undermining is required over a wide area so that tissue can be moved without tension. This procedure is also referred to as a Burow’s advancement flap (see Ch. 147). It is commonly used to avoid dog-ear repair in a free margin or in a cosmetically or functionally sensitive area.
Finessing closure of fusiform excisions may require changing the axis of the line of closure so that the scar blends better with the prominent lines and folds of the site. Changing the axis will produce dog-ears that can be repaired by any of these methods.
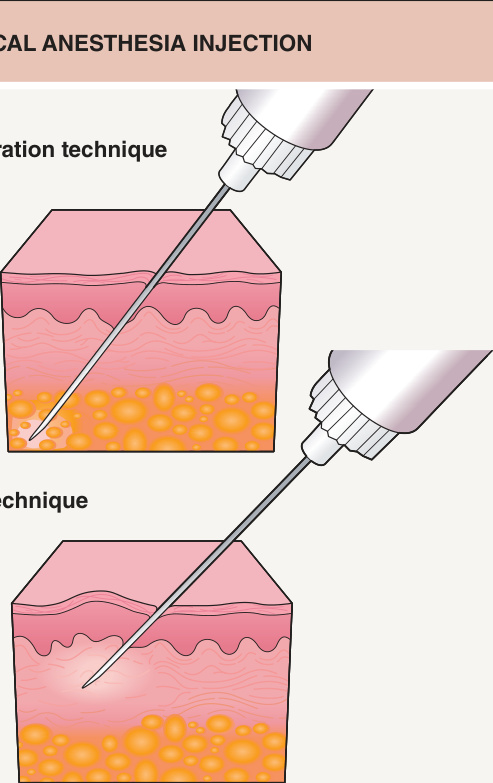
Fig. 146.1 Local anesthesia injection.A Deep infiltration. B Superficial infiltration.
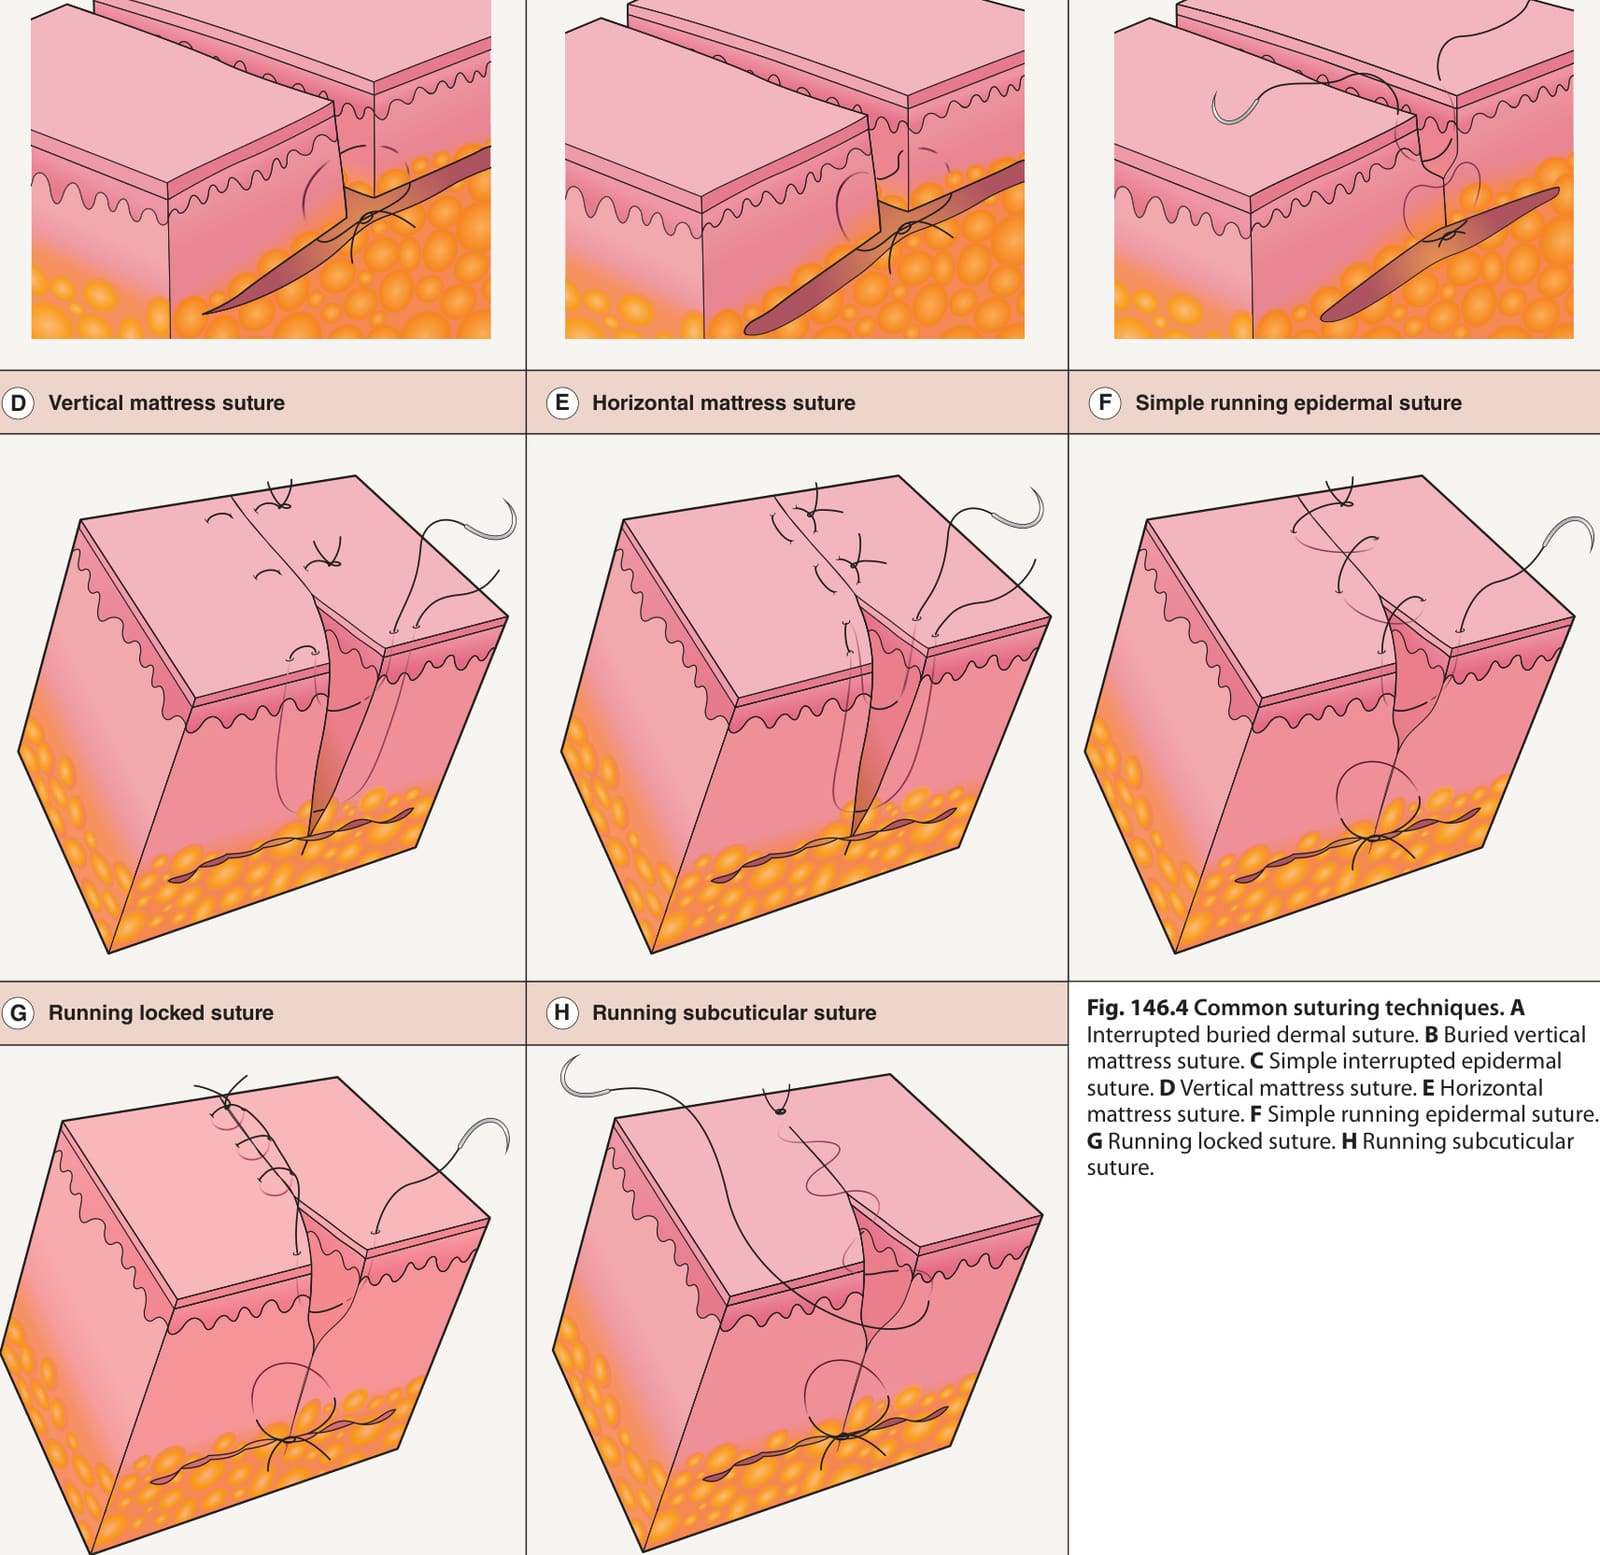
Fig. 146.4 Common suturing techniques.A
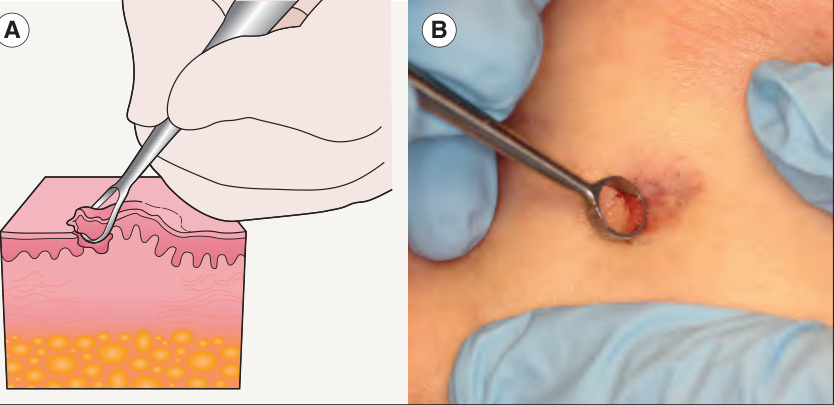
Fig. 146.5 Curettage.A Diagram. B Demonstration of technique.
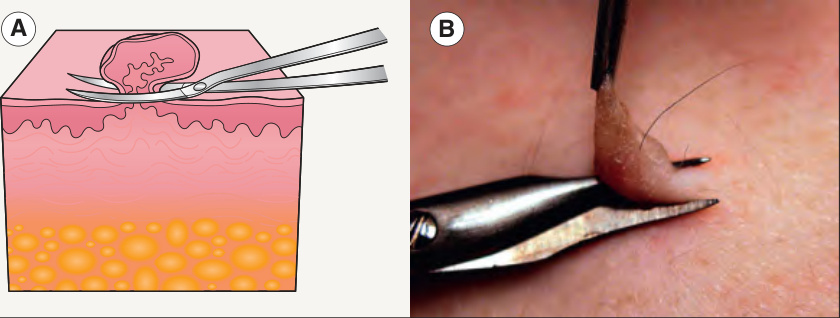
Fig. 146.6 Snip (scissors) biopsy.A Diagram. B Demonstration of technique.
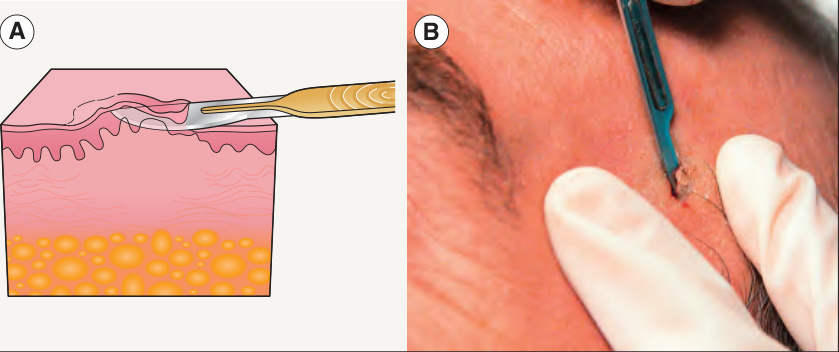
Fig. 146.7 Shave biopsy.A Diagram. B Demonstration of technique.
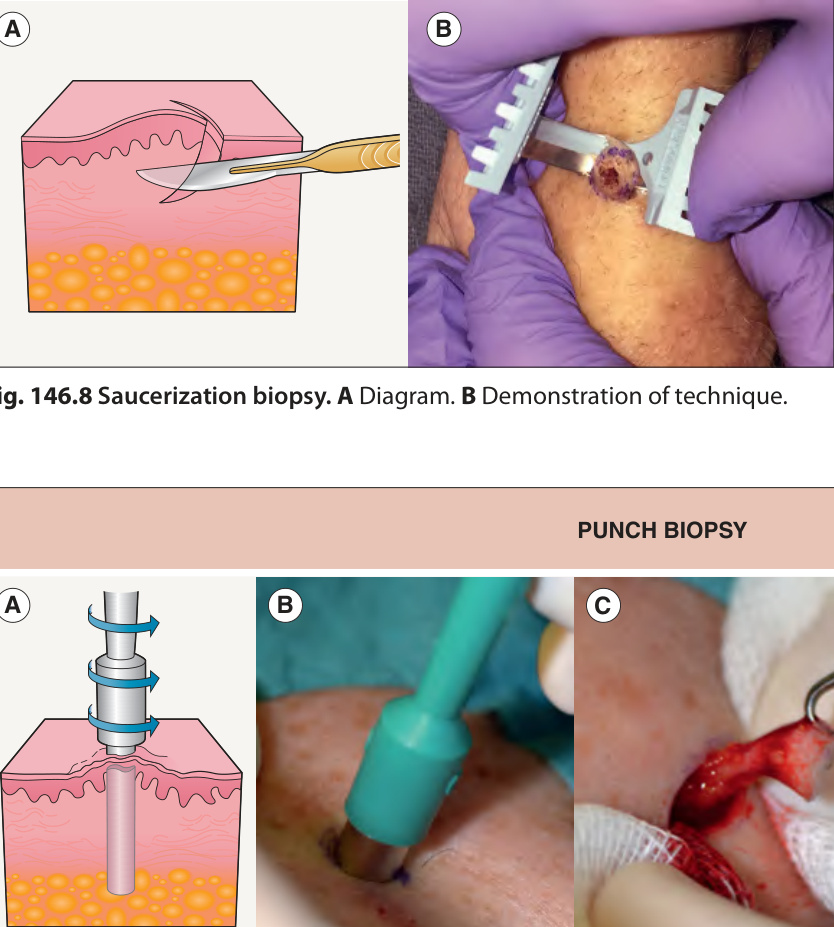
Fig. 146.8 Saucerization biopsy.A Diagram. B Demonstration of technique.
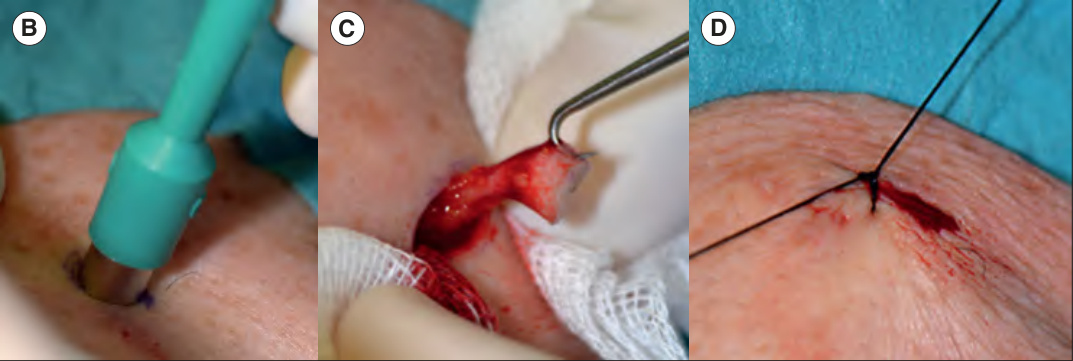
Fig. 146.9 Punch biopsy.
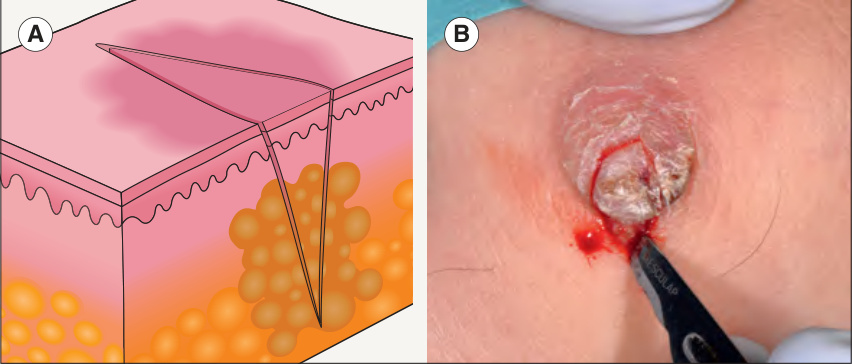
Fig. 146.10 Incisional biopsy.A Diagram. B Demonstration of the procedure.
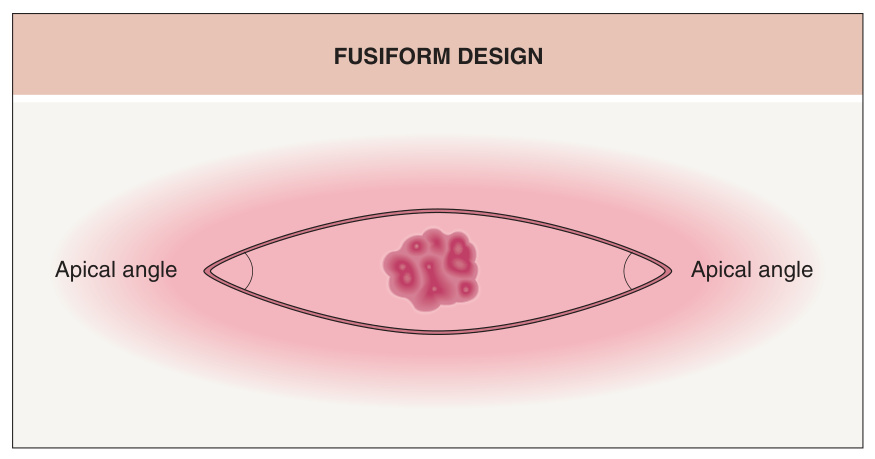
Fig. 146.11 Fusiform design.
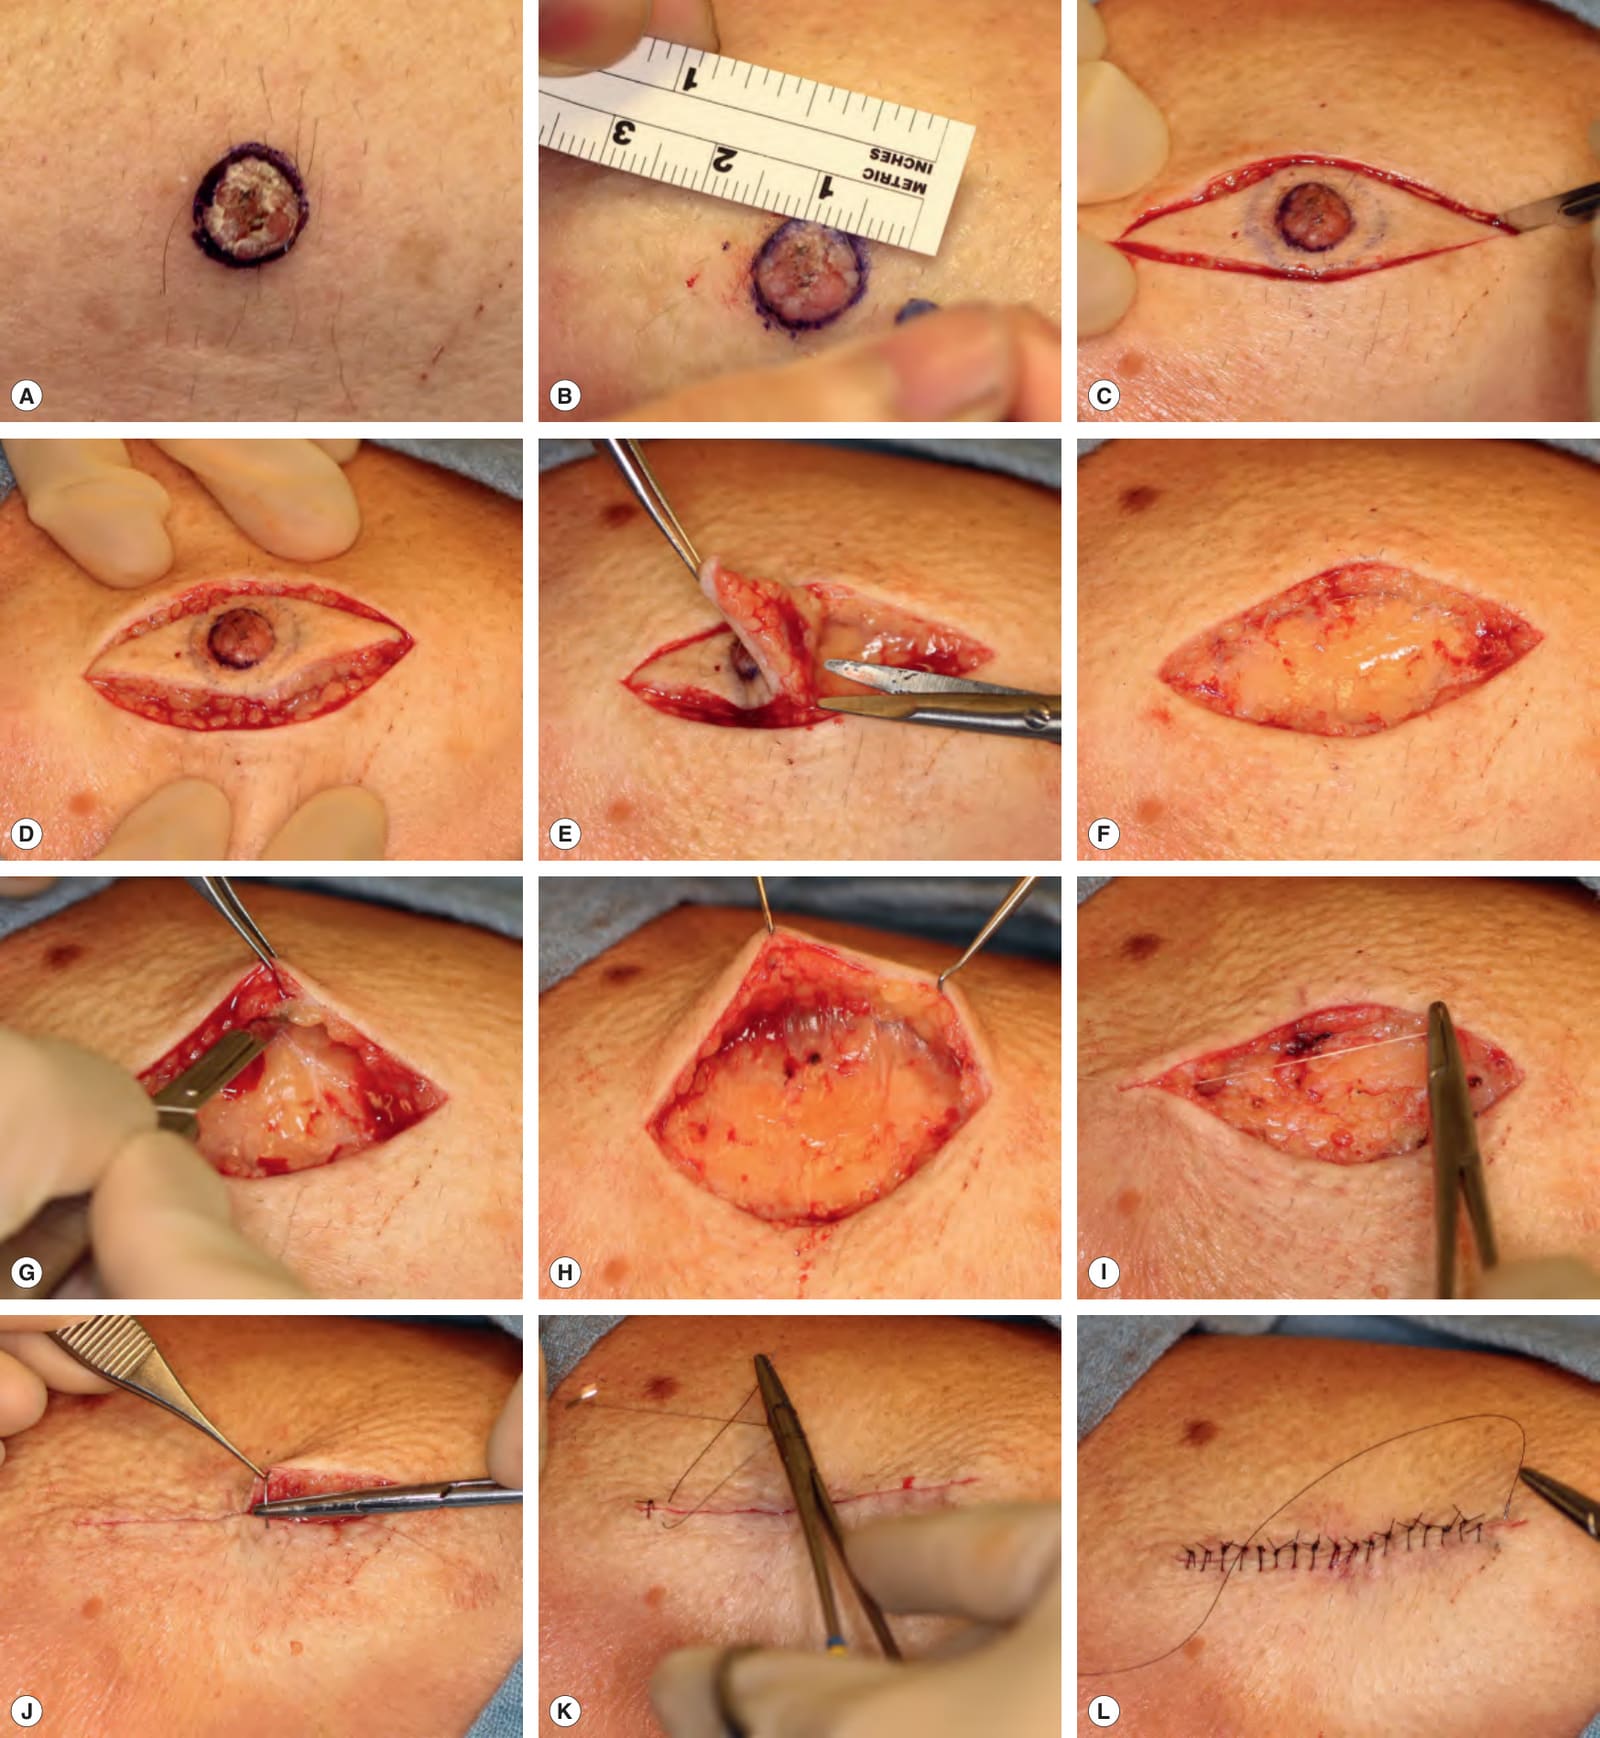
Fig. 146.12 Fusiform excision of a squamous cell carcinoma.A,B After the lesion and appropriate margins are marked, the site is anesthetized, prepped with an antiseptic agent, and draped with sterile towels. C Stabilizing the site with traction, the epidermis on one side of the fusiform design is scored using a #15 blade and then the opposite side is scored. D The incision is completed into the appropriate plane in the subcutaneous tissue and the specimen then sits up in the middle of the wound like an island. E,F The base of the specimen is dissected with scissors or a blade. G,H The wound edges are then undermined in the same plane as the base of the wound with blunt-tipped scissors or a blade. Electrodesiccation or electrocoagulation is used to address small actively bleeding vessels to achieve hemostasis. I,J The subepidermal space is closed with buried sutures. K,L The epidermal edges are apposed by simple interrupted sutures.
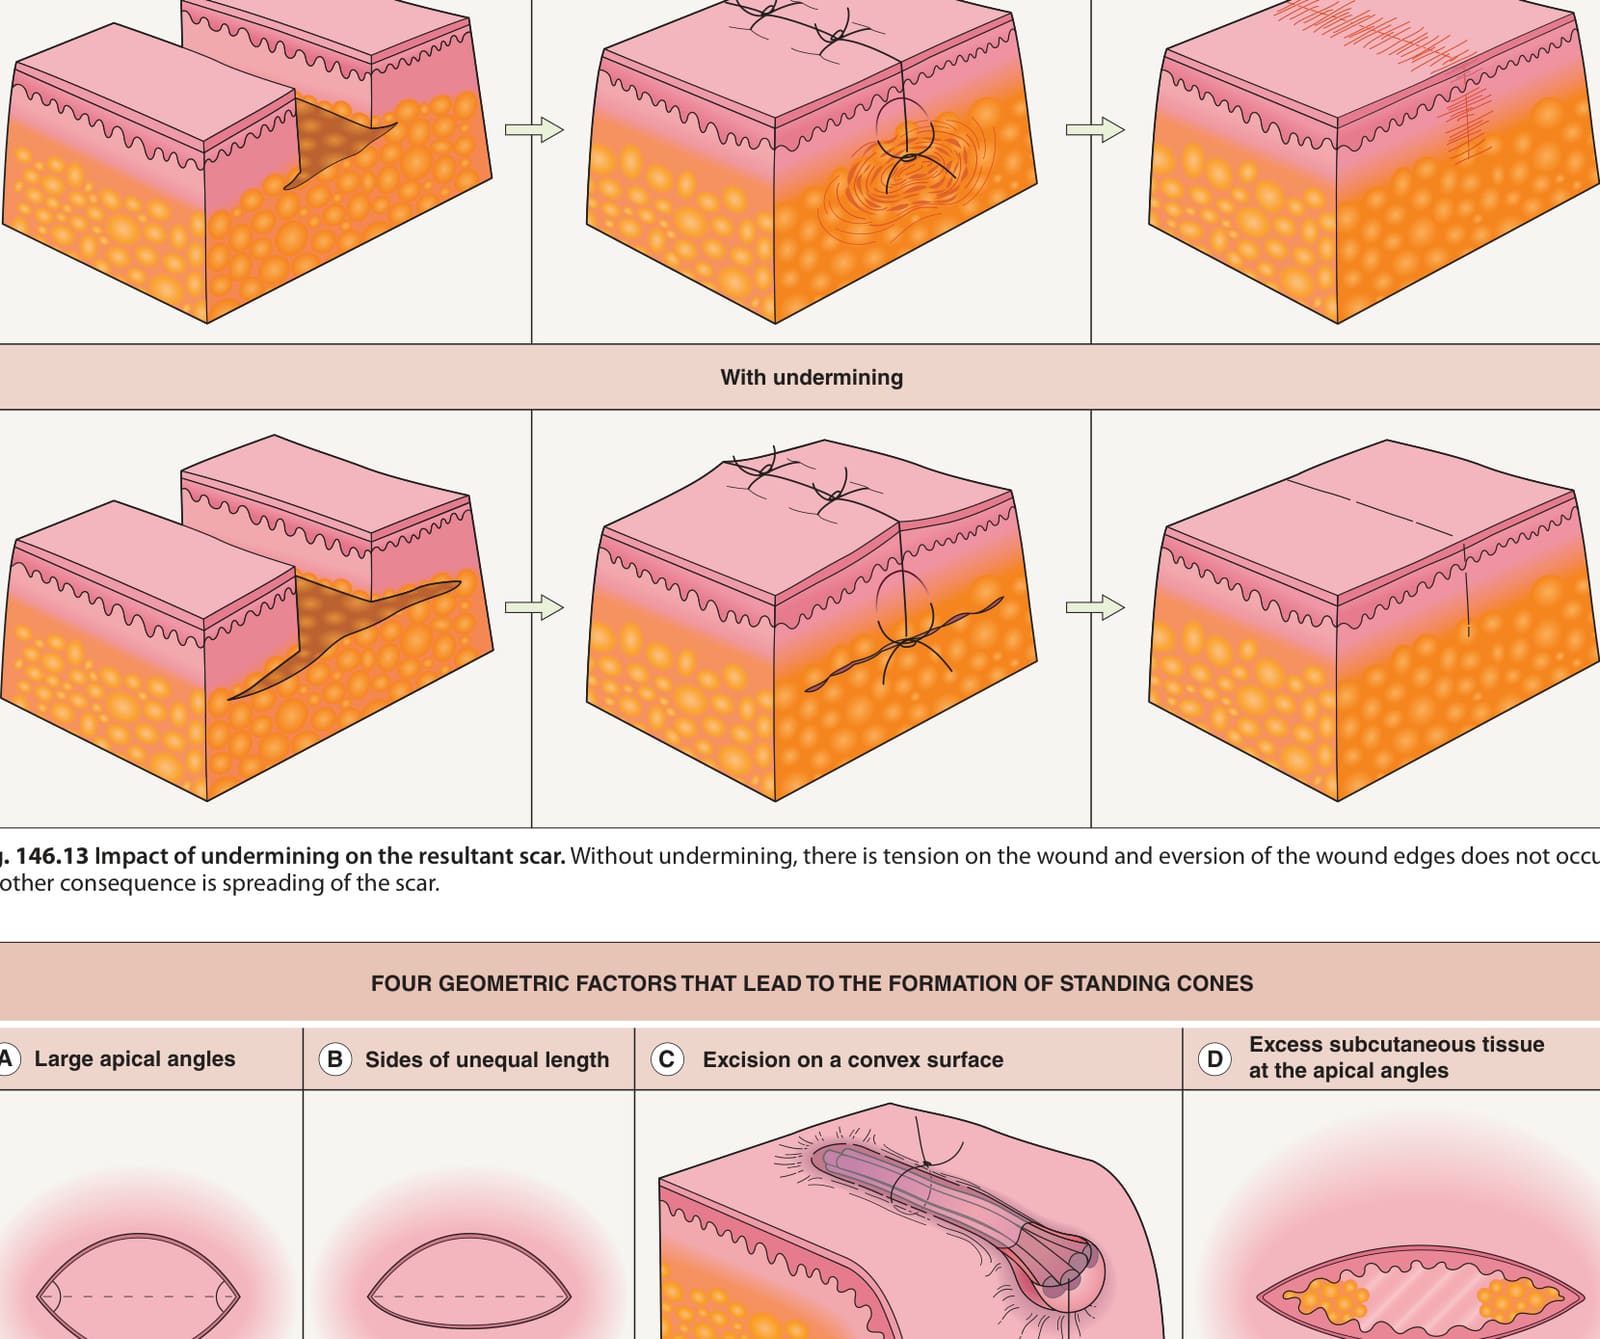
Fig. 146.13 Impact of undermining on the resultant scar. Without undermining, there is tension on the wound and eversion of the wound edges does not occur. Another consequence is spreading of the scar.
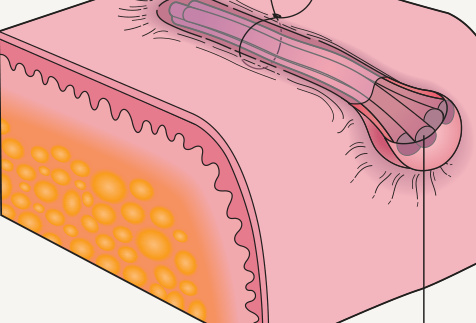
Fig. 146.14 Four geometric factors that lead to the formation of standing cones.
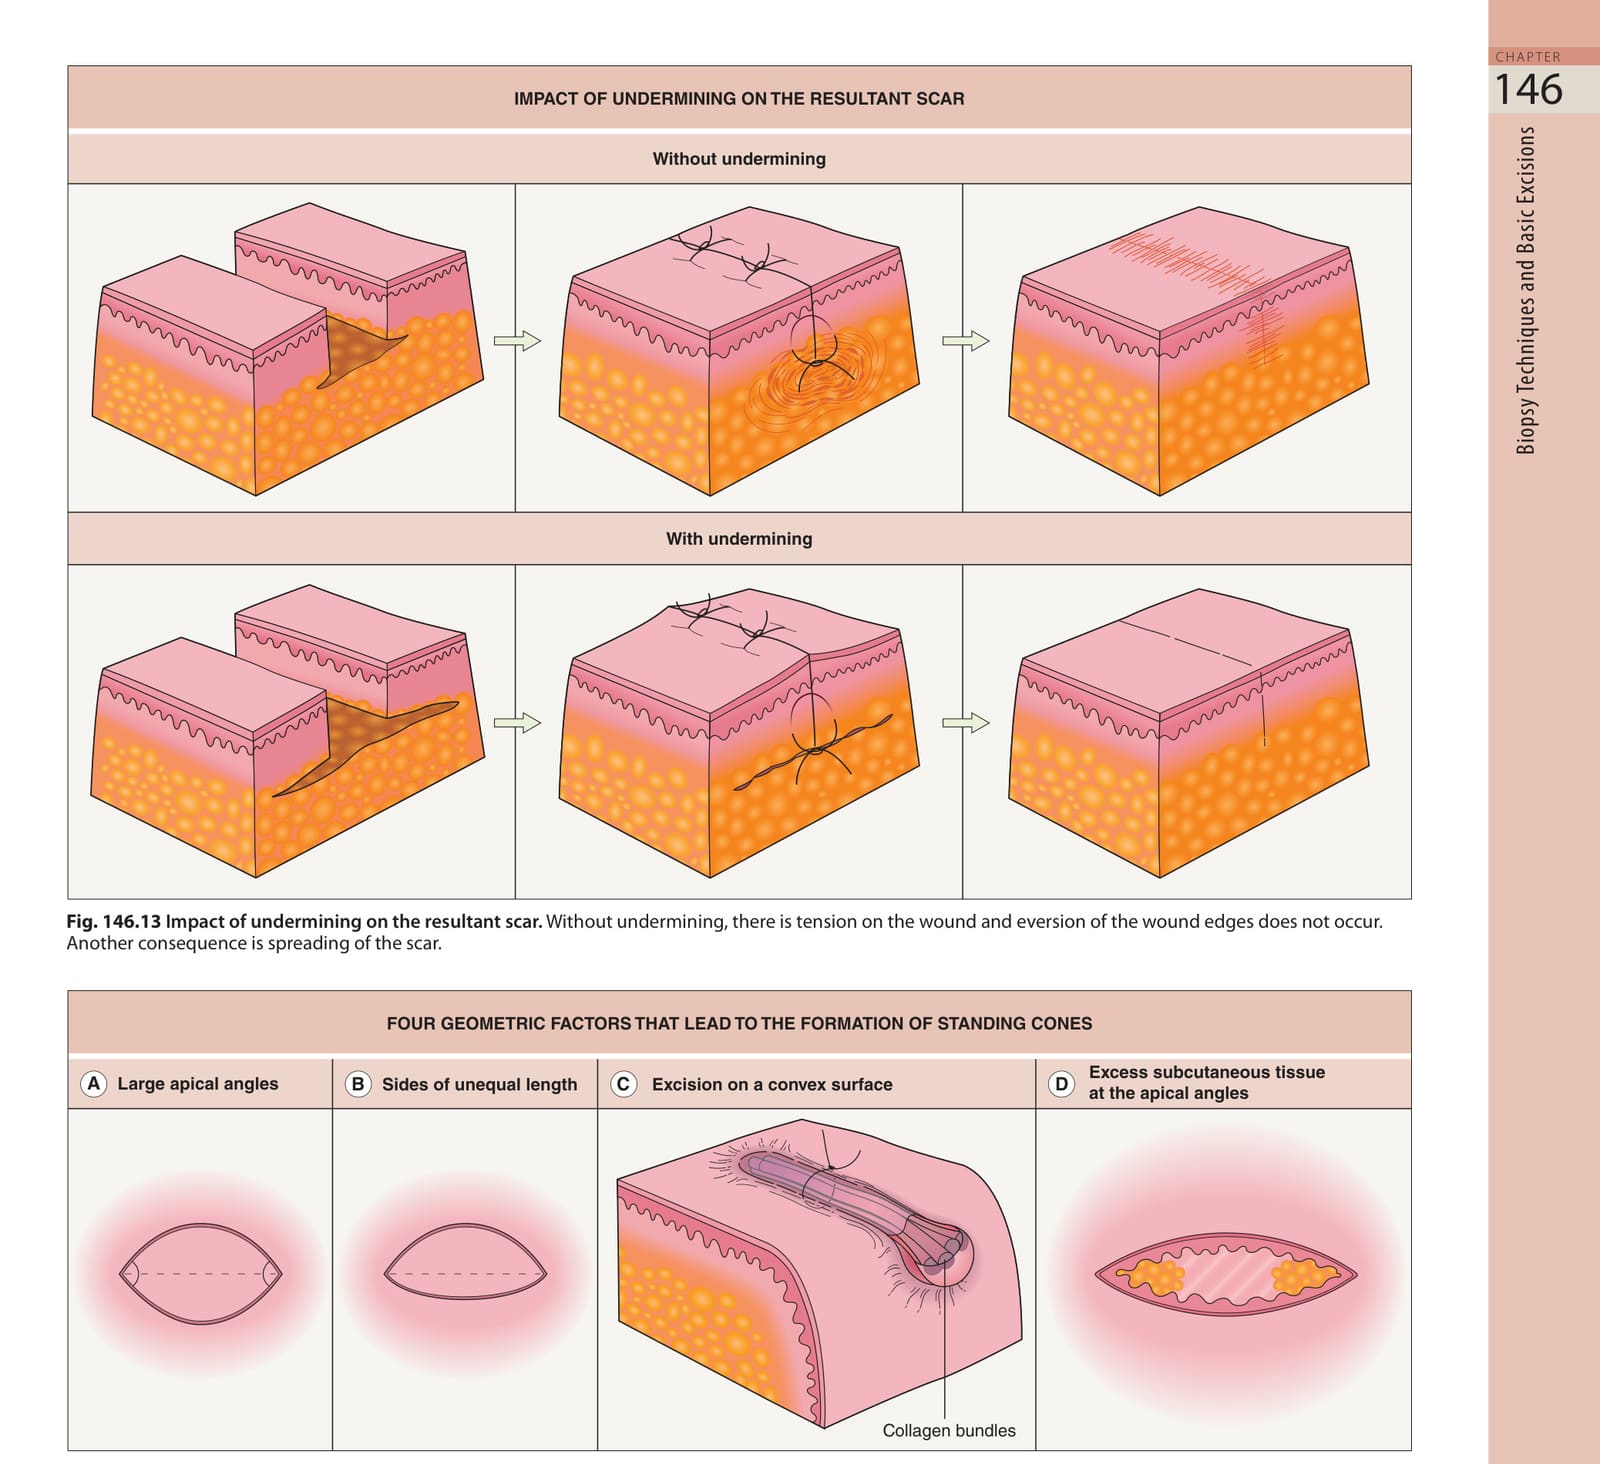
Fig. 146.15 Repair of standing cones by the rule of halves.
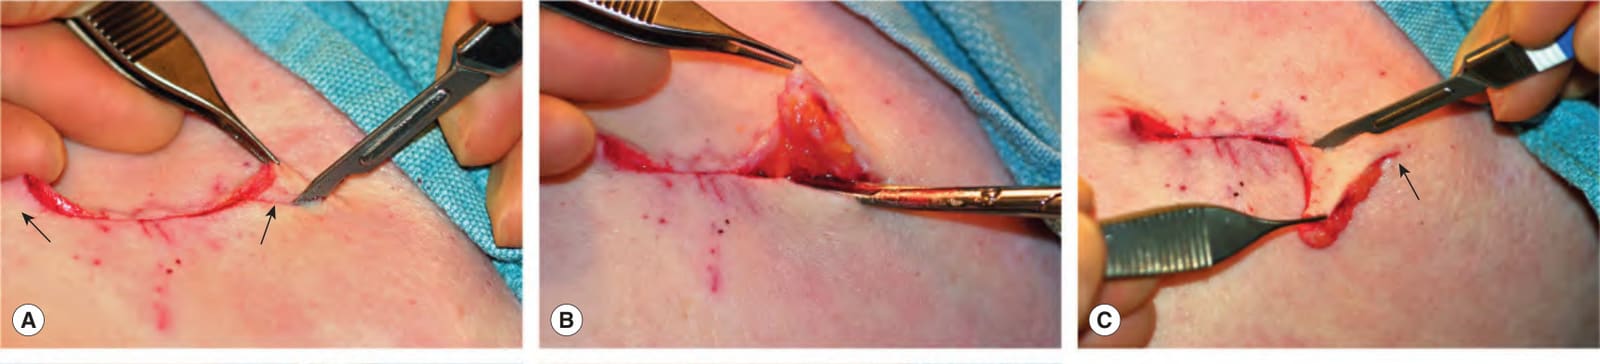
Fig. 146.16 Repair of standing cones by straight excision.A Standing cones are protrusions that form at each end during closure of a disc-shaped defect (arrows). The first limb of the standing cone is incised to the subcutaneous compartment by scissors or a blade. B The wound is undermined beneath the entire standing cone in the same plane as the rest of the defect. C The undermined standing cone is draped over the incision; the arrow indicates the apex which lies flat against the underlying skin surface. Scissors or a blade is used to complete the excision of the second limb of the standing cone. D The redundant tissue removed is in the shape of a triangle, often called a Burow’s triangle. E Subcutaneous and epidermal sutures are placed to complete the closure.
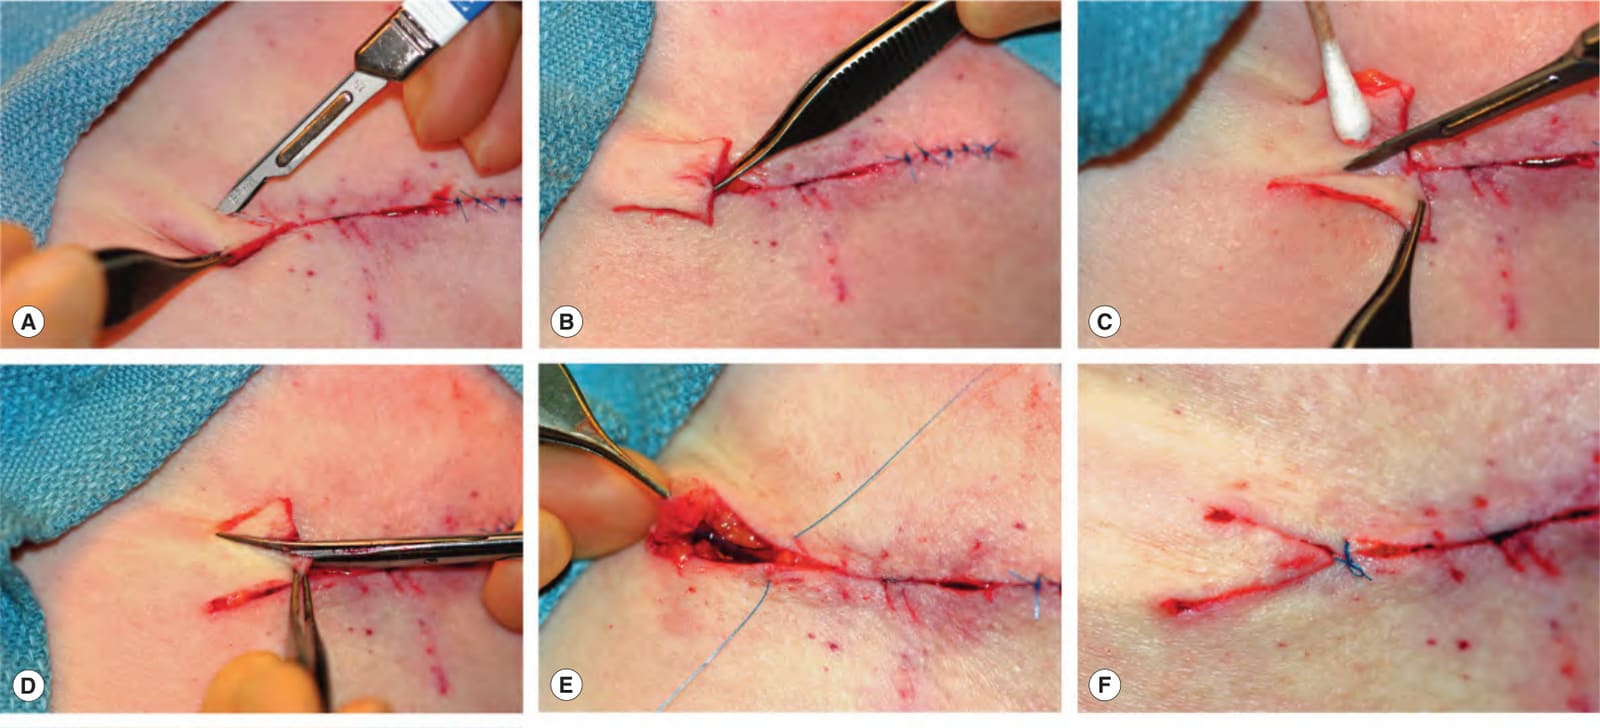
Fig. 146.17 Repair of standing cones by M-plasty.A Each limb of the standing cone is cut at a 30–45° angle from the end of the wound to about halfway toward the apex of the redundancy. B After both limbs are cut and the wound is fully undermined beneath the standing cone, the redundant tissue can be draped over the incision. At this point, an M is visible. C A Burow’s triangle is removed from half of the draped tissue. D A second Burow’s triangle is excised from the opposite side of the draped tissue. E A three-corner stitch (half-buried horizontal suture) is used to pull the point of the M-plasty into appropriate position. The needle enters the epidermis proximal to the expected position of the point, passes into the dermis, crosses the wound and enters the dermis of the tip. It then passes horizontally through the dermis of the tip, crosses the wound again, enters the opposite dermis and passes to the epidermal surface. F The knot of the corner stitch lies across the wound proximal to the position of the point of the M-plasty. G The closure can then be completed and the sutured wound lies flat.
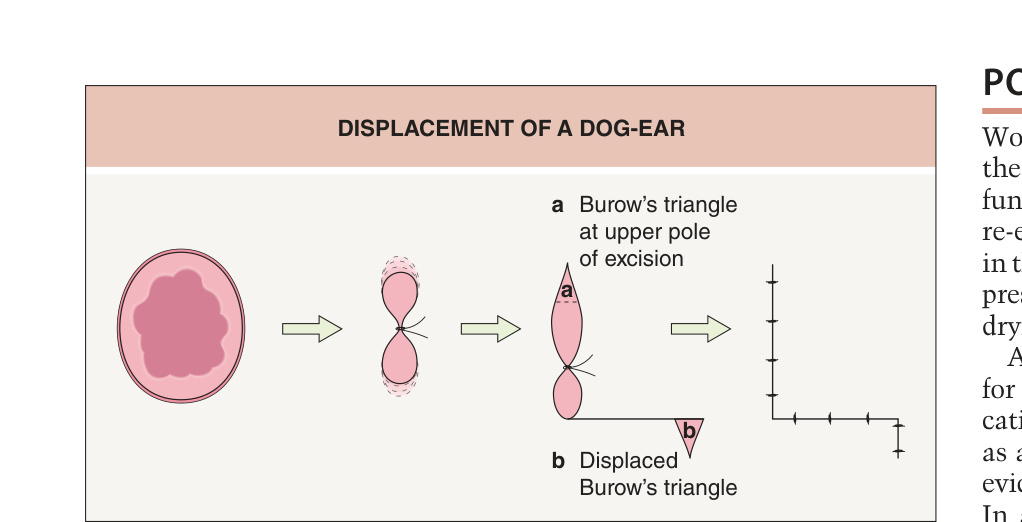
Fig. 146.18 Displacement of a dog-ear.
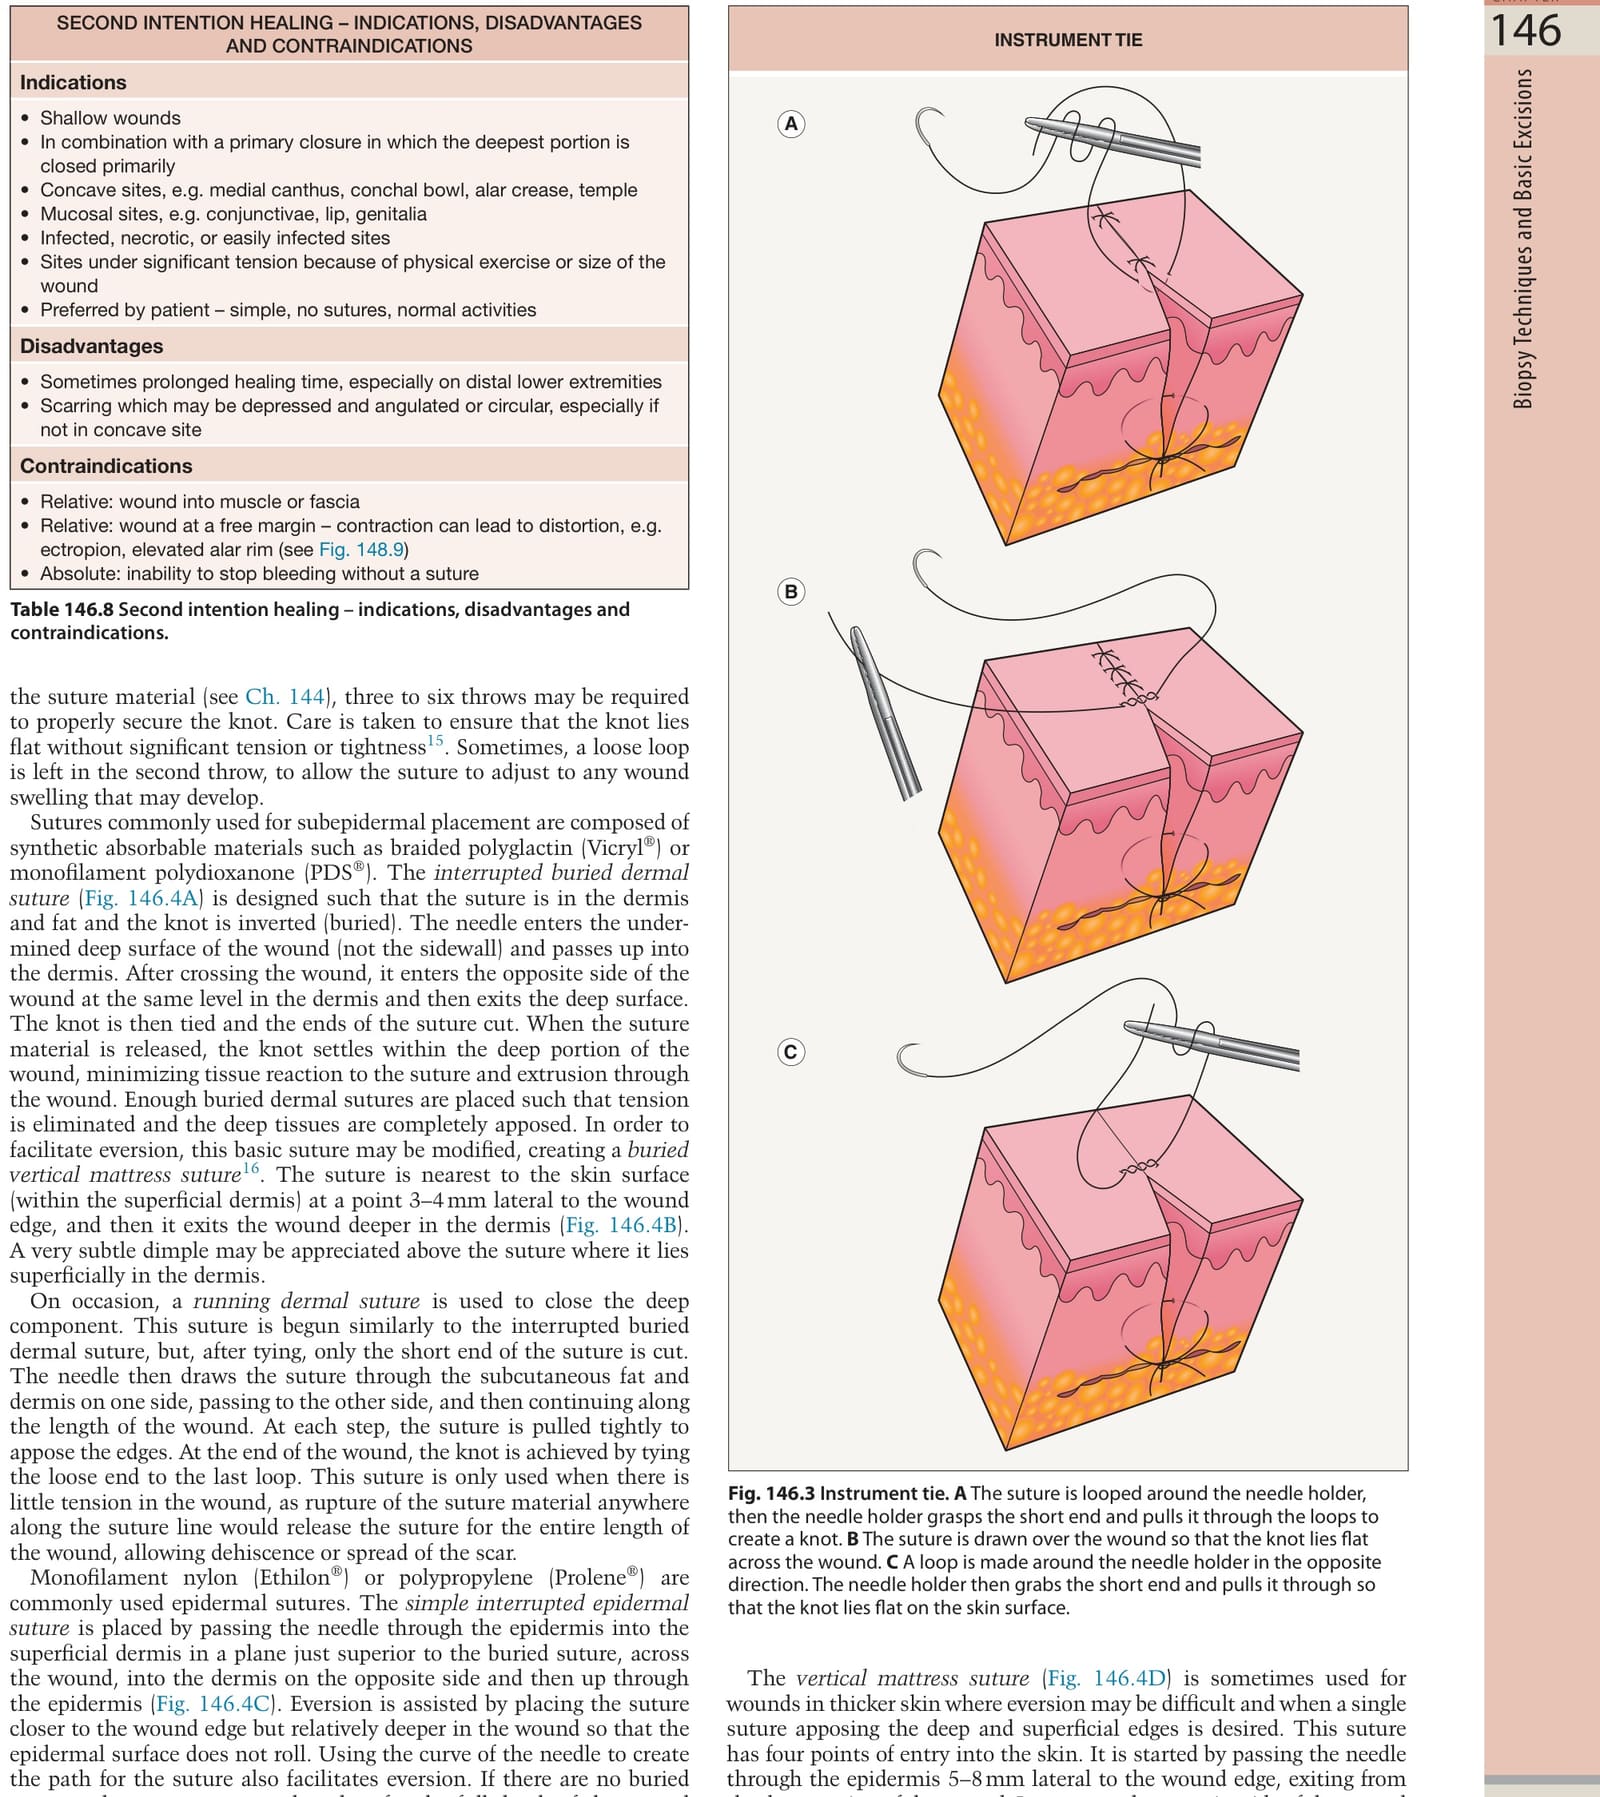
Table 146.8 Second intention healing – indications, disadvantages and contraindications.
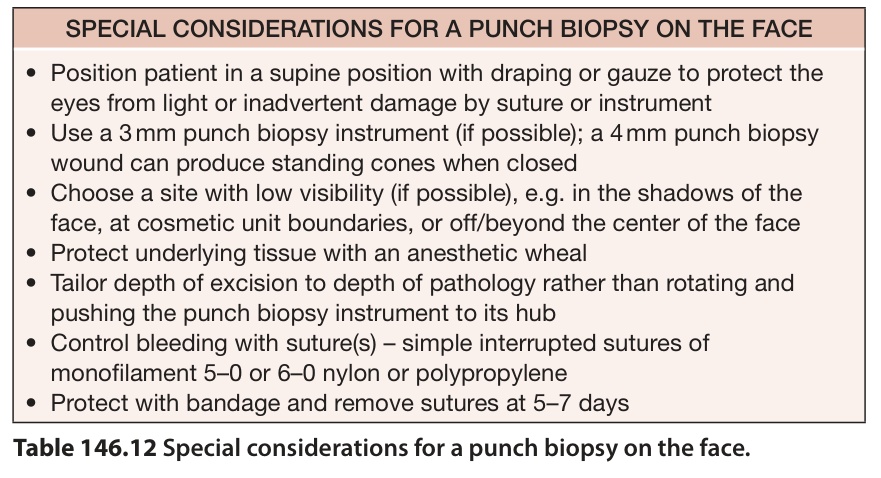
Table 146.12 Special considerations for a punch biopsy on the face.
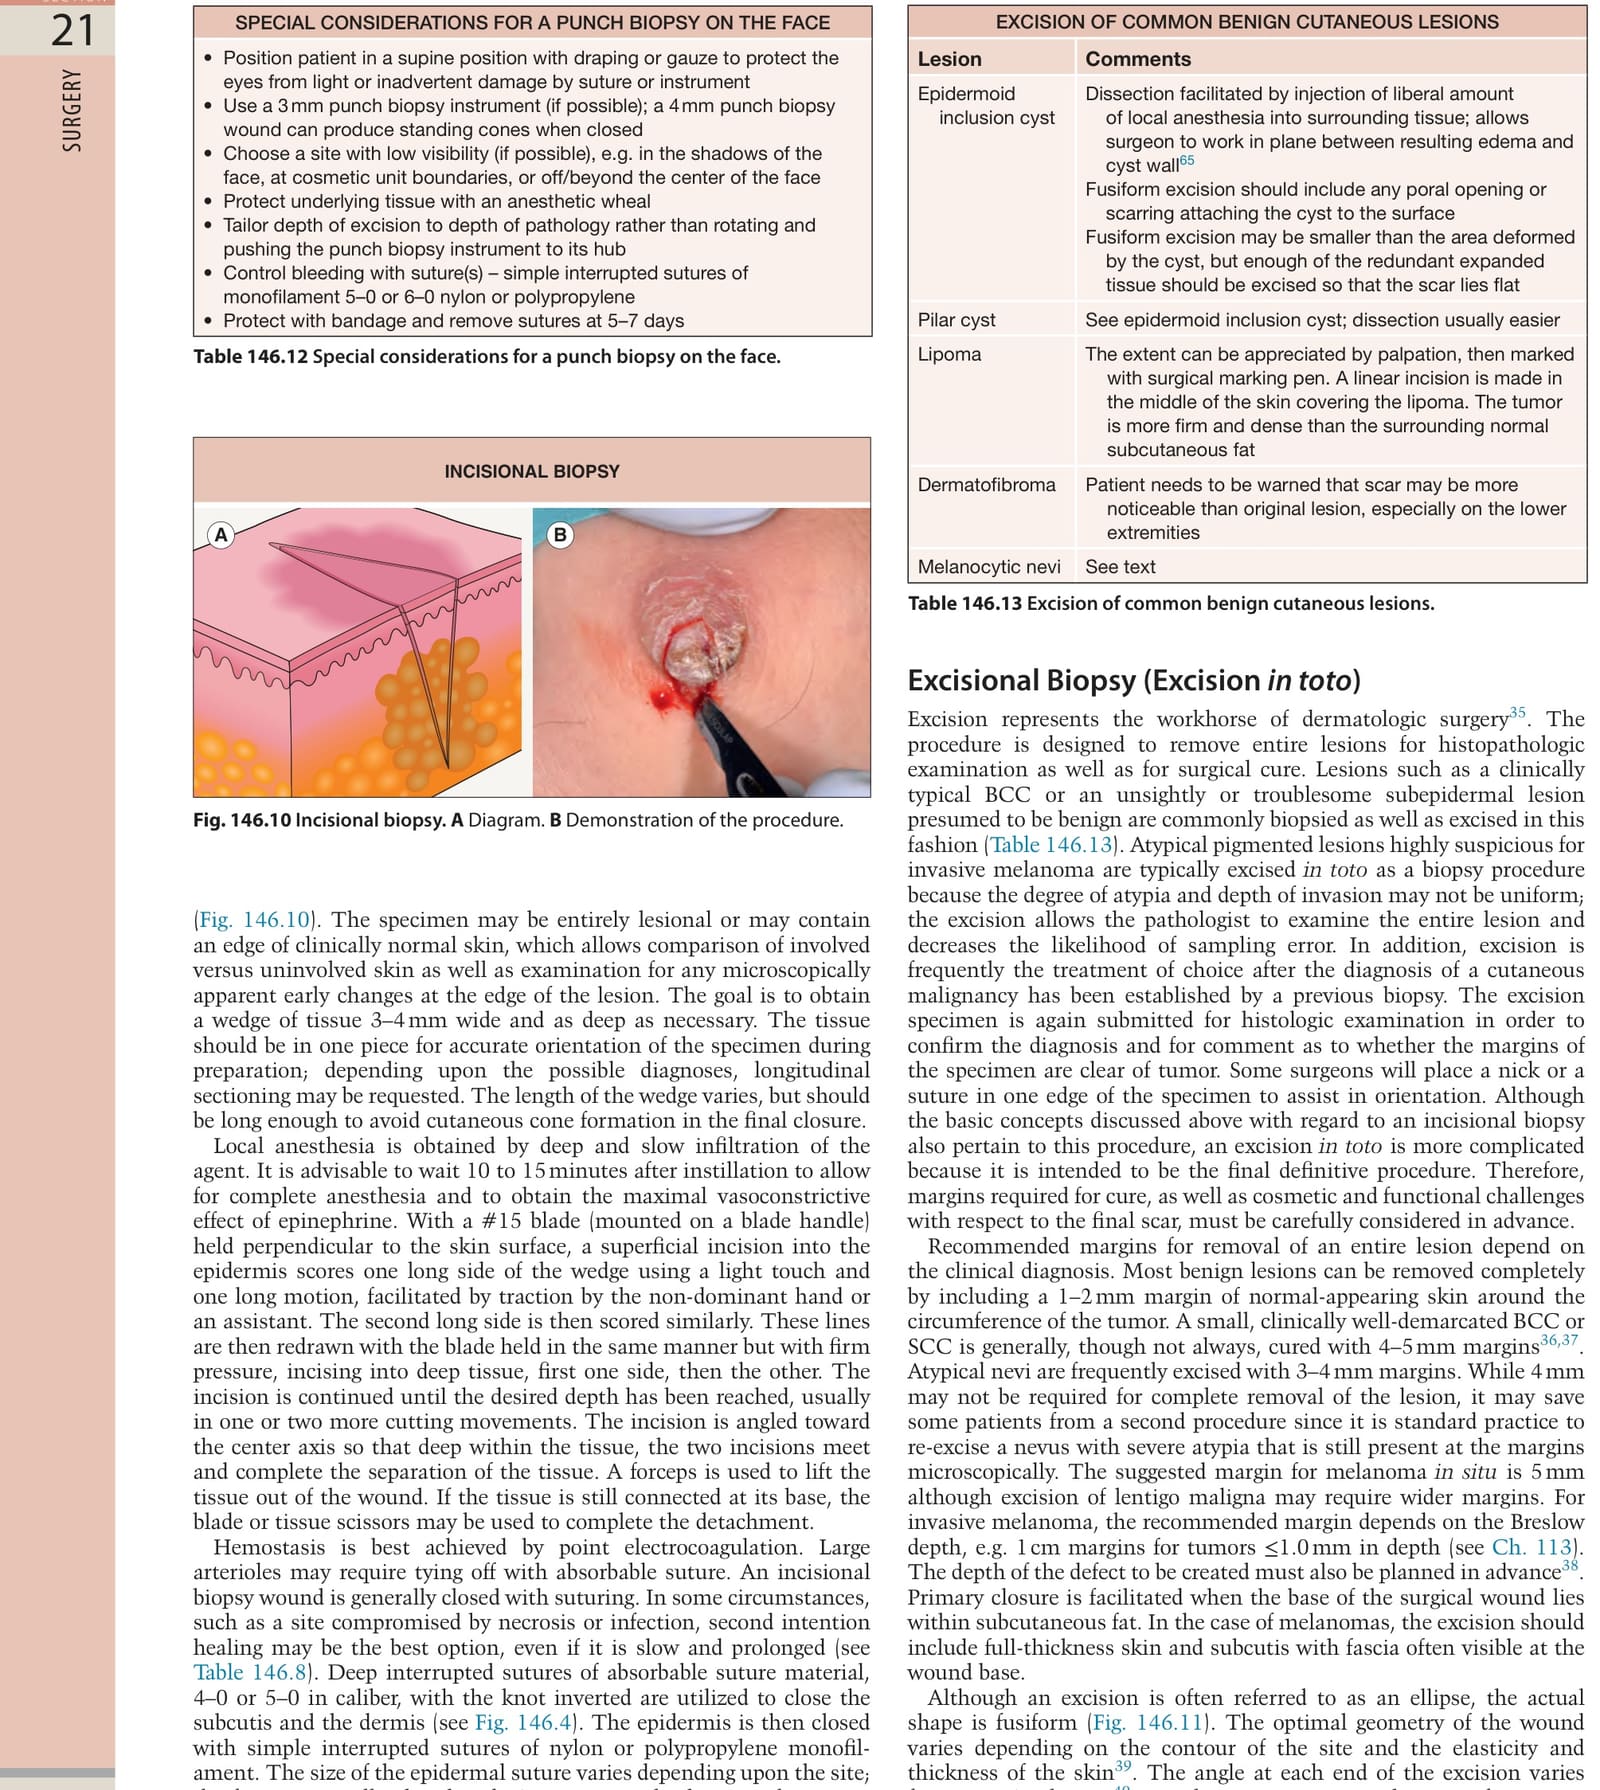
Table 146.13 Excision of common benign cutaneous lesions.