DESCRIPTION OF TECHNIQUE
Burow’s Triangle Displacement Flaps
Single tangent advancement flaps (STAFs) and
There are several variants of Burow’s triangle displacement flaps that are differentiated by the number of Burow’s triangle displacements,
(Burow’s flap).A The wound extends to the brow. B Determine the tension vector that will cause the least distortion and make the tangential incision parallel to this optimal tension vector. Both Burow’s triangles (displaced and adjacent to defect) are oriented perpendicular to the optimal tension vector. C Closure with a single tangent advancement flap with the tangent extending lateral to the brow and displacing a Burow’s triangle to the temple and lateral orbit. D The eyebrow is entirely preserved.
or the configuration of the tangential line extending to the displaced triangle (see Fig. 147.4). Ideally, the design of these flaps should, when possible, place surgical scars at cosmetic subunit borders and within relaxed skin tension lines. Therefore, when a defect is located near an arcing junction of a cosmetic subunit or if the relaxed skin tension lines are curved such as on the cheek (Fig. 147.11), then the Burow’s triangle displacement flap, classically known as the rotation flap, may be an excellent option. On the other hand, when the cosmetic subunit junctions or relaxed skin tension lines are relatively straight, the STAF, or “Burow’s advancement flap”, may be optimal. A variation, the crescentic advancement flap, can be employed when the anatomic structures are naturally curved (Fig. 147.12).
Once the need to displace a Burow’s triangle so as to avoid a vital structure is established, the incision lines should be planned in the optimal location. The incision, whether straight or arced, should extend to the point of preferred triangle displacement. The triangle should then be excised, commensurate in depth to the thickness of the flap. After undermining and hemostasis, the first point of suturing is the closure of the displaced Burow’s triangle. The second point of suturing is then the closure of the other Burow’s triangle. The remainder of the flap can then be completely sutured into the defect with even distribution of the remaining edges of the flap to the defect’s wound edges.
Double tangent advancement flaps (DTAFs)
DTAFs displace both Burow’s triangles along parallel tangents (see Fig. 147.4). Therefore, these flaps are typically peninsular in configuration with an isolated vascular base at the distal ends of the tangents. The execution of this flap is very similar to that of an STAF, except that one must be mindful of the more limited vascular supply (Fig. 147.13). This isolated vascular supply necessitates limiting the length of the flap to three to four times its width. As with other advancement flaps, the first closure points are at the site of the displaced Burow’s triangles. Suturing the advancing flap with even distribution of the flap along the recipient tissue margins completes the execution of this flap.
Site-Specific Variations of Burow’s Triangle Displacement Flaps
Helical advancement flaps
Helical advancement flaps are often discussed as a unique entity, but they are merely variants of Burow’s triangle displacement flaps. The characteristics of the helix are unique owing to its highly distortable free margin that is curved in nearly every dimension and its limited pool of adjacent tissue laxity. The common variant of the helical advancement flap is directly analogous to the DTAF in that parallel tangents are incised from the helical defect along the anterior rim of the helix and the posterior helix. Another variant is an STAF in which a single incision is made along the anterior helical rim while a non-displaced Burow’s triangle is excised directly posterior to the defect onto the posterior ear. Both the DTAF variant and this STAF variant can be either a single flap (derived superior or inferior to the defect) or two flaps (derived both above and below the defect). As with all Burow’s triangle displacement flaps, the helical advancement flap displaces the Burow’s triangle to a more convenient location. Most of these flaps derive donor skin inferiorly. The donor pool from the superior helix is typically less abundant but can be very beneficial, both in large mid-helical defects when two flaps are used and in defects of the superior helix.
A common use of the helical advancement flap is for a small to medium-sized defect on the mid helix not involving the cartilage (Fig. 147.14). While a wedge closure of the ear could be considered, displacing the anterior triangle by utilizing the lax skin of the lower helix and earlobe obviates the need to do a wedge resection of the auricular cartilage and avoids disruption of its delicate architecture. Burow’s triangles can easily be displaced to the earlobe, which facilitates the advancement of the helical skin into the defect. Despite the resultant decrease in the size of the earlobe, the aesthetic impact tends to be minimal as long as the anterior profile of the ear is maintained. Since the earlobe is most visible on the lateral view and because the opposite earlobe is not simultaneously visible, subtle changes in size tend to go unnoticed.
With a more superiorly located defect, the donor pool is at the anterior aspect of the helical rim. Although the extent of tissue movement from the anterior helix is often less than can be expected on the inferior helix, this varies greatly and must be determined for each case.
With the helical advancement flap variant, which is a double tangent flap or “U-flap”, the parallel lines are well hidden in the helical groove or on the helical rim and on the ear posteriorly. A possible disadvantage is the very narrow flap base with its attenuated blood supply. However, the helical rim has a rich vascular supply and is more forgiving even when tension on the wound edges is considerable. Nevertheless, under tension there is a risk of distal necrosis of this type of helical advancement flap.
Notably, the helical advancement flap variant with a single tangential incision does not have the same narrow base. Its posterior Burow’s triangle is excised directly posterior to the defect. The same anterior
incision is made along the helical rim (see Fig. 147.14), but the base of the flap now becomes the entire posterior ear. The flap can be dissected from the cartilage posteriorly and redraped with advancement over the defect. Equally excellent cosmetic results can be obtained with this variant and with very little downside.
Dorsal nasal flap
The dorsal nasal flap (Rieger flap) is a specialized, site-specific variant of the Burow’s triangle displacement flap that is useful for reconstructing moderately sized distal nasal defects. The basic design of this flap is predicated upon the fact that it is often inconvenient or unfeasible to remove a large Burow’s triangle on the nasal tip. The design of this flap displaces a Burow’s triangle from the nasal tip to the glabella along an incisional arc that extends from the more inferior aspect of the defect (above the alar crease) to the nasofacial sulcus and finally onto the glabella (Fig. 147.15).
The dorsal nasal flap relies on the rich blood supply of the medial canthal plexus that is largely supplied by the angular and infratrochlear arteries. This rotation flap employs a “back-cut” which slightly alters the dynamics of the flap, with the back-cut serving as the displaced
Burow’s triangle. However, this maneuver simultaneously narrows the base of the flap which improves its ease of rotational movement. Based on the rich vascular supply of the medial canthus, the narrowed base is robustly supplied by the angular artery. The back-cut also enables the incorporation of some glabellar skin into the flap, contributing to the closure of the secondary defect and reducing distortional tension on the nasal tip.
The most important aspect in the execution of the dorsal nasal flap is creation of a broad-enough arc by extending to the nasofacial sulcus, but skirting the medial canthal skin, en route to the glabella. The second key element is the plane of dissection when elevating the flap. While the portions of the flap that will be covering the nasal defect can be trimmed and thinned to match the native skin and defect, the body of the flap must be dissected at the level of the perichondrium and periosteum. This assures adequate blood supply from the canthal plexus. When these principles are observed, this flap is robust and can reconstruct moderately large nasal tip defects without distortion and with an excellent tissue match.
While the surgeon must be aware of important variables that can substantially affect the successful use of any flap, this is especially true in the case of the dorsal nasal flap. The ideal situation is a patient with very non-sebaceous and elastic or “loose” skin of the nasal dorsum. Characteristics that raise concern about whether this flap can be successfully executed include thick, inflexible, and highly sebaceous skin. Also, prior surgeries on the nose or the medial canthus should be viewed as a potential source of compromised vascular supply. Distortion of the distal nose structures may occur if there is severe structural compromise of the free margin or the cartilage of the nasal tip and consideration should be given to other reconstructive options (e.g. a tissue importation flap). The dorsal nasal flap should be reserved for defects that are too large to be reconstructed with a small local flap such as the bilobed flap, yet smaller than a defect for which a tissue importation flap would be more ideally suited. The most difficult aspect of successfully executing a dorsal nasal flap is anticipating and dealing with the secondary motion inherent in this flap. The more curved the flap, the greater the secondary defect on the nasal sidewall/nasofacial sulcus.
Other Site-Specific Flaps
Alar rotation flap (ARF) and spiral rotation flap (SRF)
There are two flaps which, like the dorsal nasal flap, are rotation flaps with back-cuts that are particularly useful for alar defects. The ARF is best suited for smaller defects limited to the ala while the SRF is useful for larger defects involving both the ala and lower nasal sidewall.
When defects are limited to the ala, the ARF is a good alternative to full-thickness skin grafts; the ideal defect is <75% of the vertical height of the ala and is located on the mid to medial ala. Classically, the superior edge of the defect is near the alar crease. The flap design displaces the triangle laterally along an arcing incision that is made within the crease and extends off the nose onto the apical triangle at the junction of the nose, cheek, and upper lip (Fig. 147.16). This incision is further extended a short distance along the nasolabial fold to where the back-cut is made. The size of the back-cut should be proportional to the defect, i.e. about the size of a Burow’s triangle had it been excised
superior to the defect. The flap, which is thick and incorporates the rich blood supply of the lateral ala, is then elevated. A diminutive Burow’s triangle is excised inferolateral to the alar defect.
The key suture of the ARF is placed at the alar–labial junction to close the back-cut defect. This nicely recreates the alar–labial junction. The second key stitch closes the alar defect. With the flap in position, the surgeon looks to incorporate enough of the back-cut portion of the flap onto the ala to replace the tissue volume of the defect. This is important because the ala is typically highly sensitive to tissue loss and the back-cut creates the opportunity to incorporate tissue from the apical triangle onto the nose. This restores and preserves the normal tissue volume of the ala.
An analogous flap may be used for alar defects located near the alar rim. The design of the flap is simply inverted and the arcing incision is made along the alar rim to the alar–labial junction where the back-cut is similar to that just described, but is inverted. A diminutive Burow’s triangle is excised superior to the defect and the flap is rotated onto the nose and into the defect in the same fashion.
The SRF is an excellent way to reconstruct defects involving the ala and the lower nasal sidewall. It enables reconstruction of the ala and alar crease in a single stage. The design is that of a 270° rotation flap with a back-cut on the medial cheek, and it represents an alternative to the nasolabial transposition flap.
An arcing incision is made from the inferomedial aspect of the wound onto the nasal sidewall and extended laterally onto the upper medial cheek (Fig. 147.17). The arc is extended inferiorly to the nasolabial fold. From there a back-cut incision is made superiorly along the fold. The proportions of the flap are important and the flap can be conceptualized as having three parts: (1) the alar portion; (2) the body; and (3) the tail. The alar portion of the flap will reconstruct the alar portion of the defect and is equal in size to this area. The body and tail of the flap are equal in size to the vertical dimension of the entire defect. This proportional sizing of the flap assures successful restoration of the nasal defect, with the skin of the medial cheek ultimately serving as the donor site. Just as with the ARF, the back-cut tissue, which in an SRF is the tail of the flap, is incorporated
as much as possible into the closure. Some of the tail will be trimmed, but incorporation of as much of this tissue as possible helps to restore the tissue volume on the nose. This restoration, in turn, prevents distortion of the free margin and other structures.
The method of undermining and raising of an SRF deserves mention. The alar portion is completely detached from the underlying tissue as is the tail. The perimeter of the flap body is undermined to enable rotation and advancement. Vascular supply of the flap is based upon the rich vascular plexus of the lateral ala and upper lateral lip located beneath the “inner” edge of the spiral. In this way, the flap is similar to the pedicled V-to-Y flap since its base is largely deep to the flap and care must be taken to preserve this base.
Cheiloplasty of the lip
Cheiloplasty of the lip is a special form of the simple elliptical closure. It is used in small to moderate-sized defects of the lip that involve the vermilion or the vermilion border. It is traditionally taught as a wedge closure with a full-thickness excision of skin, mucosa, submucosa, and musculature. However, when tissue-conserving excisions (e.g. Mohs micrographic surgery) are employed and much of the orbicularis oris muscle is preserved, a subtotal wedge excision of the muscle
(cheiloplasty) is preferred due to its simplicity as well as the decreased chance of lip dysfunction and other complications.
Careful realignment of the vermilion border is essential. Prior to excision of the tumor, hash marks are made with a scalpel along the vermilion border as precise reference points. The hash marks enable precise realignment of the vermilion border (Fig. 147.18).
The surgeon surveys the amount (if any) of redundant soft tissue that forms when the wound edges are approximated. Usually, the apex of the wedge (after removal of redundant muscle) is obtuse, creating a very slight trough in the lip in an anterior-to-posterior direction. In our experience, the less muscle that is removed, the less likely a noticeable notch in the vermilion lip will form and the function of the lip is beautifully maintained. After excision of Burow’s triangles on the external lip and the internal lip (see Fig. 147.18B), and after under-mining the cutaneous portion of the defect, the key suture is the one that reapproximates the medial and lateral muscle edges. This is best done by the placement of a “figure-of-eight” suture, which is similar to a horizontal mattress suture and snares the bellies of the anterior edge of the orbicularis oris muscle and precisely approximates them (see Fig. 147.18C–E). Upon healing, the ridge created by this approximation becomes a functional and aesthetic component of the lip and recreates
the appropriate muscular bulge at the vermilion border. Adjustment of the wound edges to perfectly realign the previously placed hash marks with epidermal sutures will ensure a perfectly realigned vermilion border. Some surgeons use braided rather than monofilament sutures to minimize irritation of the mucosal portion of the other lip.
Defect Reconfiguration (Pedicled V-to-Y) Flaps
The pedicled V-to-Y flap (PVYF) is a unique advancement flap in that the creation of an island of epidermis and dermis eliminates any blood supply from the rich vascular plexus within the deep dermis and super-ficial subcutaneous skin. In effect, the vascular supply is isolated to the subcutaneous tissue. The two variations in pedicle design hinge upon whether the pedicle is created immediately beneath the island or from the subcutaneous tissue lateral to the island (Fig. 147.19). The variant with the vascular pedicle immediately beneath the island of skin is created by dissecting away surrounding superficial subcutaneous tissue and eliminating the tethering effects of the tissue adjacent to the pedicle. The PVYF with laterally based pedicles is created by tunneling immediately beneath the island while carefully maintaining vascularized sheets of subcutaneous and muscle tissue, either bilaterally or unilaterally to the side of the island (Fig. 147.20). Selection of which pedicle variation is best depends upon the site. PVYFs in locations with elastic, spongy subcutaneous tissue do well with deep pedicles whereas lateral pedicles are preferred for defects within tighter skin with less spongy subcutaneous tissue and with a good lateral blood supply; the latter often comes in the form of facial muscle.
In general, it is appropriate to think of the PVYF as an advancement of what would be one of the Burow’s triangles in a simple side-to-side closure. The PVYF is an extremely tissue-efficient flap in which little or no tissue is discarded and yet often provides outstanding clinical results. The mechanism for tissue conservation involves a reconfiguration of the roundish defect into an angular shape (see Fig. 147.6). The original shape of the defect is reconfigured behind the advancing island to a defect of equal area, but very angular in shape that can be closed without tissue redundancy.
It is conceptually useful to recognize that a PVYF (especially with the pedicle based immediately beneath the island) is essentially a rotation flap turned perpendicular to the surface of the skin (Fig. 147.21). Whereas, in a rotation flap, the vascular source lies parallel with the skin, the analogous vascular supply of the PVYF runs perpendicular to the skin. Similarly, the plane of tissue movement in the traditional rotation flap is parallel with the skin, but is perpendicular to the skin in a PVYF. Once this analogy between a rotation flap and a PVYF is under-stood, it is easy to see that movement of the PVYF is facilitated by the same factors that facilitate movement of a rotation flap. For example, excision of the Burow’s triangle facilitates the rotation and advancement of the rotation flap. Likewise, the advancement of a PVYF is facilitated by the removal of the tissue analogous to the Burow’s triangle, i.e. any subcutaneous tissue at the base of the defect (Fig. 147.21B). Without its removal, the subcutaneous tissue left in the wound base serves as a physical impedance to the advancing flap.
Another technique for enhancing rotation flap mobility, the back-cut, is also applicable to the PVYF. A back-cut for a rotation flap releases some of the restraining tension of the flap and is helpful in its mobilization. The equivalent of a back-cut can also improve the mobility of a PVYF. This is done by incising the subcutaneous pedicle at the trailing edge of the flap in a direction beveled slightly into the pedicle (see Fig. 147.21B).
In order to enable eversion of the skin edges of a PVYF, the island is very slightly undermined at the dermal–subcutaneous junction to facilitate its eversion. In addition, the skin surrounding the flap is widely undermined in the superficial subcutaneous tissue. The flap is then advanced into the defect, with closure of the donor site behind the flap in a V-to-Y fashion and closure of all skin edges.
Pedicled V-to-Y flap variation: the pincer flap
Altering the shape of the pedicled flap or the nature of the pedicle affords advantages in site-specific reconstructions. For example, the pincer flap is used to reconstruct the cupid’s bow of the upper lip (Fig. 147.22). In the pincer flap, the shape of the flap is altered by extending its lateral incisions outside of the lateral margins of the defect, thereby creating peninsular extensions of the flap. These, unlike the body of the flap, are detached from the underlying tissue so they can be folded inwardly in a “pincer” fashion, thus forming a teardrop-shaped flap (see Fig. 147.22B). Upon suturing, this curved advancing edge recreates and preserves the curvaceous vermilion border at the cupid’s bow. In addition to preserving function, it beautifully avoids disruption of an aesthetically critical facial feature.
Tissue Reorientation Flaps
Transposition flaps are among the most useful flaps because of their ability to tap into adjacent tissue reservoirs and repair defects in anatomic locations with minimal laxity. These flaps allow for repair of even large defects with minimal or no skin tension and without distortion of important surrounding anatomic structures. The classic transposition flap is the rhombic flap, with other useful transposition flap variants being the bilobed flap and the single-staged nasolabial transposition flap. All these reorientation flaps are fundamentally based upon the Z-plasty.
Rhombic transposition flap
The classic rhombic flap, originally described by Limberg in 1963, was based on the concept of placing the tension vector of the secondary defect nearly perpendicular to that of the primary defect (Fig. 147.23A). After closure of the donor site, the Limberg flap allowed for repair of the primary defect with essentially no wound edge tension. Dufourmentel added important modifications that made the closure of the donor site easier by placing the secondary defect at an acute angle (60°) to the primary defect. Thus, the flap passes through a shorter arc in order to be positioned within the primary defect (Fig. 147.23B). Webster modified the rhombic flap further by making the angle of the secondary defect even more acute (30°) to further facilitate closure of the secondary defect (Fig. 147.23C). The smaller flap size of the Webster variant allows the surgeon to position the flap in almost any location relative to the primary defect in order to tap into the most lax skin available. However, as the angle of the secondary defect becomes more acute, more of the wound tension is transferred from the donor site to the primary defect. Care must be taken to ensure that the tension on the flap does not compromise its vascular supply and flap viability. Another important concept to bear in mind is that as more tension is transferred to the primary defect, nearby anatomic structures will be more prone to distortion.
Careful planning is required prior to incising the rhombic transposition flap in order to ensure that the donor site comes from an area adjacent to the defect with adequate tissue laxity. This donor site, most commonly, parallels the relaxed skin tension lines. The Burow’s triangle is removed at the pivot point prior to insetting of the flap. This ensures more accurate incision lines and allows more precise suture placement in order to distribute the flap tension evenly. After undermining and hemostasis, the first suture is placed to close the secondary defect. Next, the flap is inset into the defect, trimmed to fit, and sutured.
Although extremely versatile, there are specific areas where the rhombic flap provides reliable and reproducible results. The lateral upper two-thirds of the nose and the lateral forehead are ideally suited for the rhombic flap because of the frequent difficulty in closing defects in these areas primarily (Fig. 147.24). The adjacent tissue laxity available on the nasal sidewall and the lateral cheek provide ample reservoirs of donor tissue. Large defects of the central cheek may be closed by the rhombic flap when simpler options are not possible. One significant drawback of this flap is the difficulty in concealing the geometric shape of the incision lines.
Bilobed transposition flap
The bilobed flap is essentially two transposition flaps in series, and it is one of the most useful flaps for repair of defects of the lower one-third of the nose. The easily distorted alar rim can be protected from distortional tension by virtue of the inherent series of Z-plasties within this flap, with the Z-plasties serving to reorient skin in the direction of the alar rim. The bilobed flap was first described by Esser in 1918 and important modifications to the flap were described by Zitelli in 1989. Zitelli modified the classic flap to decrease the pivot angle of the flap from 180° to 90–100° (Fig. 147.25). This simple modification helps to minimize two of the most common problems associated with the bilobed flap – a trapdoor deformity (pincushioning) of the primary lobe and the tendency for standing cones to form at the pivot point of the flap.
Careful planning is required for the bilobed flap to ensure minimal distortion of surrounding structures. Fig. 147.25B depicts a reliable method for planning the incisions of the bilobed flap. Drawing with a sterile marker on the patient ensures that the incision lines are placed in such a way as to maximize both functional and aesthetic results. For nasal defects, the flap should be designed so that the tertiary defect is closed perpendicular to the alar rim. This ensures that the contralateral ala is not lifted during closure of the tertiary defect. On the side of the flap where the pivot point is located, the plane of undermining is carried to the nasofacial groove in order to facilitate mobilization of the flap with no distortion of surrounding structures. Closure of the tertiary site is followed by closure of the Burow’s triangle adjacent to the defect. Next, the flap is inset and sutured into the defect. The secondary flap is then trimmed to match the secondary defect and sutured in place (Fig. 147.26).
Defects of the lower one-third of the nose measuring 0.5–1.5 cm are the ideal size for the bilobed flap. Smaller defects can often be closed in a primary fashion and larger defects may need either a skin graft or a two-staged tissue importation flap. Although the bilobed flap is most commonly used for the distal third of the nose, it may be used in other anatomic sites, especially when there is potential for distortion of a free margin. Bilobed flaps can be combined with other flaps to repair relatively large defects located adjacent to the alar rim. This avoids distortion and enables the use of a smaller flap. Video 147.1 illustrates the combination of a bilobed flap and an island pedicle flap.
Trilobed flap and rhombic flap with Z-plasty
Useful variants of the rhombic and bilobed flaps include the trilobed flap and the rhombic flap with Z-plasty. These flaps expand on the concept that transposition flaps which are arranged in series include more Z-plasties and, therefore, enable greater tissue movement without distortion of free margins. Again, the most common site for these flaps is the distal nose. In particular, they are useful for defects located very distally on the nasal tip (Fig. 147.27), for defects on delicate, easily distortable noses, or for defects that are larger than what a bilobed flap can effectively close.
The only difference between a bilobed and trilobed flap and a rhombic flap with a single or multiple Z-plasties is the size of the second subsequent lobe(s). The latter uses a diminutive lobe (the Z-plasty) that, when transposed into the defect, only partially fills it. The remainder of the tertiary defect(s) is closed primarily.
Nasolabial transposition flap
The single-staged nasolabial (melolabial) flap is a transposition flap variation that can be used to reconstruct defects of the nasal sidewall or large alar defects. Traditional designs of the nasolabial flap resulted in significant blunting of the nasofacial sulcus and frequently in a trapdoor deformity, often requiring one or more postoperative revisions. This is perhaps why this flap has been underutilized in reconstruction of the nose. In 1990, Zitelli described several modifications of the traditional design that helped to minimize the need for surgical revisions. The flap should be designed to include the preplanned excision of the Burow’s triangle along the lateral nasal sidewall (Fig. 147.28). The donor site should parallel the nasolabial fold and, once incised and elevated, should be widely undermined; the recipient site should be undermined in the submuscular plane on the nose.
The first stitch is a periosteal suture placed in the undersurface of the flap corresponding to the new location of the nasofacial sulcus. This is secured to the periosteum of the lateral nasal sidewall, thus recreating the sulcus while eliminating tension on the flap. The periosteal sutures also minimize secondary flap movement that might pull the ala laterally. The distal flap should then be thinned and sutured in place. Tacking sutures are placed in the undersurface of the flap in an attempt
to recreate the alar crease and to prevent collapse of the internal nasal valve. The tip of the flap is finally trimmed to match the defect and sutured in place.
Tissue Importation Flaps
Tissue importation flaps are a loosely associated group of flaps that employ the concept of transferring tissue from a distant reservoir into a defect when other adjacent repair options are unsatisfactory. The flap itself is supported by either: (1) a single vessel as with an axial flap; or (2) a rich plexus of subcutaneous perforating vessels that enter the flap pedicle through underlying muscle (random pattern flap). Tissue importation flaps are ordinarily two- or three-stage procedures. The first stage includes the initial planning and implementation of the flap. The vascular pedicle is left in place after the first stage to ensure adequate blood supply. The second stage involves the separation of the pedicle and insetting of the proximal flap. Tissue importation flaps are most useful for reconstruction of large defects and are especially valuable when cartilage grafting is required to rebuild normal anatomic substructure and preserve proper function.
Forehead flaps
The paramedian forehead flap is classically an axial flap based on the supratrochlear artery. It is the most useful flap for reconstruction of subtotal and total nasal defects. The excellent vascular supply supports both the flap and any cartilage grafts that are used to rebuild the cartilage framework of the nose (see Ch. 148). The paramedian forehead flap also provides excellent color and texture match and often exceeds the cosmetic results of a skin graft.
An important concept in flap design includes the enlargement of the nasal defect to encompass the entire cosmetic unit when possible. This makes the junction of the flap and the remaining nasal skin less conspicuous and is more likely to result in an excellent cosmetic outcome. If necessary, proper mucosal lining is ensured by using a nasal mucosal flap, a turndown flap, or a split-thickness skin graft (Fig. 147.29). If cartilage support is required, conchal or nasal septal cartilage is used to rebuild the normal cartilage framework (see Ch. 148). Next, a foil template of the defect is constructed and used to outline the flap on the forehead. A 4 × 4-inch gauze is used to simulate the length of the pedicle.
For tissue importation, the design of the pedicle is a critical step since it is the conduit for blood supply to the flap. Classically, the paramedian forehead flap is considered an axial flap based upon the supratrochlear artery (STA). Doppler identification of its precise location is often done to assure inclusion of the STA and optimization of blood flow. However, the need to meticulously include the Doppler-identified artery has recently been challenged. In a study that compared flaps based on a Doppler-localized STA versus paramidline forehead flaps based medial
to the STA without the use of Doppler (see Fig. 147.29E), similar clinical results were observed. Furthermore, histologic examination of the proximal and distal portions of the pedicle found little differences in vascular composition when the two groups were compared. The only histologic difference was more blood vessels in the pedicles of the paramidline forehead flaps than in the STA-based flaps.
The paramidline forehead flap design utilizes the exact midline of the glabella for the medial pedicle incision. The lateral incision is made 1.2 cm lateral to this without respect to the location of the STA. All other aspects of the forehead flap execution are the same as with the STA-centered flap design (see Fig. 147.29E).
Irrespective of how the forehead flap is designed, flap procurement is begun by incising the distal flap (on the upper forehead) in the
subcutaneous plane, and as dissection progresses inferiorly, it is gradually deepened. That is, the distal one-third of the flap is dissected in the superficial subcutaneous plane, with deepening over the middle one-third to just above the periosteum in the proximal one-third (just above the brow). When dissecting the glabellar portion of the pedicle, care must be taken to ensure that the axial arteries are not severed as they exit the supraorbital foramen. Bilaterally, the forehead donor site is undermined in the subgaleal plane and then closed in a layered fashion. The widest part of the forehead defect may not close, but heals well by second intention. Finally, the distal end of the flap is thinned to match the thickness of the remaining nasal skin before it is inset.
The second stage of the forehead flap is typically performed 3 weeks later (see Fig. 147.29G). The pedicle is severed near its base and closed primarily. After carefully trimming and thinning the proximal edge of the nasal flap as well as freshening its margin, it is inset into the defect.
Nasolabial interpolation flap
The nasolabial (melolabial) interpolation flap has been utilized primarily for defects of the nasal ala. This flap is especially useful for large defects and complex defects involving the alar rim. In certain circumstances, the flap may be utilized for the repair of nasal tip defects when the latter are moderate in size and a paramedian forehead flap is less optimal.
When utilizing the nasolabial interpolation flap for the repair of alar defects, excision of the remainder of the cosmetic unit of the ala ensures a better aesthetic and functional result (Fig. 147.30). After providing any necessary cartilage support, a foil template is made of the contralateral ala and then it is flipped over and placed on the ipsilateral nasolabial skin. A 4 × 4-inch gauze can be utilized to ensure proper flap length. The flap on the cheek is incised and dissected to a well-vascularized pedicle deep in the subcutis.
The flap can be based either superiorly or inferiorly. The former is best for larger or more medial defects (see Fig. 147.30), but in men, this design is limited by hair-bearing skin. In women, longer flaps can be designed affording greater reach medially. The inferiorly based flap, incised from the nasofacial sulcus, is more limited in length and width. However, the skin is more delicate and free of hair follicles, often resulting in better skin match. The flap is twisted on its pedicle, trimmed, and sutured into place. The donor defect is closed up to the base of the pedicle.
Three weeks later, the patient returns for separation of the pedicle (see Fig. 147.30C,D). The surgeon amputates, trims, and sutures the flap and the cheek to ensure recreation of the normal complex anatomic features of this aesthetically important area. Fusiform excision of the
pedicle stump provides for the most aesthetically pleasing repair of the cheek donor site.
Retroauricular flap
The two-staged retroauricular flap is useful for large defects of the helical rim, antihelix, and scapha (Fig. 147.31). The retroauricular flap is a random pattern flap without a single vascular pedicle. Nonetheless, because of the rich blood supply of scalp skin, this represents one of the best vascularized random pattern tissue importation flaps and easily supports cartilage grafts (if needed).
After providing cartilage support (if needed; see Ch. 148), a foil template of the defect is fashioned and placed on the skin of the postauricular scalp. The distal flap may originate anywhere from the retroauricular sulcus to the posterior surface of the ear, depending on how far anteriorly it must reach. The incisions are then made, extending posteriorly to the hairline. The flap is dissected in a subcutaneous plane and the tip judiciously thinned to match the thickness of the skin at the defect. The flap is sutured into place being sure to minimize tension as the flap curls around the anterior helical rim. The use of bolster sutures can be very helpful in recreating the curve of the antihelix. Three weeks later, the pedicle is severed near the scalp and inset. The donor site can be closed primarily, with a skin graft, or left to heal by second intention.
Spear’s flap
The inverted nasolabial (melolabial) pedicle flap, described by Spear, is useful for reconstruction of full-thickness defects of the ala that involve the attachment point of the lateral ala to the cheek (Fig. 147.32).
The design of the Spear’s flap is planned in a manner similar to that of the single-staged nasolabial interpolation flap, with the use of a foil template made from the contralateral ala. This template is placed upside down on the skin of the cheek lateral to the nasolabial fold and the flap is incised to a point just lateral to the superior edge of the defect. The flap is then dissected to a well-vascularized pedicle deep in the subcutis. Next, the flap is twisted on its pedicle and the edge of the mucosal defect adjacent to the nasal tip is sutured to the under-turned skin of the medial edge of the flap. The lateral portion of the under-turned flap is then sutured to the lateral mucosal defect. By folding the flap upon itself, the alar rim and the external surface of the ala are recreated, and the tip of the flap is carefully trimmed to match the contralateral ala. The surface of the flap is closed in a layered fashion. As with the other nasolabial flaps, the donor site is closed after widely undermining the skin of the cheek. Occasionally, a standing cone is created superolaterally to the new ala and it needs to be excised and sutured to complete the repair. Postoperatively, the newly formed ala may be positioned too far laterally and may require repositioning using a Z-plasty transposition of the alar base medially in a revision performed two or more months later.
Tunneled flaps
Tunneled flaps are variants of tissue importation flaps in that skin from a non-adjacent site is used to reconstruct a defect. They can be single-stage flaps, but may require revision because of the deformation the pedicle can create along the path of the tunnel. Examples of these flaps include the nasolabial to lip pull-through flap, the paranasal to ala flap, and the retroauricular pull-through flap (flipflop flap).
These flaps are based upon a pedicle that, like the PVYF but unlike other tissue importation flaps, is composed entirely of subcutaneous and muscular tissues and includes an axial vascular bundle within the pedicle. The flap skin and its pedicle are then passed through a tunnel of intervening skin (or cartilage) to the defect. As a result, it is a higher-risk flap than most PVYFs and tissue importation flaps. The initial key step is finding suitably vascular locations for these flaps. Sites most often chosen for flap placement include the nose, lip, and ear. Of note, the subcutaneous tunneling island pedicle flap (IPF) is not a traditional advancing IPF and technically is not a defect reconfiguration flap. Rather, it is a type of tissue importation flap (see Table 147.3).
First, the donor skin is identified in an area with a suitably vascular pedicle. Careful measurements of both the defect and the length of the subcutaneous pedicle are necessary so that the latter reaches the defect under minimal tension. Next, the island is incised and a pedicle deep to the island is developed. It may be helpful to elevate the skin overlying the prospective pedicle to visualize its development. Once an adequate pedicle is developed, the skin between the base of the pedicle and the defect is undermined, creating a tunnel. The tunnel must be large enough for the tissue to pass and not be compressed; cautious defatting of the tunnel walls is often helpful to ensure ample room. This defatting also decreases the degree of fullness of the intervening skin created by the bulk of the pedicle. The length of the pedicle should be limited to three to four times its diameter, unless it is an axial flap. It is prudent to anticipate a 10%–20% “shortening” of the pedicle as it is rotated and stretched through the tunnel into the defect.
Larger alar defects can likewise be repaired with the paranasal to ala tunneled flap (Fig. 147.33). This flap also uses skin from the medial cheek, with a pedicle developed from the paranasal subcutaneous tissue and muscle. A short tunnel is developed between the flap and the defect through which the flap is passed. As noted previously, debulking of the soft tissue around the tunnel facilitates the passing of the flap and pedicle through it. The donor site is closed primarily and the flap is inset and sutured into the wound.
In the retroauricular pull-through flap (flip-flop flap), an island of skin is pulled through a “tunnel” (created either by the surgeon or in the
process of cancer removal) that goes through the cartilage of the conchal bowl in order to repair the anterior surface of the ear (Fig. 147.34). The principles of developing the pedicle and assuring that adequate space exists within the tunnel apply to this flap as well. The flap itself originates from the postauricular skin and is pedicled upon the rich vascular plexus of the retroauricular sulcus. It is flipped like a book page on its pedicle, pulled through to the anterior surface of the ear, and sutured. The donor site may heal by second intention, be closed (partially or completely) primarily, or grafted.
Combination Flaps
Not all defects can be conveniently closed with a single flap. There are times when a combination of closure techniques is employed, either because the defect is too large or because the defect involves more than one cosmetic subunit. These types of wounds are better closed using a combination of flaps or flaps plus grafts (see Fig. 147.31). Combination closures for very large defects are usually employed when a flap is able to close a significant portion, but not all, of the defect. In that situation, a full-thickness graft may be used to supplement a flap and complete the coverage of a defect. Grafts can be harvested from any of the common donor sites, depending on tissue match and the adequacy of donor skin (see Ch. 148). When reconstructing a wound after Mohs micrographic surgery (i.e. a high degree of certainty of cancer-free margins exists), tissue adjacent to the wound can be safely used as “Burow’s grafts”.
The Burow’s triangle(s) of a flap can be defatted and trimmed to fit the remaining defect rather than being discarded.
Sometimes, flap and graft combinations are used to reconstruct defects that involve more than one cosmetic subunit. In such a wound, a flap is used to reconstruct one cosmetic subunit while a full-thickness skin graft is used to reconstruct the other, maintaining the “separateness” of each cosmetic subunit. The principle of maintaining the boundaries between cosmetic subunits is very useful in achieving a much less noticeable cosmetic result. If flaps or grafts are applied across cosmetic subunits, the aesthetic disruption that occurs becomes more visible.
There are also defects that involve multiple cosmetic subunits that are best repaired individually with different flaps. The same principle applies in that maintaining the integrity of individual cosmetic subunits is an important consideration in achieving a more natural and less noticeable result. These types of closures require creativity and sometimes ingenious methods to accomplish complete closure.
Table 147.4 summarizes previously discussed flaps and areas of the face where the specific flaps are most useful for providing excellent functional and aesthetic results.
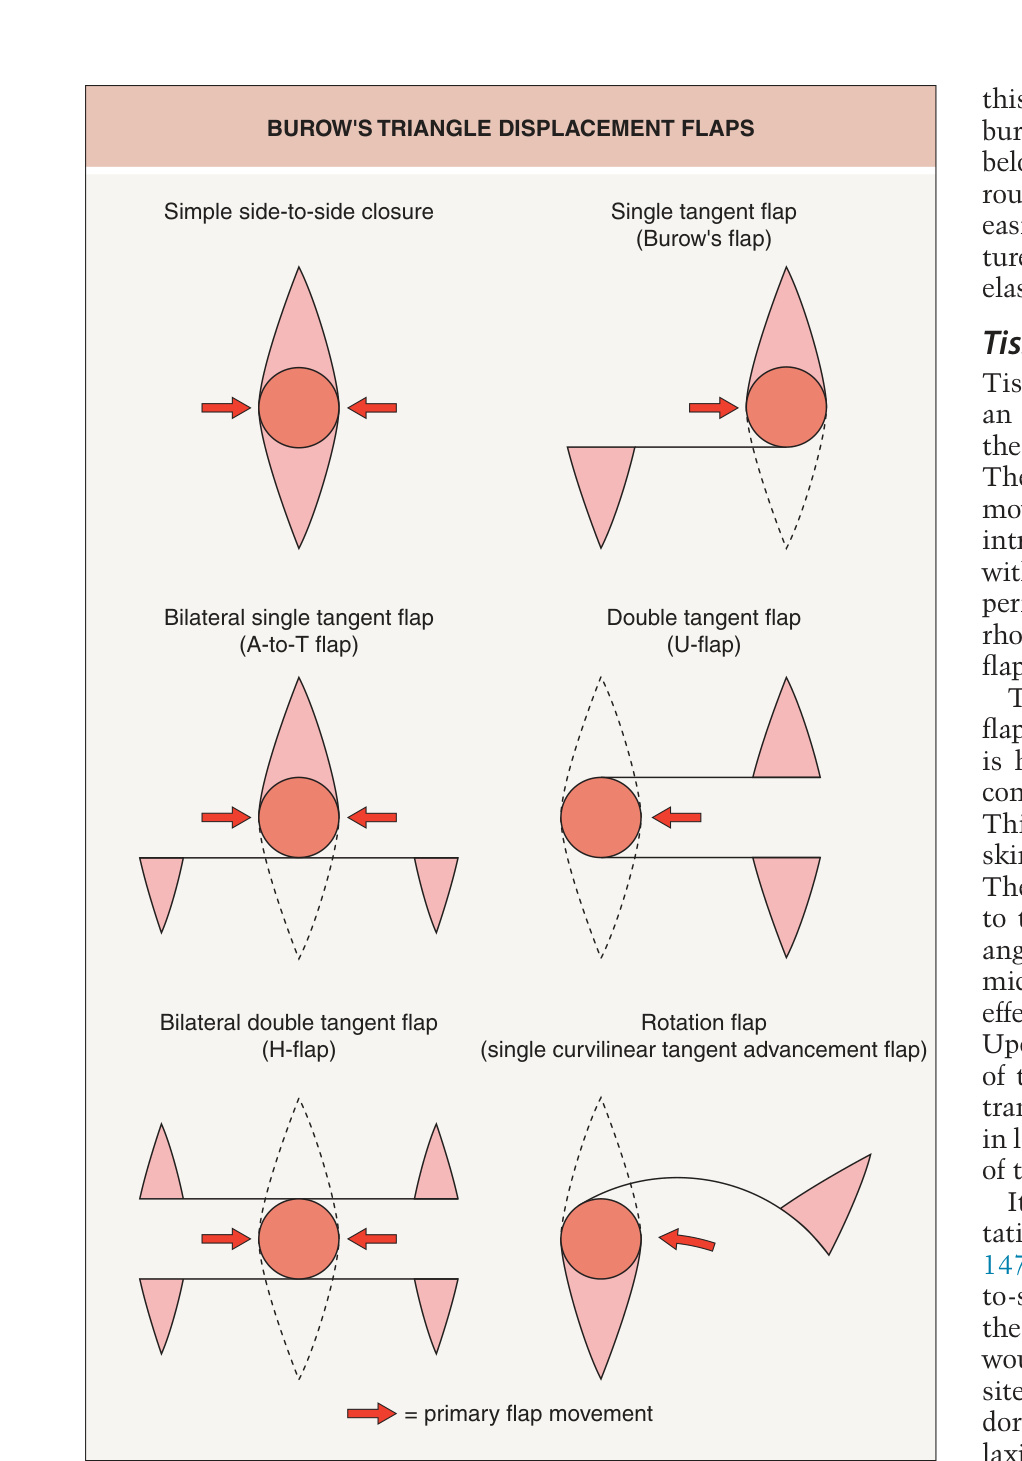
Fig. 147.4 Burow’s triangle displacement flaps.
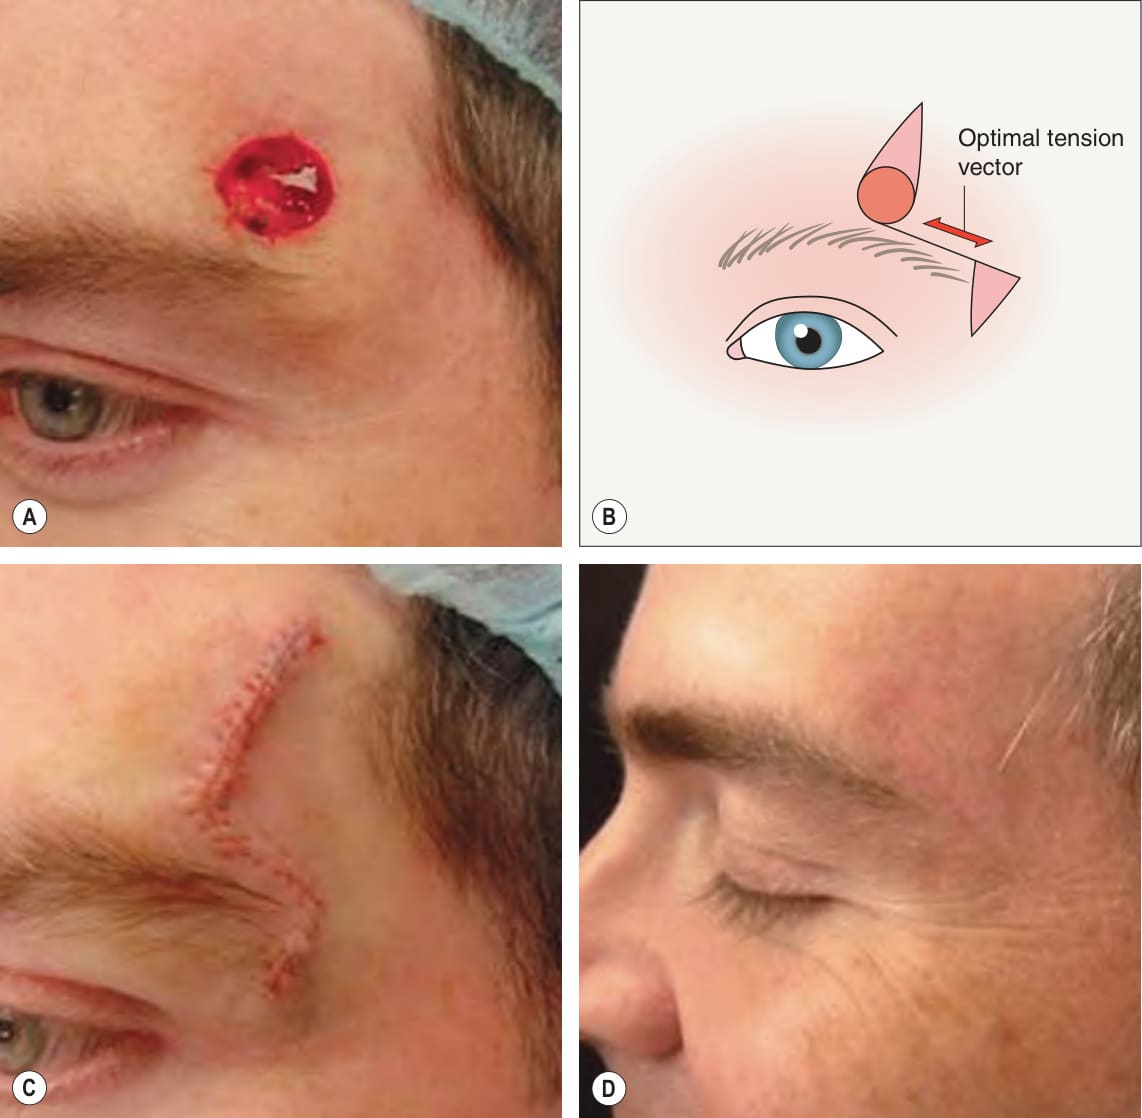
Fig. 147.5 Single tangent advancement flap
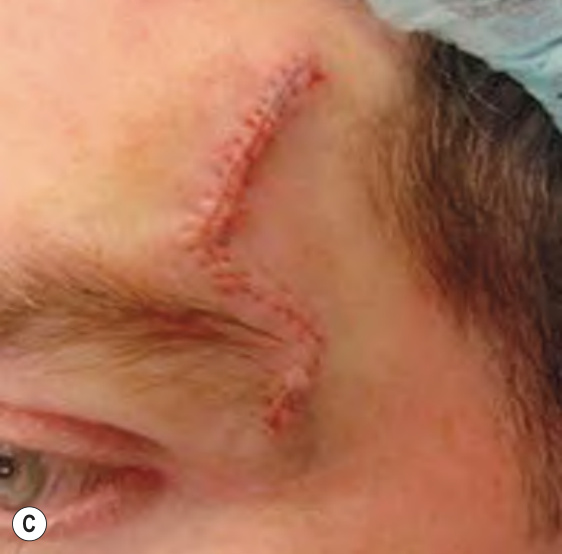
Fig. 147.6 The pedicled V-to-Y flap. Reconfiguration of the defect (pink shaded area) in A to the defect in B. The shaded secondary defect in B is comprised entirely of acute angles which are easily closed primarily (C). Also see Fig. 147.20.
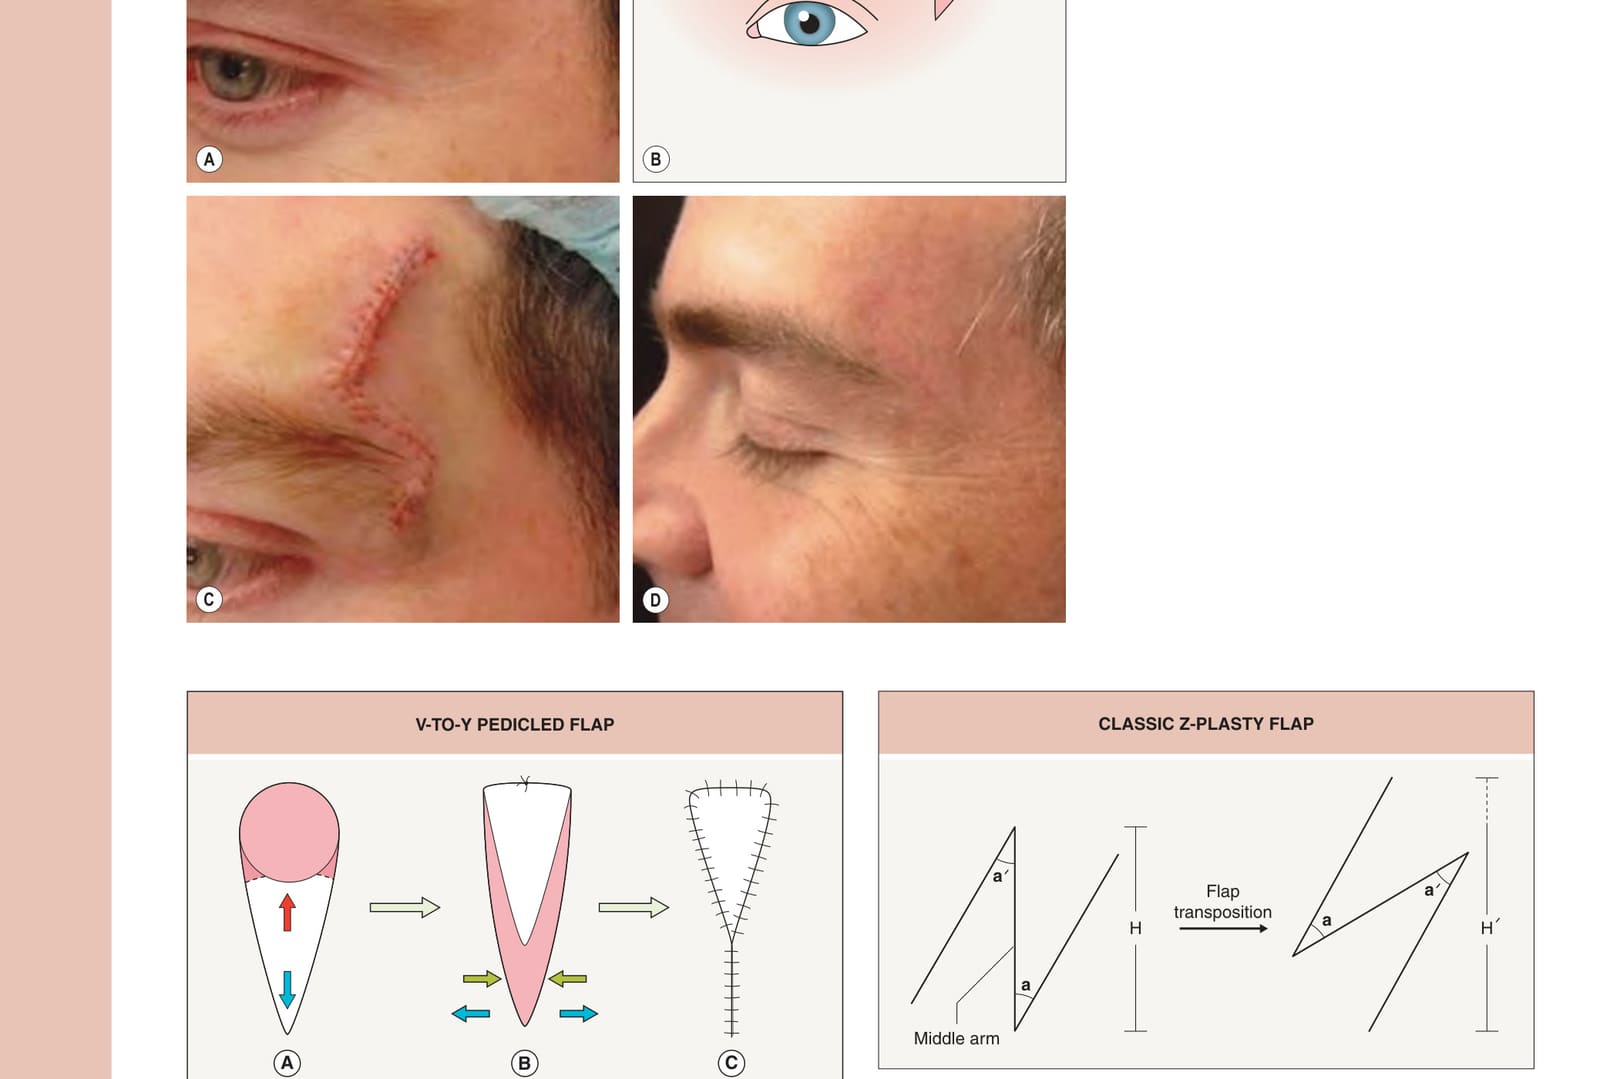
Fig. 147.7 Classic Z-plasty flap. The directional tissue gain (dotted line) is depicted (H to H′) after flap transposition in the direction of the middle arm of the Z-plasty.
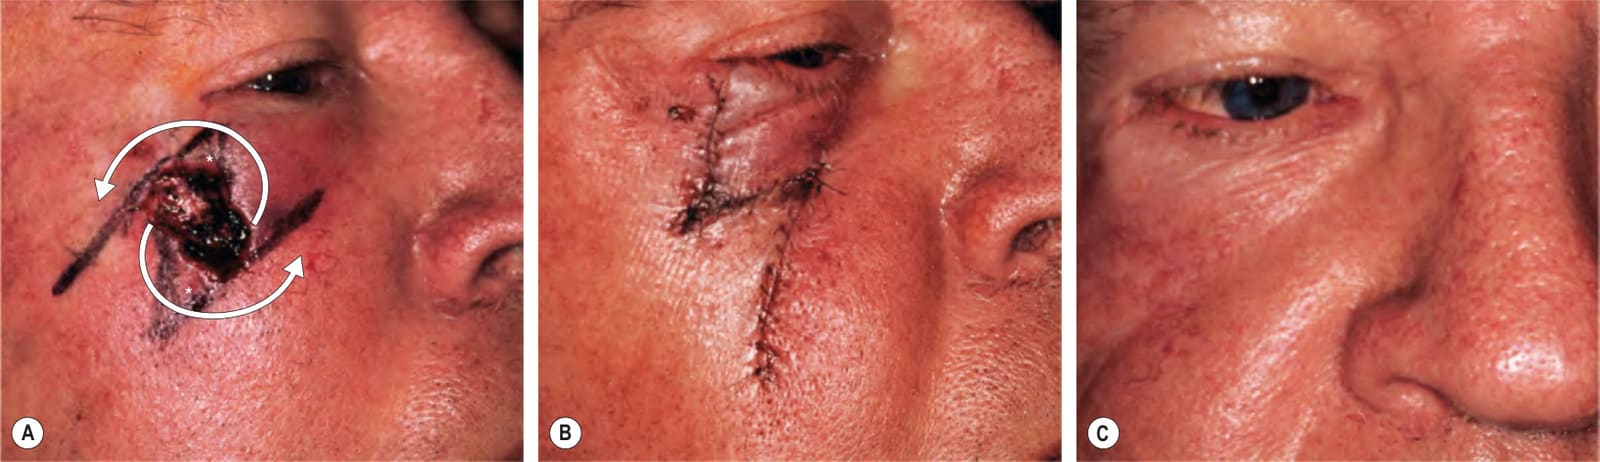
Fig. 147.8 Classic Z-plasty flap.A Defect close to the eyelid margin. The middle arm of this Z-plasty flap is composed of the defect plus the Burow’s triangles excised above and below it to facilitate the transposition of the flaps (*). The medial flap is transposed over the lateral flap (arrows). B The wound is closed via a Z-plasty closure with the transposition of flaps at the upper medial and lower lateral aspects of the wound. This is done to lengthen tissue in the direction of the palpebral margin in order to prevent ectropion as demonstrated at the 4-month postoperative visit (C).
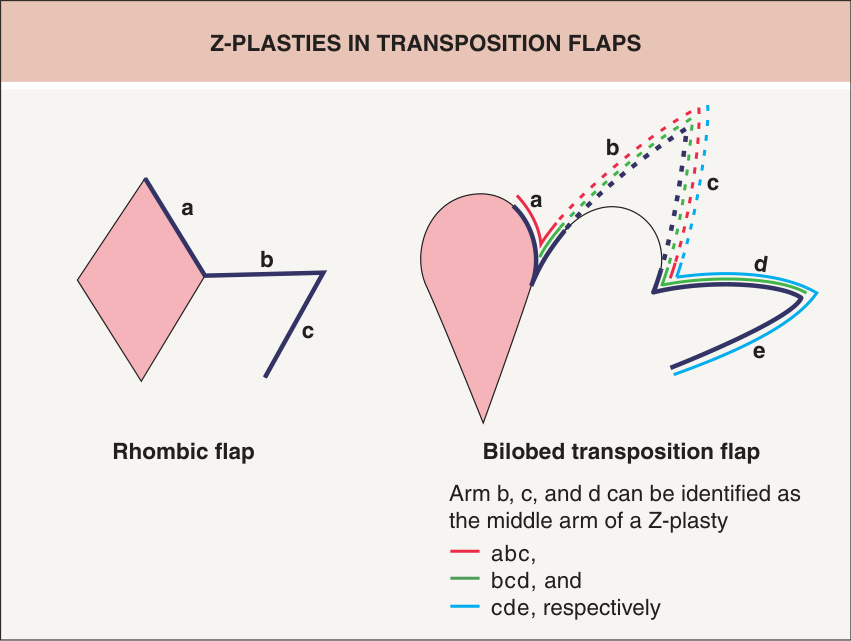
Fig. 147.9 Z-plasties in transposition flaps. Z-plasties are highlighted within the designs of both the rhombic and the bilobed transposition flap. Note in the rhombic flap the middle arm of the Z-plasty is line (b) and is the direction of anticipated tissue lengthening. In the bilobed transposition flap diagram, there is a series of three Z-plasties all contributing to tissue gain in the desired direction of the defect.
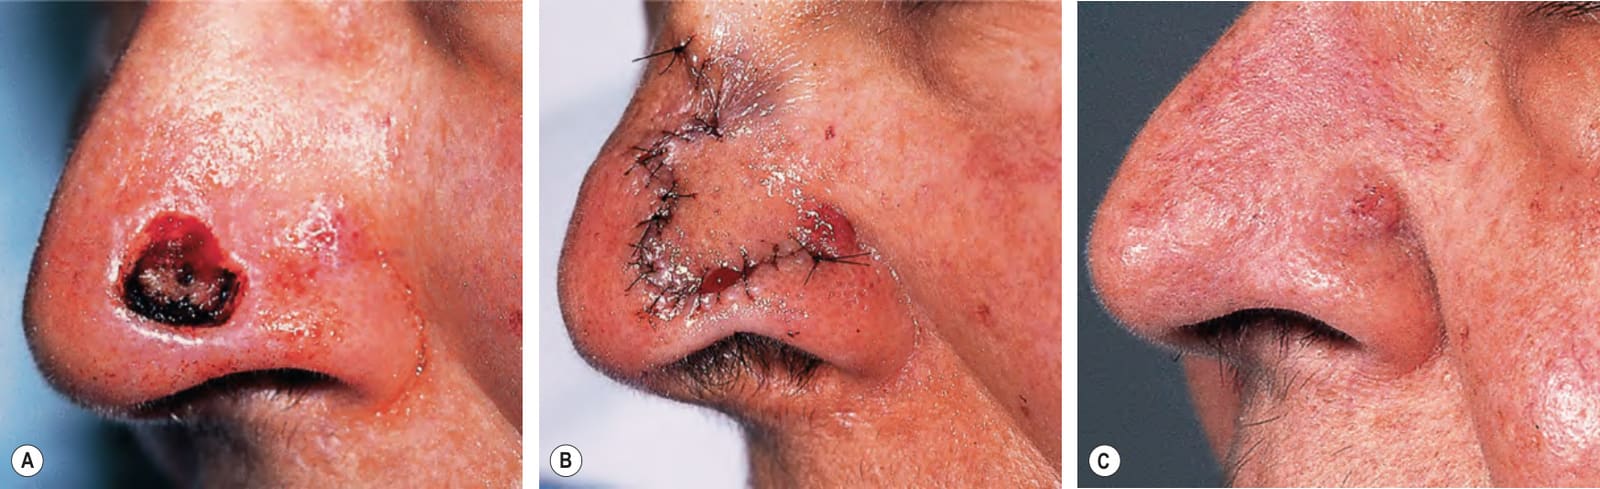
Fig. 147.10 Bilobed flap. A Defect on the nasal tip adjacent to the free margin of the ala. Bilobed flap reconstruction with minimal distortion of the alar rim (B) and long-term result (C).
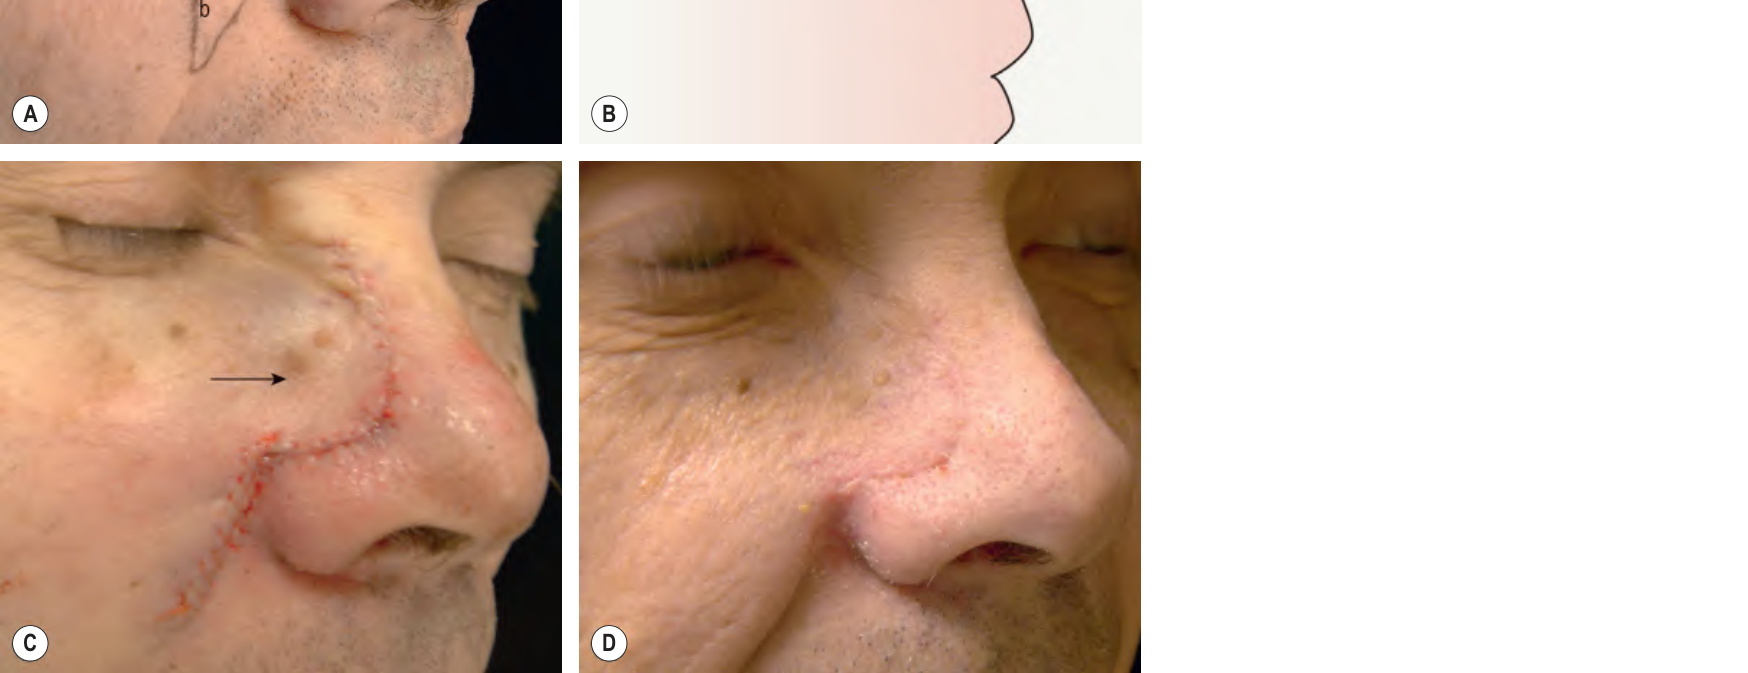
Fig. 147.11 Rotation flap. Large defect (A) on the medial cheek and lower eyelid reconstructed with a rotation flap (Mustarde flap) with displacement of the superior Burow’s triangle laterally along the curvilinear tangent which follows the relaxed skin tension lines (B). C Final results with no distortion of the eyelid and incision lines nicely camouflaged along cosmetic subunit borders and relaxed skin tension lines.
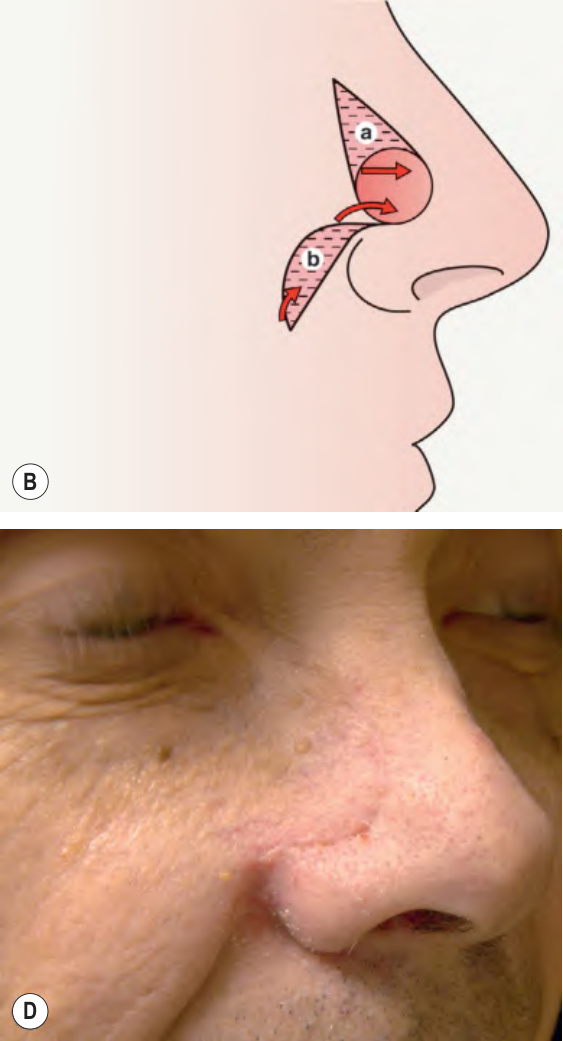
Fig. 147.12 Crescentic advancement flap.A Medium-sized defect on the right inferior nasal sidewall. A single tangent advancement flap (Burow’s flap) is planned with a crescent-shaped Burow’s triangle on the medial cheek. B The crescent (b) fits nicely into the naturally curved anatomic configuration of the alar crease and creates a “wound edges of unequal length” situation which further contributes to the advancement of skin onto the nose. C Flap sutured in place; note the subtle indentation (arrow) that corresponds to a periosteal suture placed at the nasofacial sulcus in order to prevent tenting and to recreate the sulcus. D Four-month postoperative appearance.
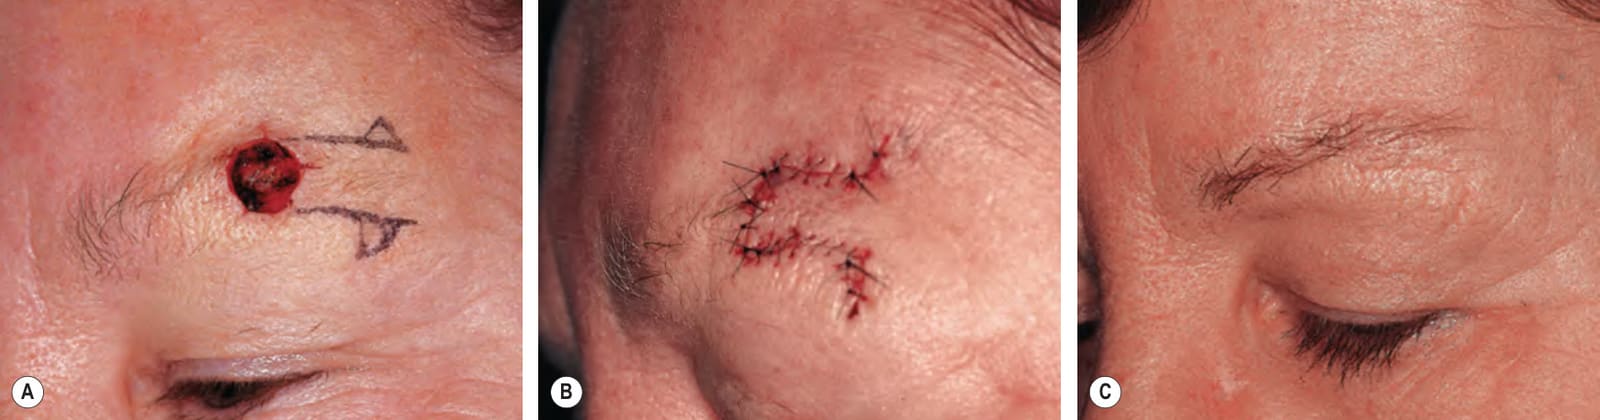
Fig. 147.13 Double tangent advancement flap.A Defect with preoperative plan to advance skin from lateral to the defect, incorporating the residual brow. B Sutured flap realigning the brow. C Six months postoperatively with reconstitution of the brow. This technique was used to reconstruct and preserve the continuity of the eyebrow in this patient.
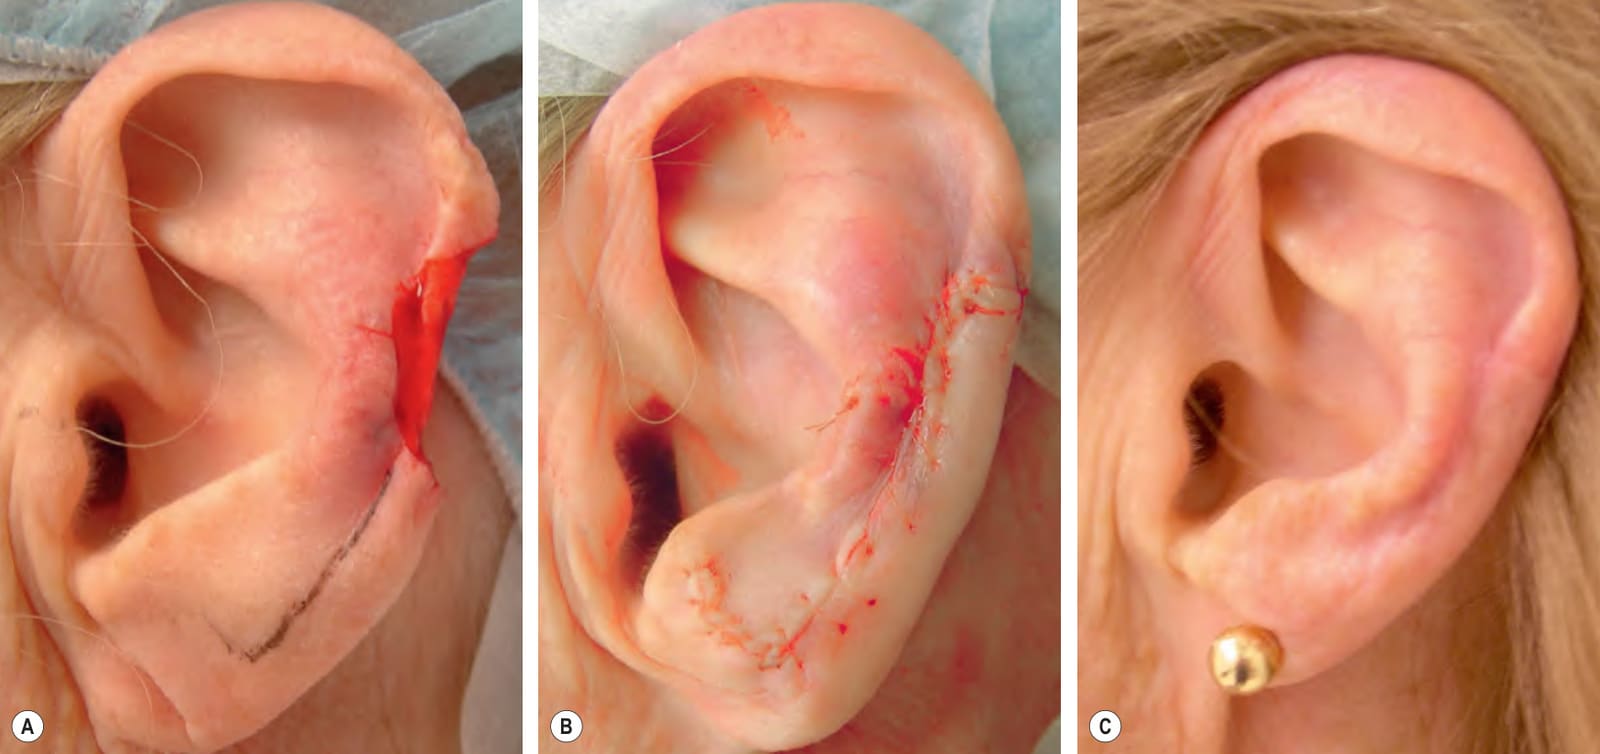
Fig. 147.14 Helical rim advancement flap.A Defect of the mid helix involving a small amount of cartilage. A single tangential incision is planned inferiorly within the helical groove to the earlobe. A Burow’s triangle excision is planned directly behind the defect on the posterior ear. The flap will be raised by dissection of the skin from the posterior ear above the perichondrium. The displaced Burow’s triangle will be removed from the earlobe and the skin of the flap will be redraped through upward advancement into the defect. B The flap is sutured after a very small wedge of cartilage has been removed to reconstitute the helical rim of cartilage. C Three-month postoperative appearance.
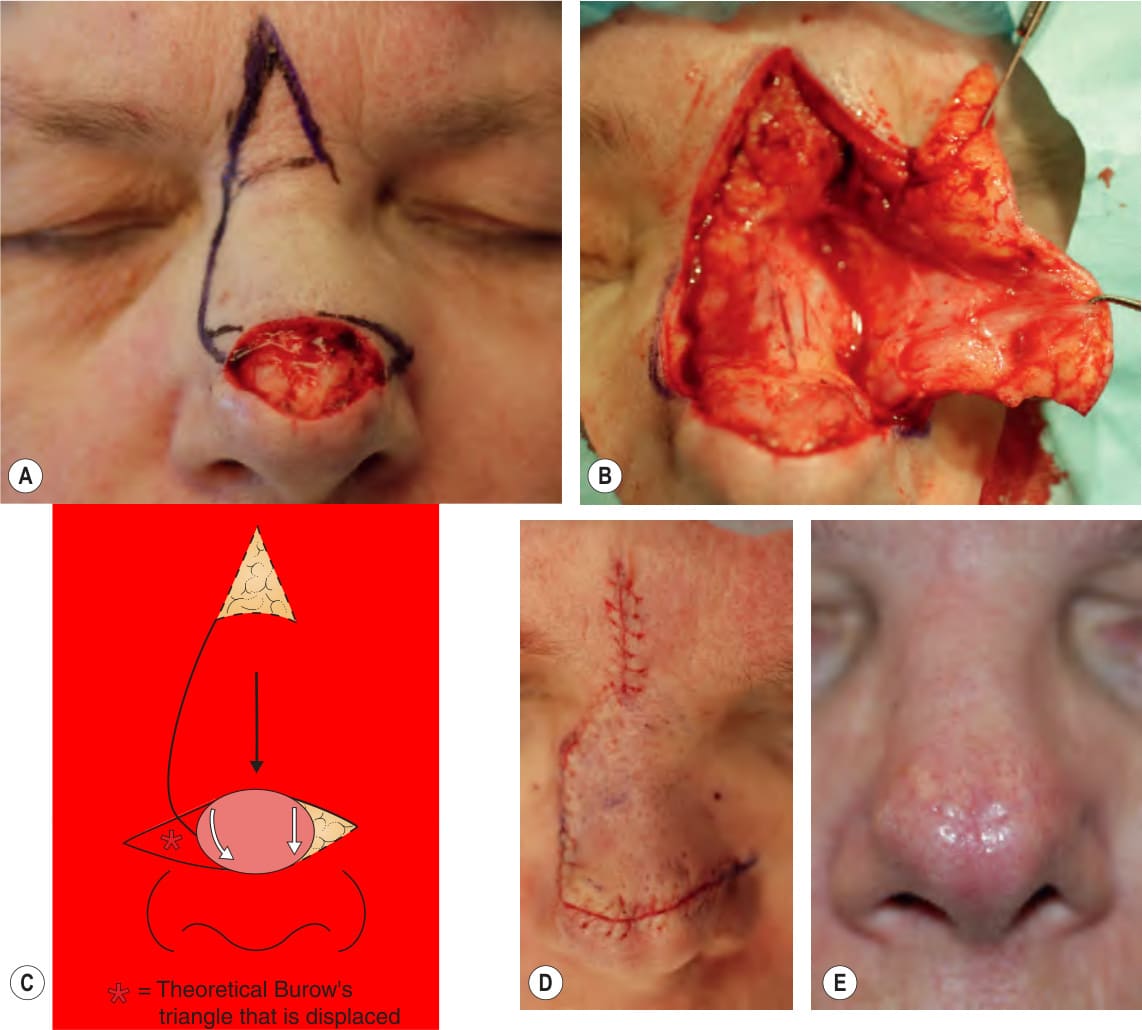
Fig. 147.15 Dorsal nasal (Rieger) flap.A Moderate-sized defect of the nasal tip. B The flap is incised and reflected demonstrating the deep plane of dissection just above the nasal periosteum. The flap will be redraped over the tip of the nose with primary closure of the displaced Burow’s triangle on the glabella. C Displaced Burow’s triangles (*) are depicted as is downward tissue advancement via rotation of nasal tissue on a lateral base. D Flap sutured into place. E Result four months postoperatively.
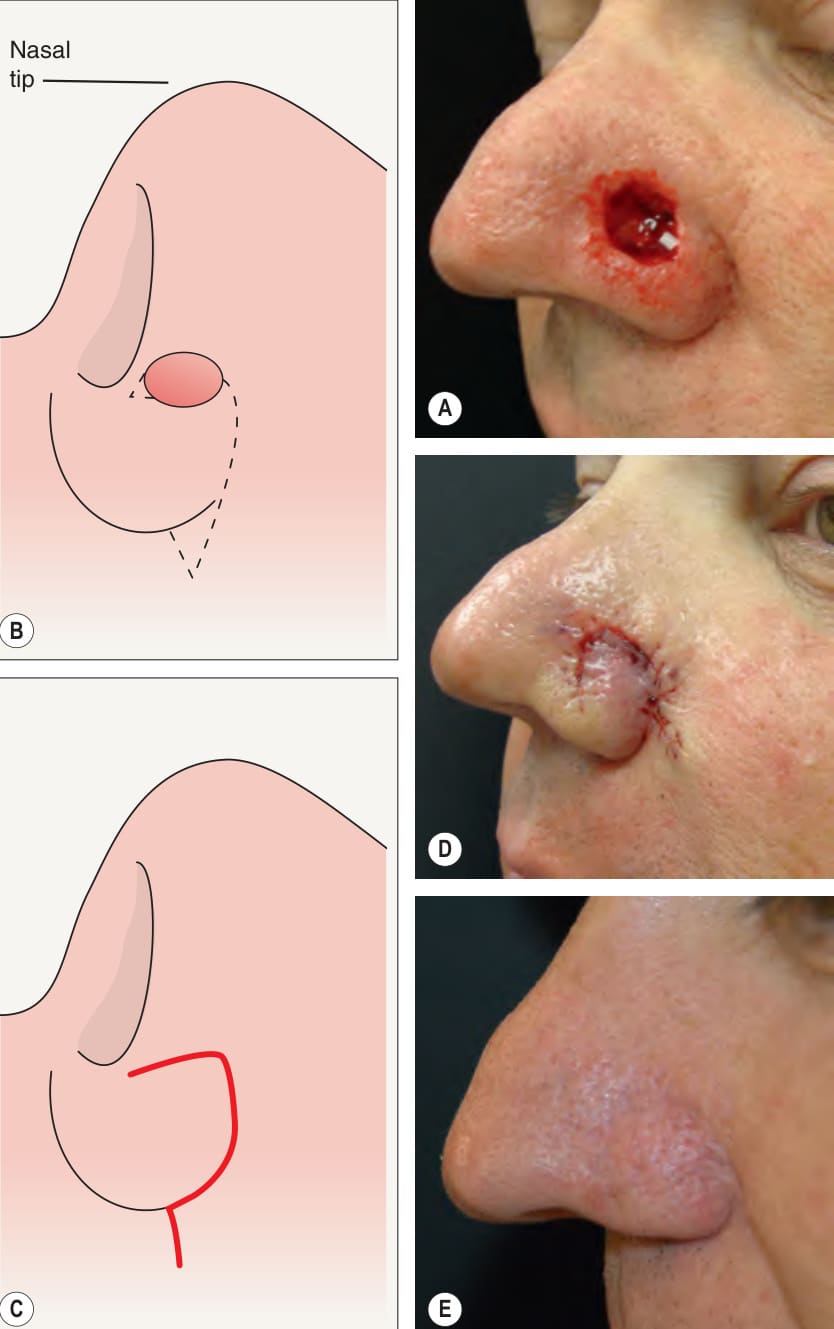
Fig. 147.16 Alar rotation flap (ARF).A These flaps are best suited for mid to medial defects that are <75% of the vertical height of the ala. B The design is a rotation flap with a back-cut incised within the alar crease to the apical triangle at the alar–labial junction. C Closure of the back-cut recreates the crease at the alar–labial junction. D Incorporation of the back-cut skin onto the ala prevents distortion of the ala. E Long-term follow-up.
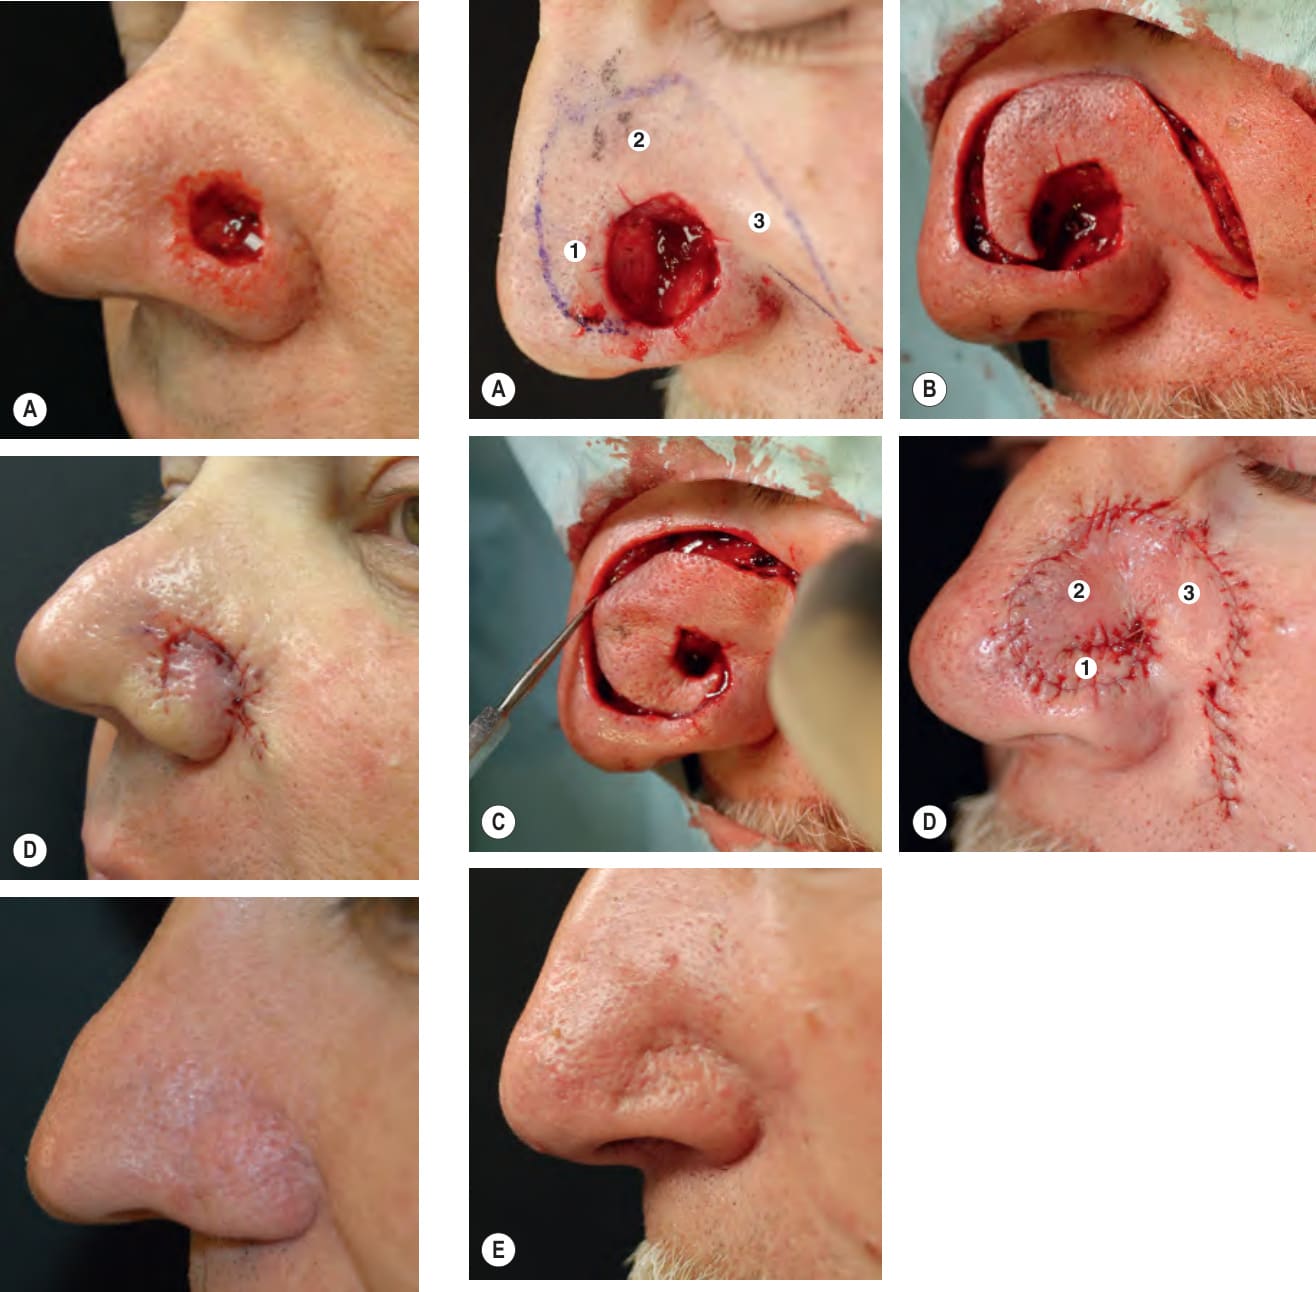
Fig. 147.17 Spiral rotation flap (SRF).A These flaps are well suited for larger defects involving the ala, alar crease, and lower nasal sidewall. The flap (outlined in ink) can be conceptualized as having three parts: (1) the alar portion (equals the size of the alar defect); (2) the body; and (3) the tail; the latter two components equal the size of the entire wound. B Incision of the flap with a back-cut on the medial cheek along the melolabial junction. C After undermining, with the flap base created at the inner aspect of the spiral flap, demonstration of the spiral rotation of the flap into the alar portion of the defect. D Sutured flap. E Three-month follow-up.
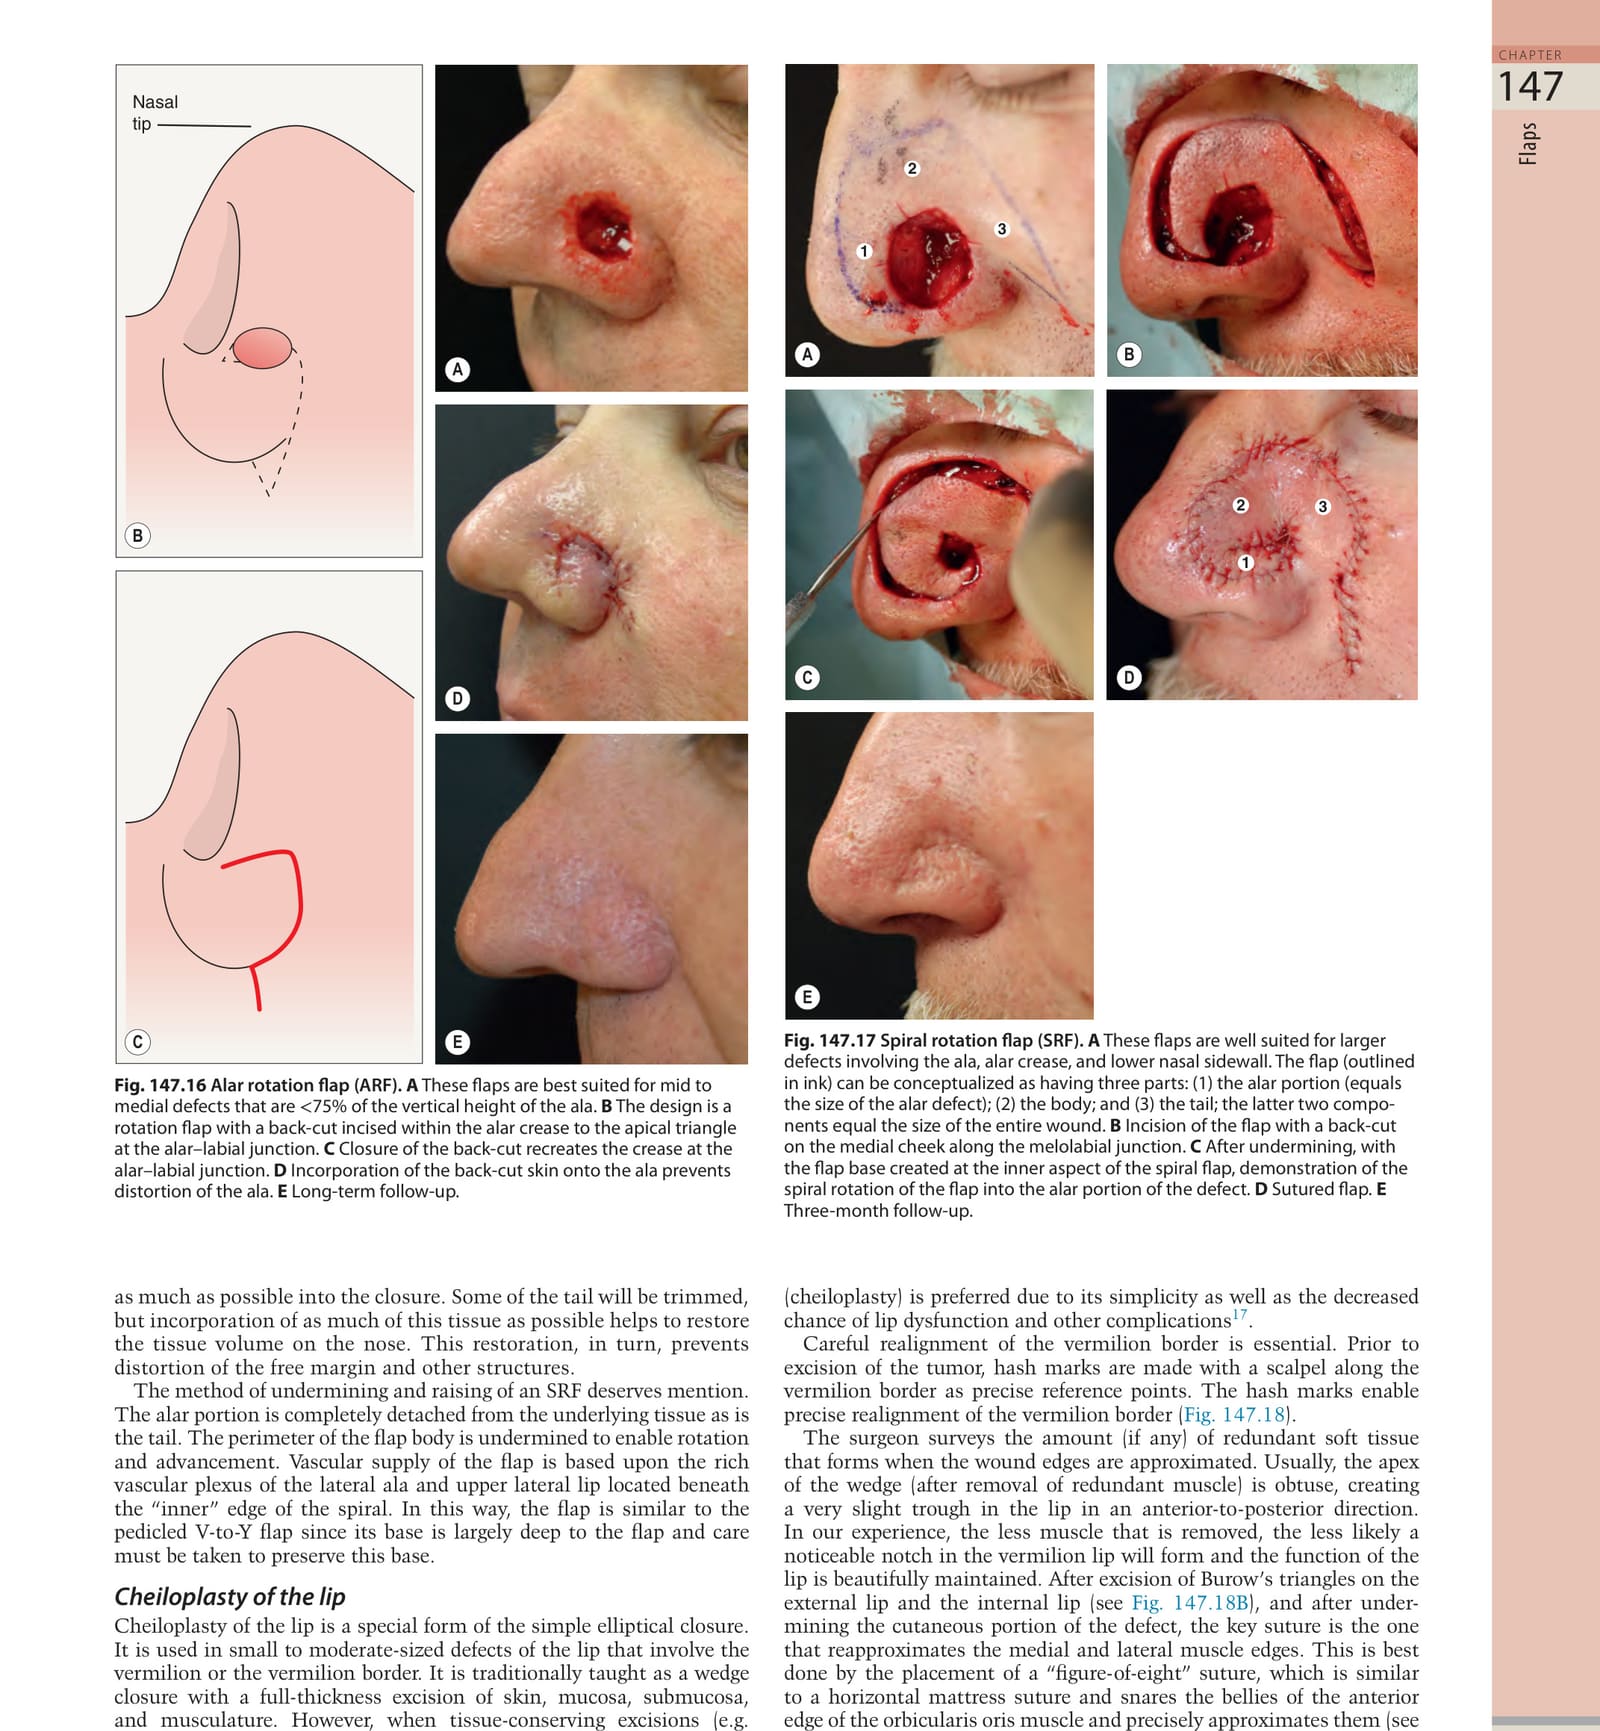
Fig. 147.18 Wedge closure of the lip.A Typical defect after Mohs surgical excision of a squamous cell carcinoma. Note indelible ink lines and nicks in the skin that demarcate the vermilion border, facilitating precise realignment. B Burow’s triangles are excised intraorally and extraorally perpendicular to the vermilion border. After determining the minimal amount of muscle that must be removed to avoid excessive redundancy when the wound edges are approximated, an obtuse wedge of muscle is removed. C The anterior margin of the orbicularis oris muscle is identified medially and laterally. A “figure-of-eight” stitch is placed to reapproximate the muscle margins. D “Figure-of-eight” suture in place prior to reapproximation of muscle edges. E Realignment of the anterior edge of the orbicularis oris muscle. F Wound closure prior to the placement of superficial epidermal sutures. Note the near perfect realignment of the vermilion border and the well-proportioned recapitulation of the lower lip.
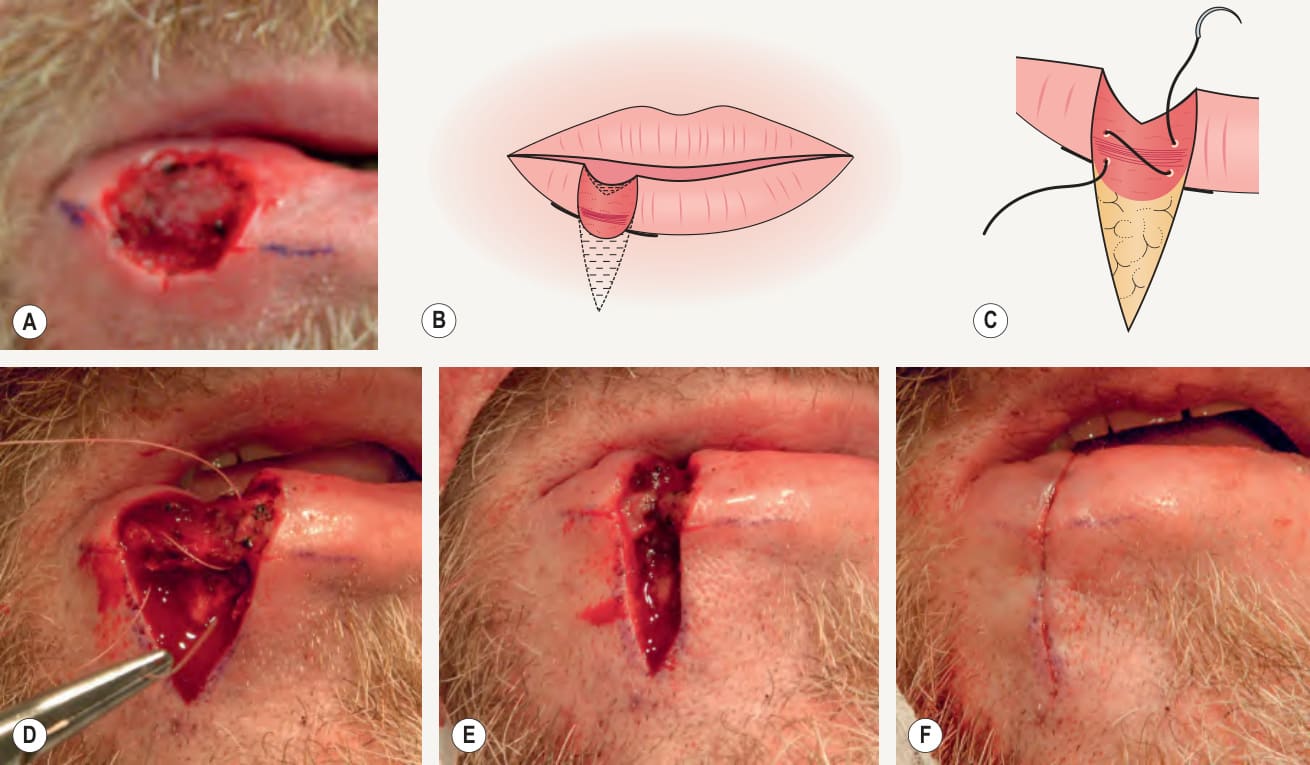
Fig. 147.18 Wedge closure of the lip.A Typical defect after Mohs surgical excision of a squamous cell carcinoma. Note indelible ink lines and nicks in the skin that demarcate the vermilion border, facilitating precise realignment. B Burow’s triangles are excised intraorally and extraorally perpendicular to the vermilion border. After determining the minimal amount of muscle that must be removed to avoid excessive redundancy when the wound edges are approximated, an obtuse wedge of muscle is removed. C The anterior margin of the orbicularis oris muscle is identified medially and laterally. A “figure-of-eight” stitch is placed to reapproximate the muscle margins. D “Figure-of-eight” suture in place prior to reapproximation of muscle edges. E Realignment of the anterior edge of the orbicularis oris muscle. F Wound closure prior to the placement of superficial epidermal sutures. Note the near perfect realignment of the vermilion border and the well-proportioned recapitulation of the lower lip.
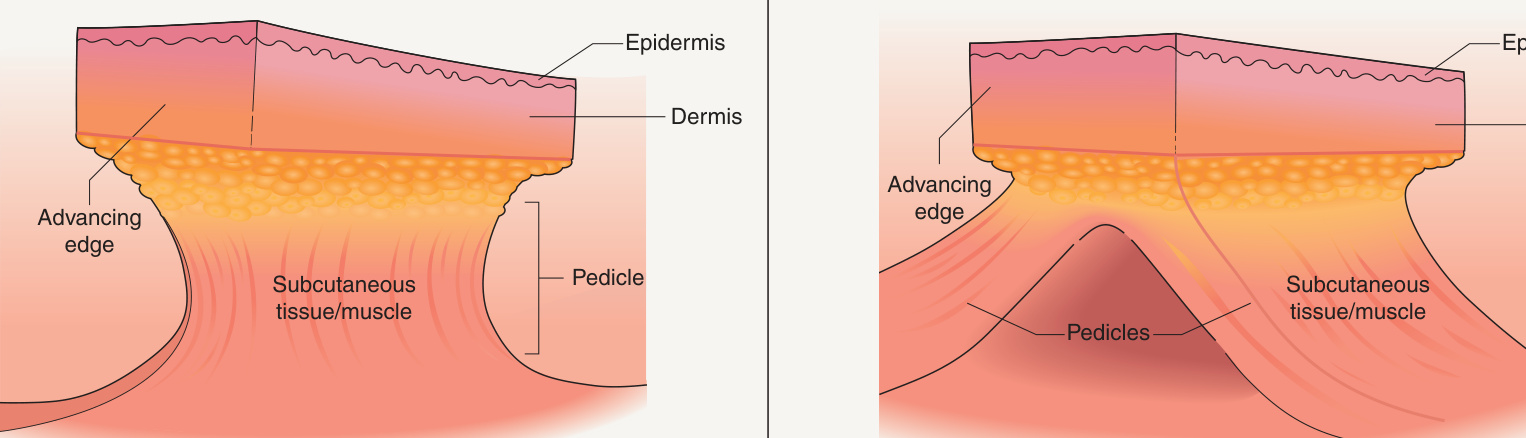
Fig. 147.19 The pedicled V-to-Y flap.A Vascular pedicle derived immediately beneath the island of skin. B Vascular pedicles derived from tissue lateral to the island of skin.
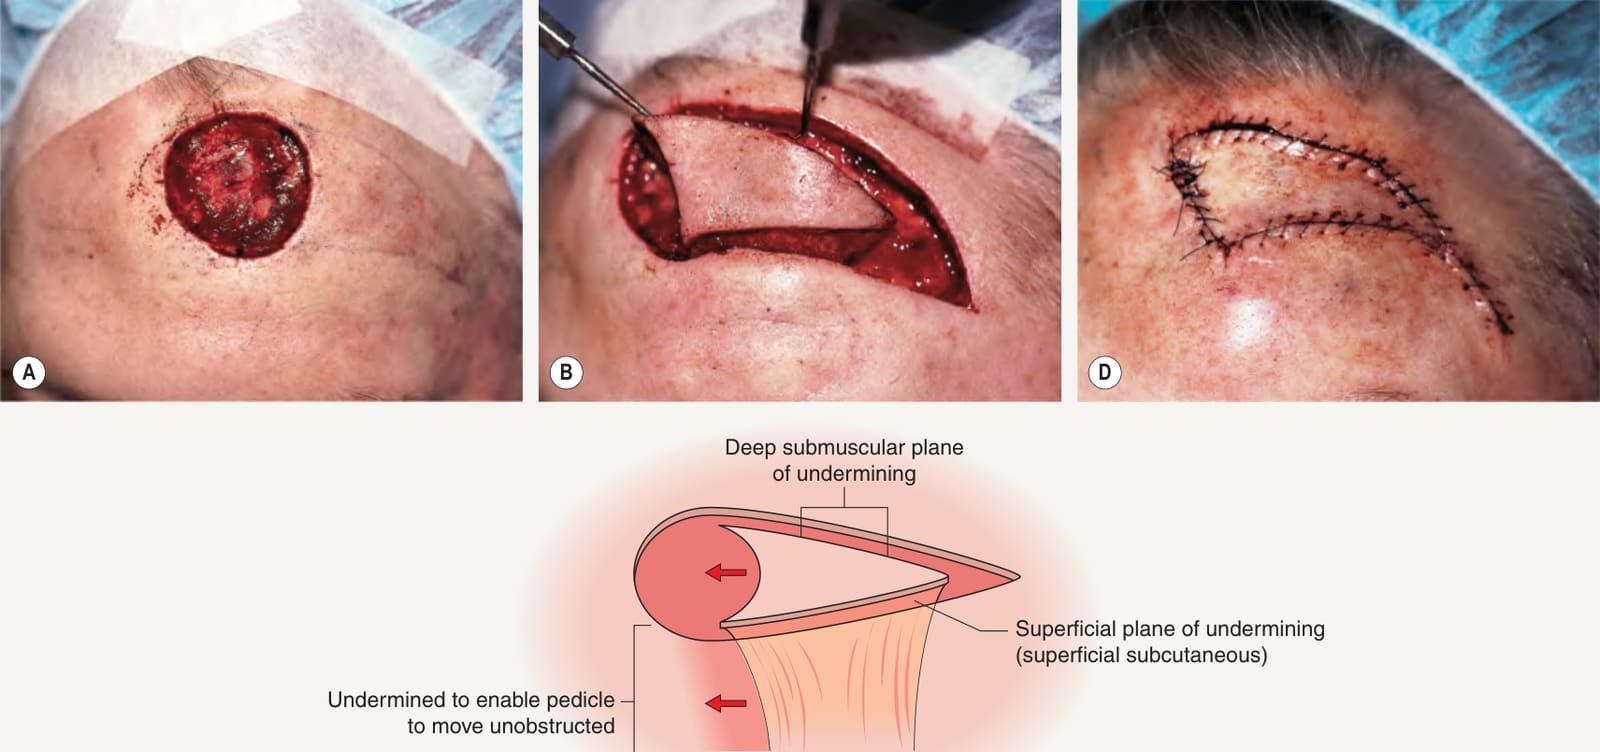
Fig. 147.20 The pedicled V-to-Y flap.A Large mid-upper forehead defect. B Intraoperatively, the pedicled V-to-Y flap is designed with a single inferior muscular pedicle based on the rich blood supply of the supratrochlear and supraorbital arteries. C The frontalis muscle serves as the inferiorly based pedicle for the flap. This muscular pedicle is constructed via undermining in the subcutis beginning at the lower edge of the flap (superficial plane) and undermining in the submuscular plane which is begun at the superior edge of the flap (deep plane). The skin medial to the pedicle must also be undermined to facilitate its advancement in the direction of the defect. D The defect is now comprised of acute angles which are easier to close primarily.
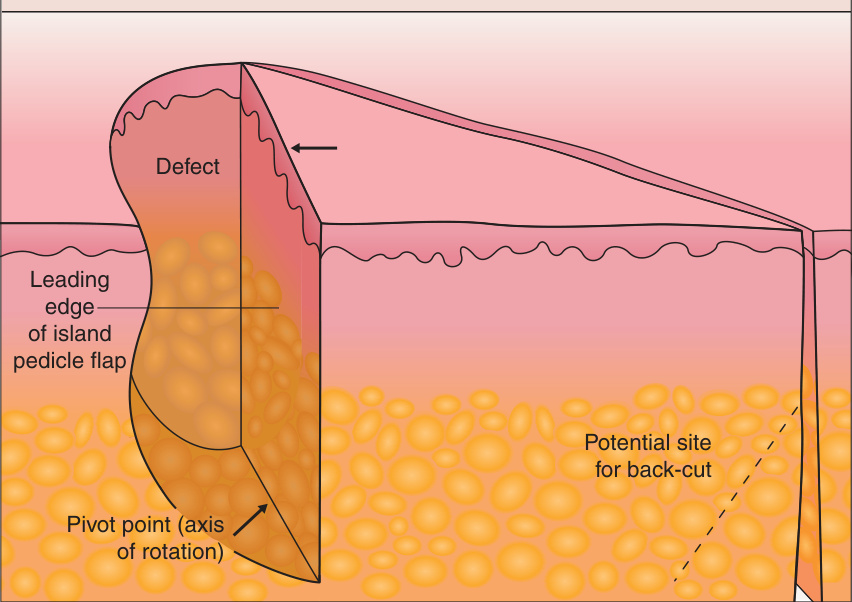
Fig. 147.21 Rotation flap analogy for the pedicled V-to-Y flap.A A rotation flap with standard removal of a Burow’s triangle adjacent to the defect and the site of a potential back-cut which would facilitate flap movement. B Side view of a defect and the pedicled V-to-Y flap. The plane of rotation is perpendicular to the skin surface. The shaded area is where the equivalent of a Burow’s triangle has been removed to facilitate flap movement. The dotted line is analogous to the back-cut of a rotation flap. Note the similarities between a rotation flap and the pedicled V-to-Y flap.
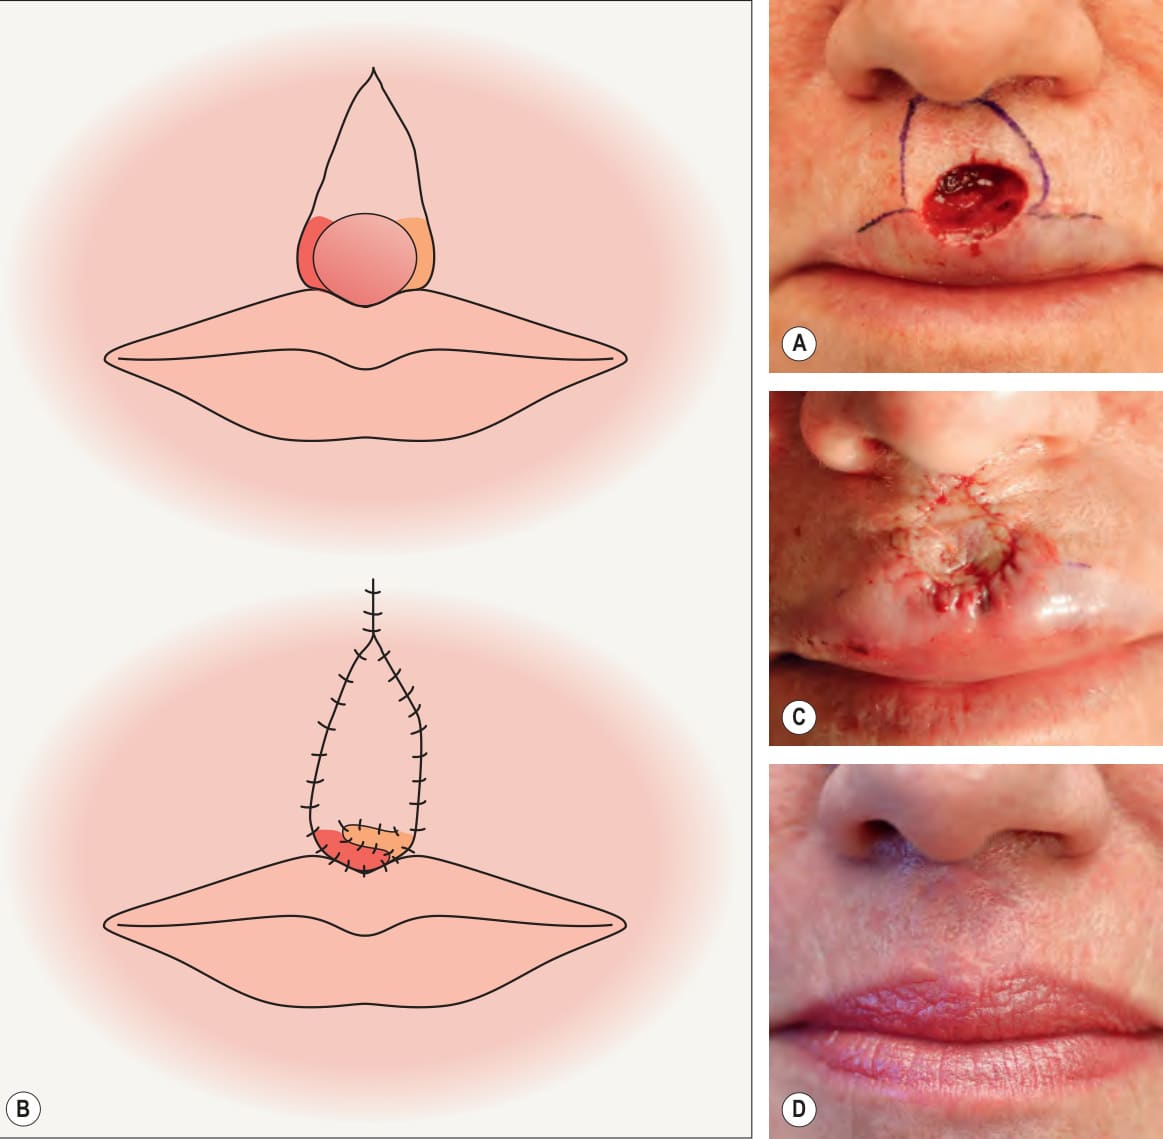
Fig. 147.22 Pincer flap.A This variant is site-specific for the cupid’s bow. B The pedicled V-to-Y flap with pincer-like extensions on the lateral edges of the defect (shading). These “pincers” are folded upon one another to recreate the teardrop shape of the philtrum and cupid’s bow. C Pincer flap sewn into place with side-lighting to show the recreation of the concavity of the philtrum at the cupid’s bow. D Four-month follow-up.
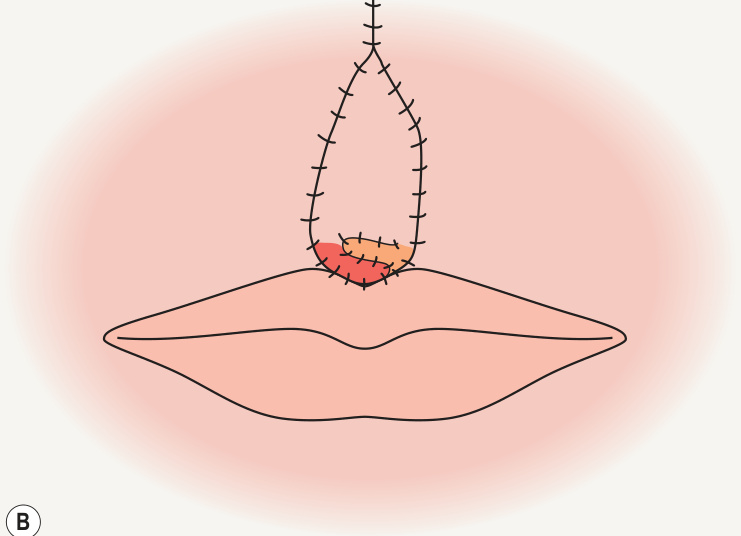
Fig. 147.23 Variants of the rhombic flap.A The Limberg flap is the standard rhombic flap. B The modifications of Dufourmentel. C The Webster 30° modification of the rhombic flap.
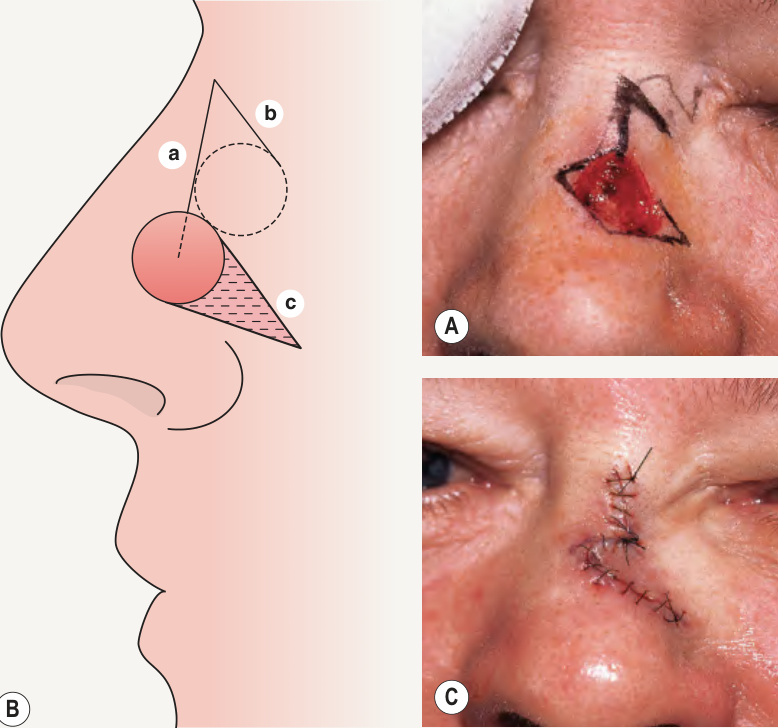
Fig. 147.24 Rhombic transposition flap on the upper lateral nose.A, B Key to the correct design of this flap is identification of the center point of the defect. The first incision for the flap is made in a line (a) along a vector radiating from the central point into the donor skin. The second incision (b) is made at an angle between 45° and 60° to this radiating incision, keeping in mind that the width of the flap must equal the width of the defect. Next, a 30° Burow’s triangle is excised such that the flap side of the incision (c) is parallel to the lateral edge of the rhombic flap (b). C The tip of the flap is trimmed to fit the defect and the wound edges are sutured.
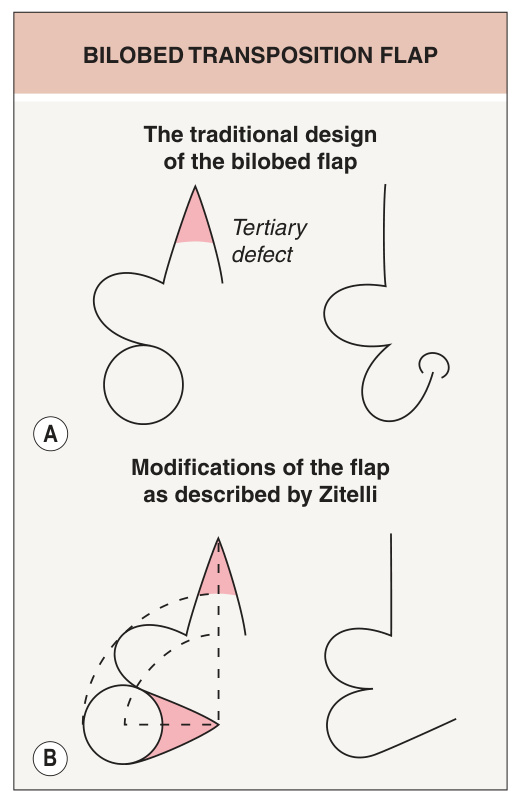
Fig. 147.25 Bilobed transposition flap.A The traditional design of the bilobed flap results in tissue protrusion at the pivot point. B Modifications of the bilobed flap as described by Zitelli.
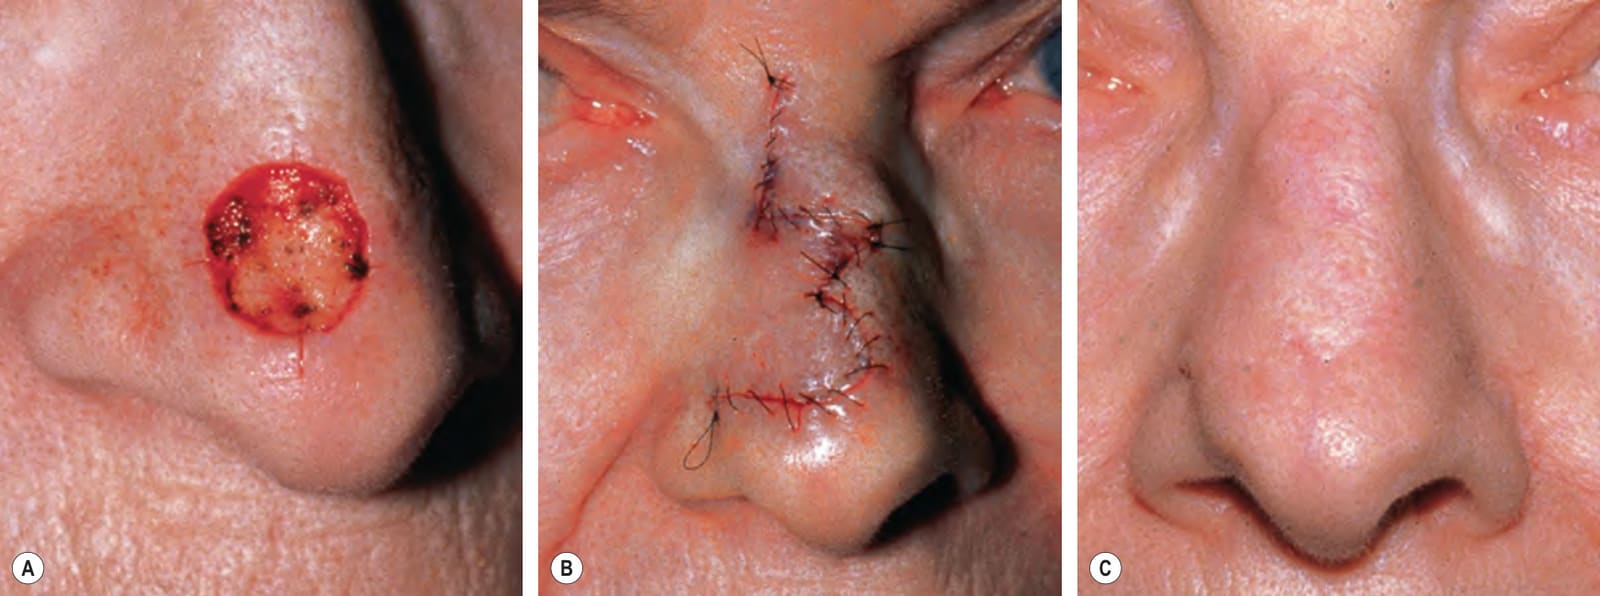
Fig. 147.26 Bilobed flap.A Distal nose defect. B Defect reconstructed with a bilobed transposition flap. C Cosmetic result at 1 year postoperatively.
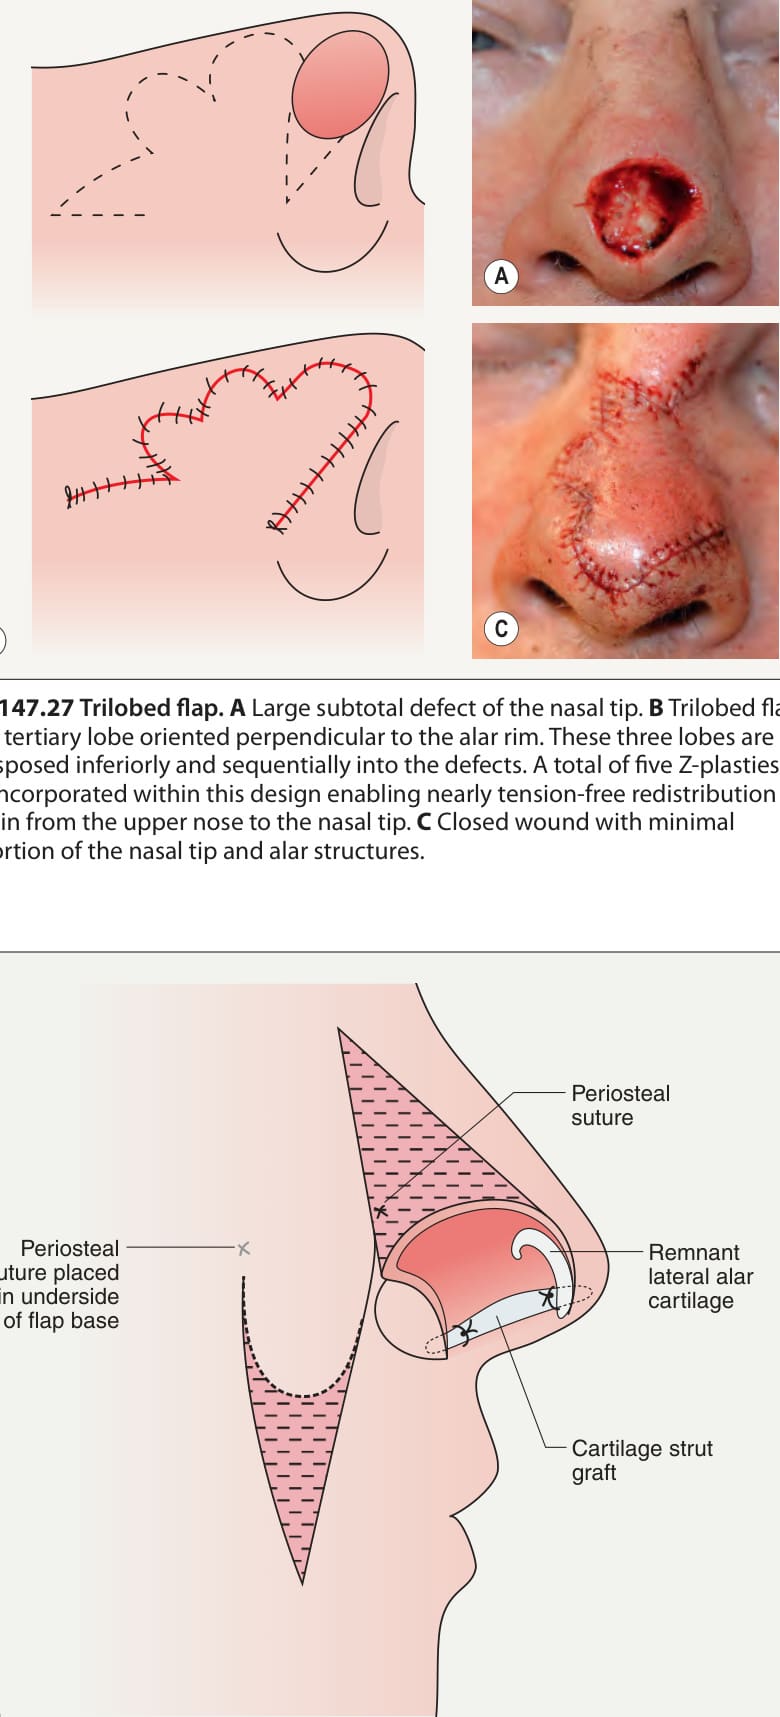
Fig. 147.27 Trilobed flap.A Large subtotal defect of the nasal tip. B Trilobed flap with tertiary lobe oriented perpendicular to the alar rim. These three lobes are transposed inferiorly and sequentially into the defects. A total of five Z-plasties are incorporated within this design enabling nearly tension-free redistribution of skin from the upper nose to the nasal tip. C Closed wound with minimal distortion of the nasal tip and alar structures.
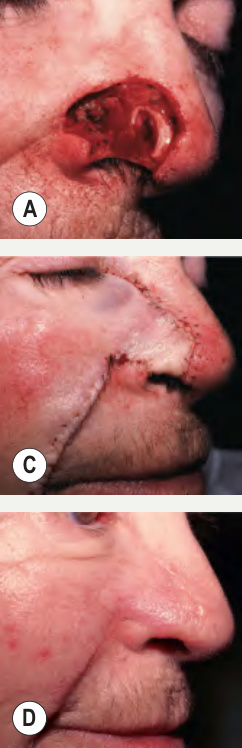
Fig. 147.28 Nasolabial transposition flap.A Large nasal defect involving loss of cartilage and extending to the intranasal skin. B Excision of a Burow’s triangle on the nasal sidewall is oriented towards the medial canthal tendon. The lateral incision of the flap should extend no higher than the apex of alar skin over which the flap is to be transposed. In this case, an auricular cartilage strut graft is placed along the alar rim and inserted into medial and lateral dermal pockets and anchored with deep sutures into the wound base. The points of placement of the periosteal sutures into the undersurface of the advancing flap are indicated with an X. The distal flap is aggressively defatted. C The flap is trimmed to fit the defect, wrapped around the alar rim and folded onto itself, reforming the rim. D Cosmetic result at 6 months postoperatively.
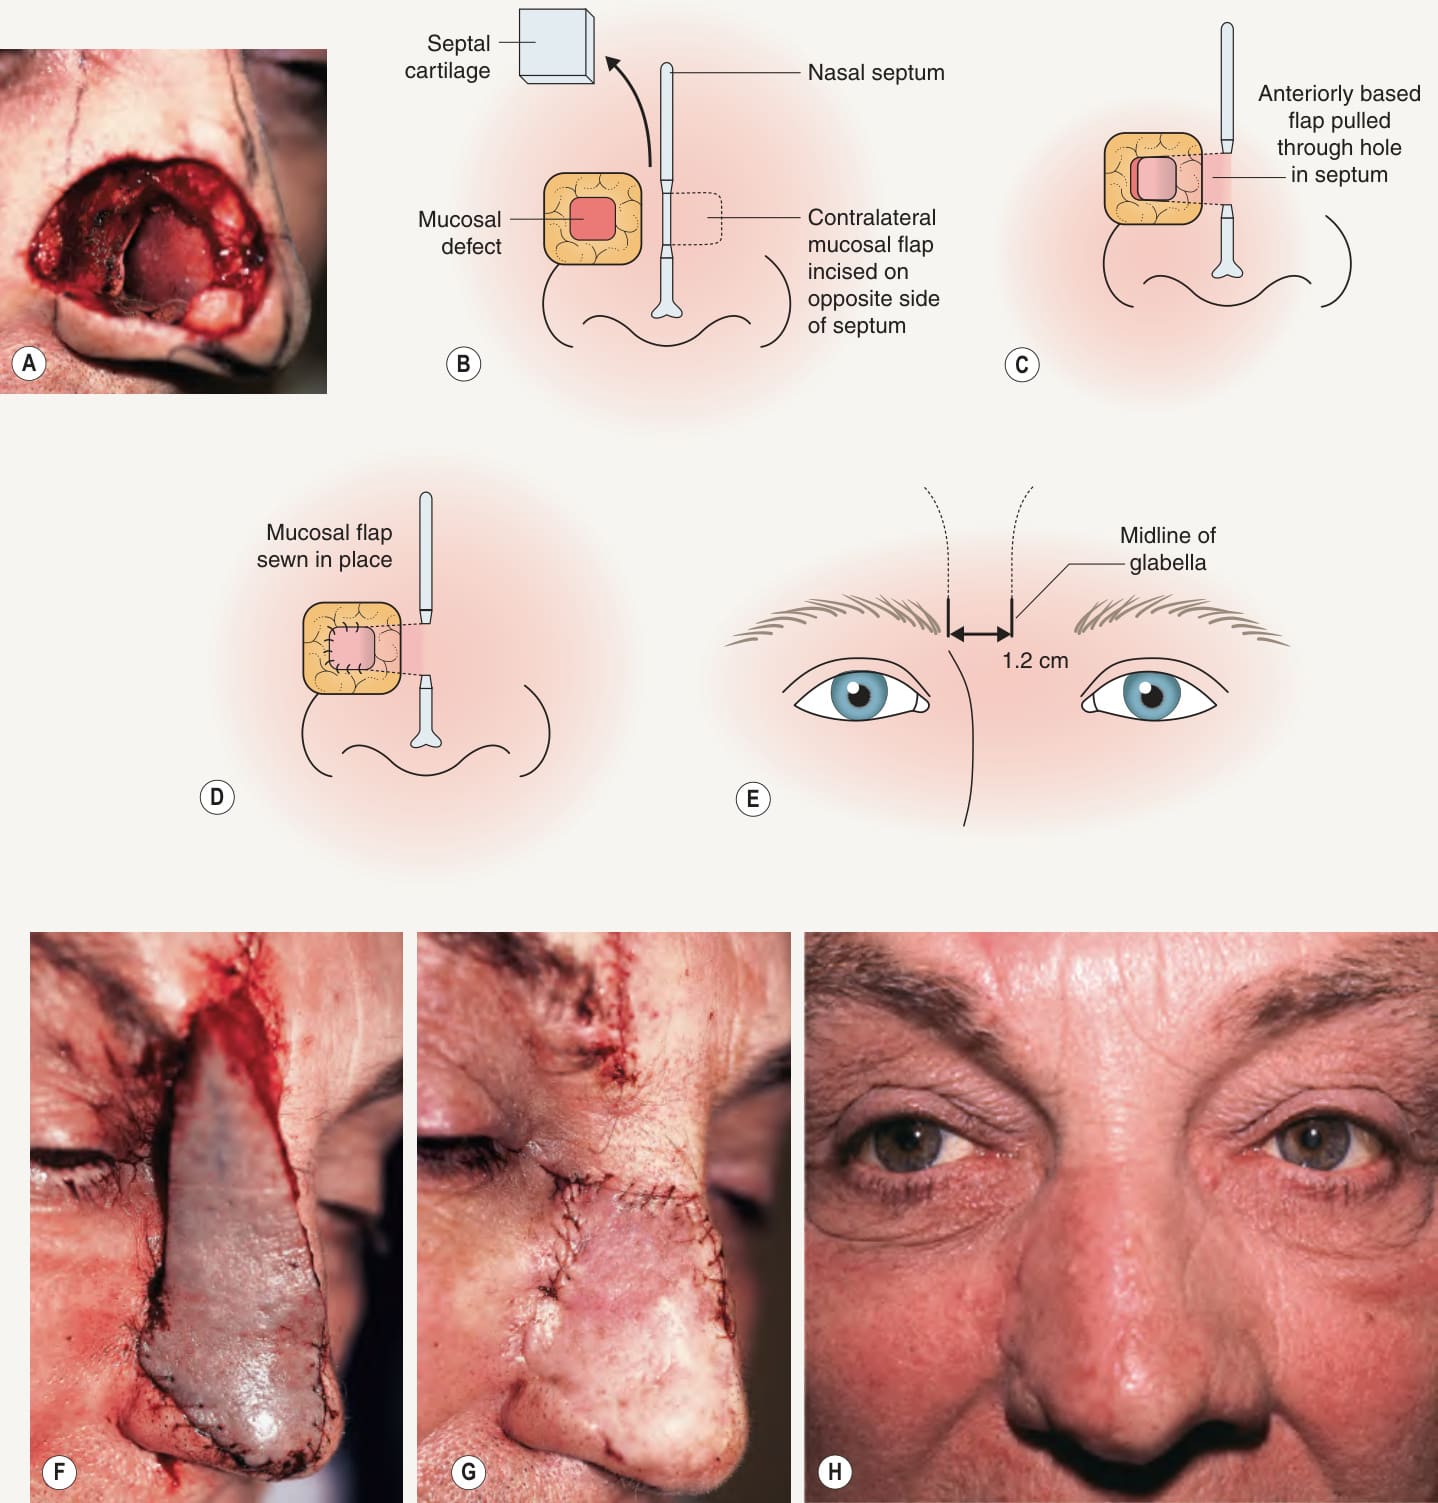
Fig. 147.29 Paramidline forehead flap.A Large full-thickness defect of the right half of the distal nose. B The mucosal defect is reconstructed with a contralateral septal mucosal pull-through flap. A U-shaped incision is made in the contralateral septal mucosa, based anteriorly and correctly sized to cover the defect. In addition, a 15 mm2 cartilage graft is harvested from the nasal septum and used to reconstitute the structural integrity of the nasal sidewall. (Note that the remainder of the nasal sidewall cosmetic subunit and the right nasal tip subunit will be excised prior to reconstruction with the forehead flap.) C The mucosal flap is delivered through the septal defect into the right nasal vestibule. D The mucosal flap is sutured into place. E The design of the pedicle uses the midline of the glabella as the medial incision point; the lateral incision is made 1.2 cm lateral to the midline. Using a template, the forehead flap is then incised and raised on this 1.2 cm-wide pedicle. F Immediately postoperatively. G Immediately after takedown of flap 3 weeks later. H Early cosmetic results with no revision 2 months postoperatively.
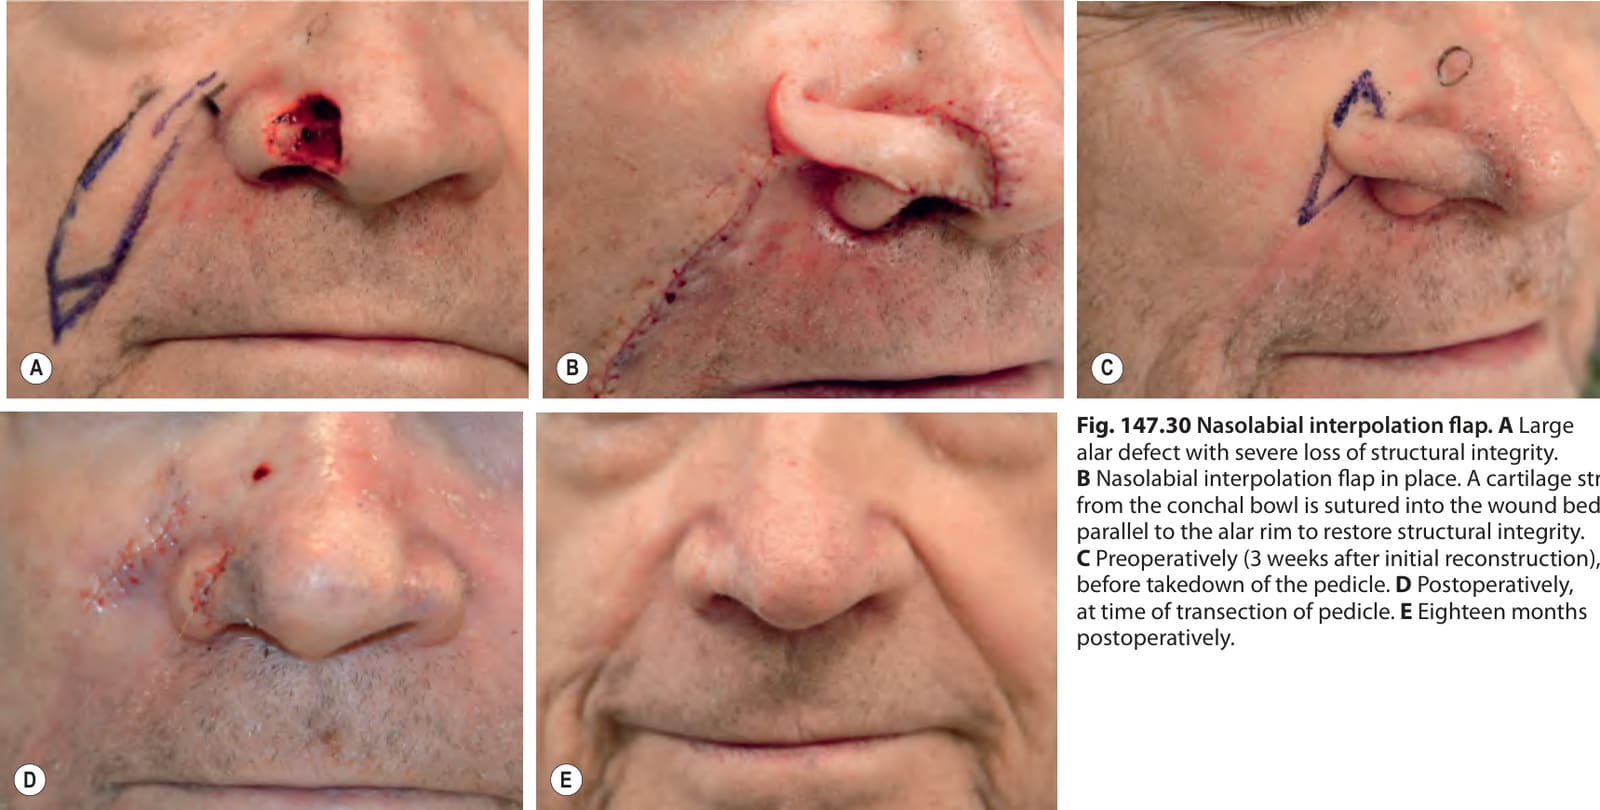
Fig. 147.30 Nasolabial interpolation flap.A Large alar defect with severe loss of structural integrity. B Nasolabial interpolation flap in place. A cartilage strut from the conchal bowl is sutured into the wound bed parallel to the alar rim to restore structural integrity. C Preoperatively (3 weeks after initial reconstruction), before takedown of the pedicle. D Postoperatively, at time of transection of pedicle. E Eighteen months postoperatively.
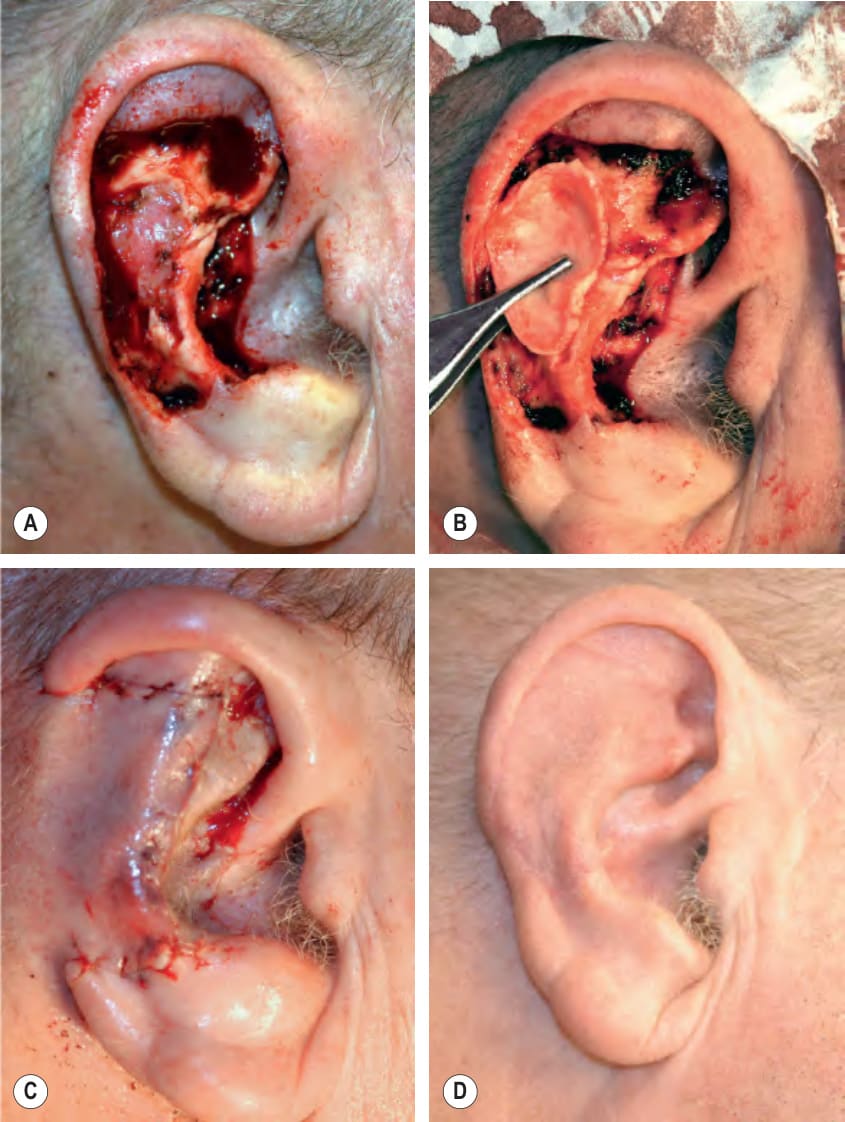
Fig. 147.31 Retroauricular flap.A Large defect of the anterior ear including substantial loss of cartilage of the mid antihelix and helical rim. B A cartilage graft harvested from the contralateral conchal bowl is used to restore structural integrity of the infrastructure of the auricle. C Closure of the retroauricular flap with resurfacing of the helix and antihelix. A split-thickness skin graft is used to resurface the crus of the antihelix and a portion of the conchal bowl. The pedicle from the retro auricular skin will be divided at 3 weeks. D Reconstructive results at 4 months.
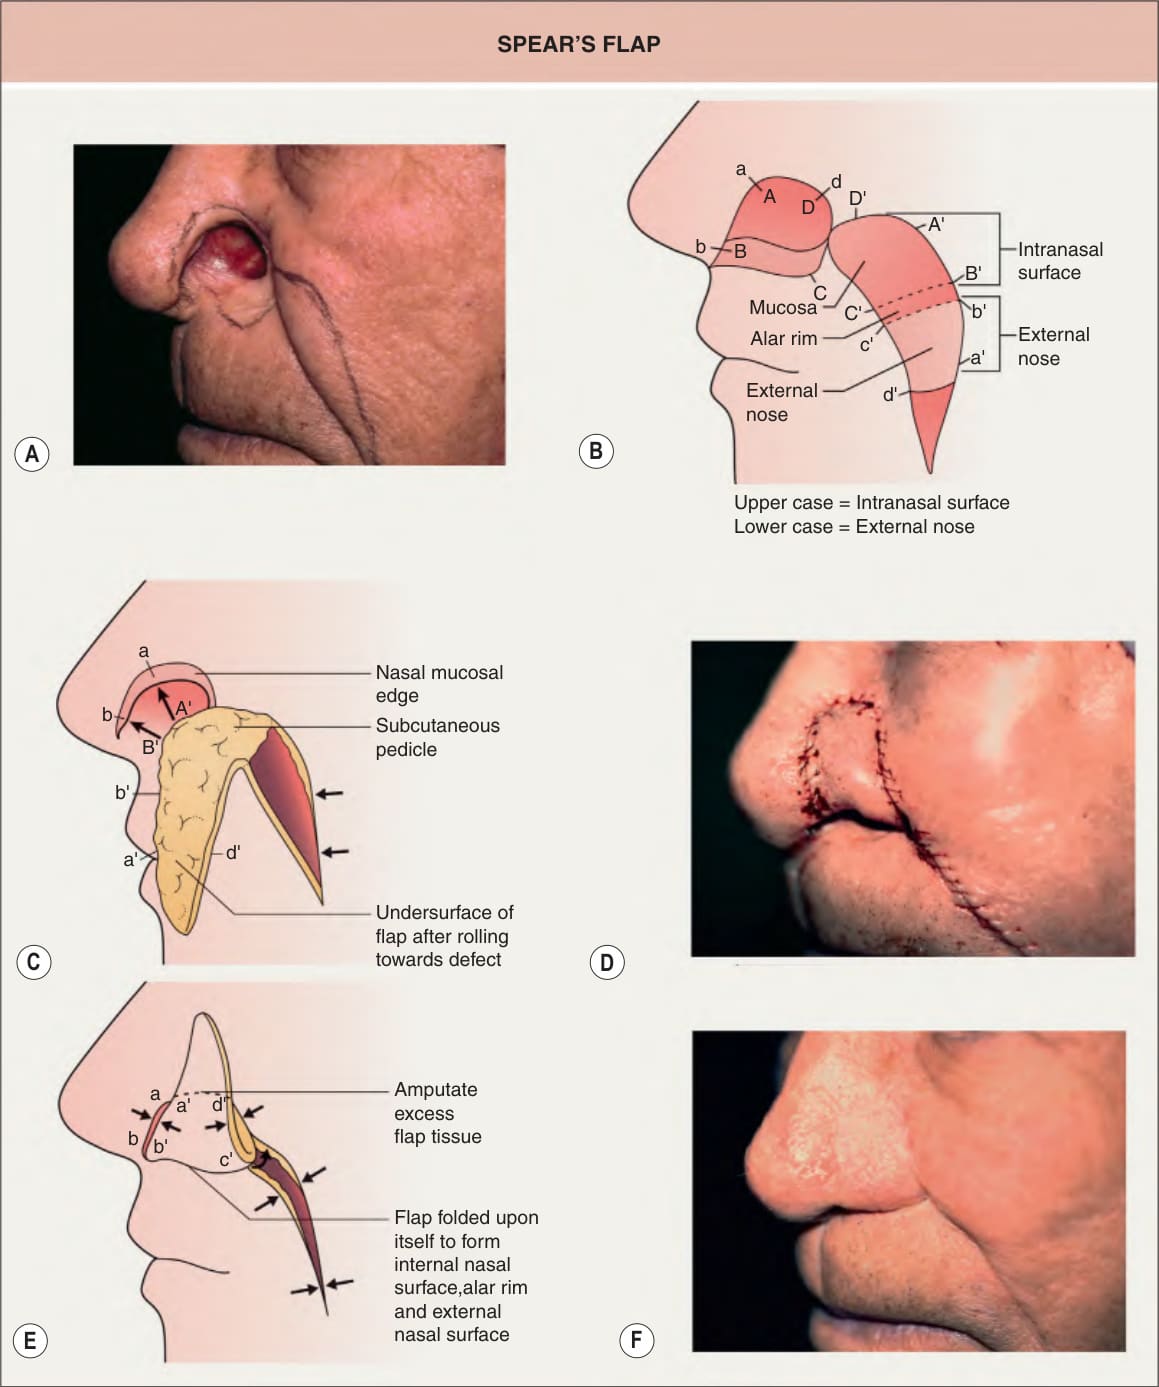
Fig. 147.32 Spear’s flap.A Nasal defect involving the entire nasal ala and a portion of the nasal sidewall with the plans marked for a nasolabial transposition flap with a twist as described by Spear. B Flap incised prior to rolling towards defect. C Initial movements of flap. D Flap in place having been twisted on a subcutaneous pedicle sutured into the mucosal side of the defect and folded upon itself followed by suturing of the cutaneous side of the defect. E Corresponding schematic demonstrating placement of the flap and amputation of the distal portion. F Early results after second revision.
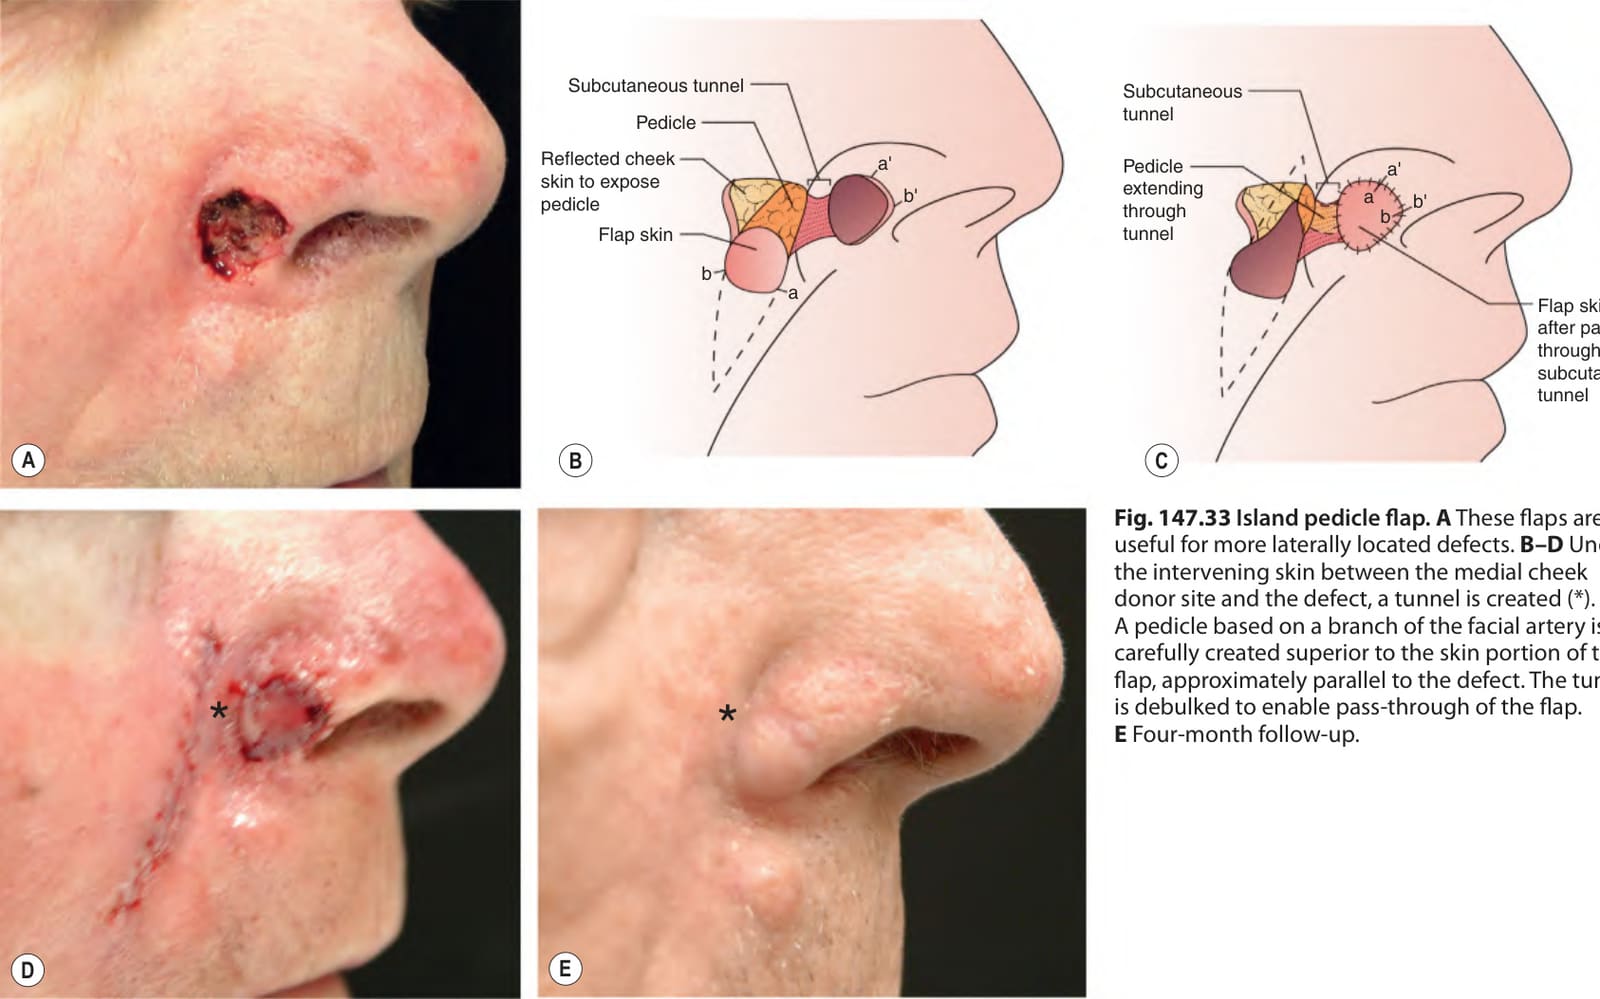
Fig. 147.33 Island pedicle flap.A These flaps are useful for more laterally located defects. B–D Under the intervening skin between the medial cheek donor site and the defect, a tunnel is created (*). A pedicle based on a branch of the facial artery is carefully created superior to the skin portion of the flap, approximately parallel to the defect. The tunnel is debulked to enable pass-through of the flap. E Four-month follow-up.
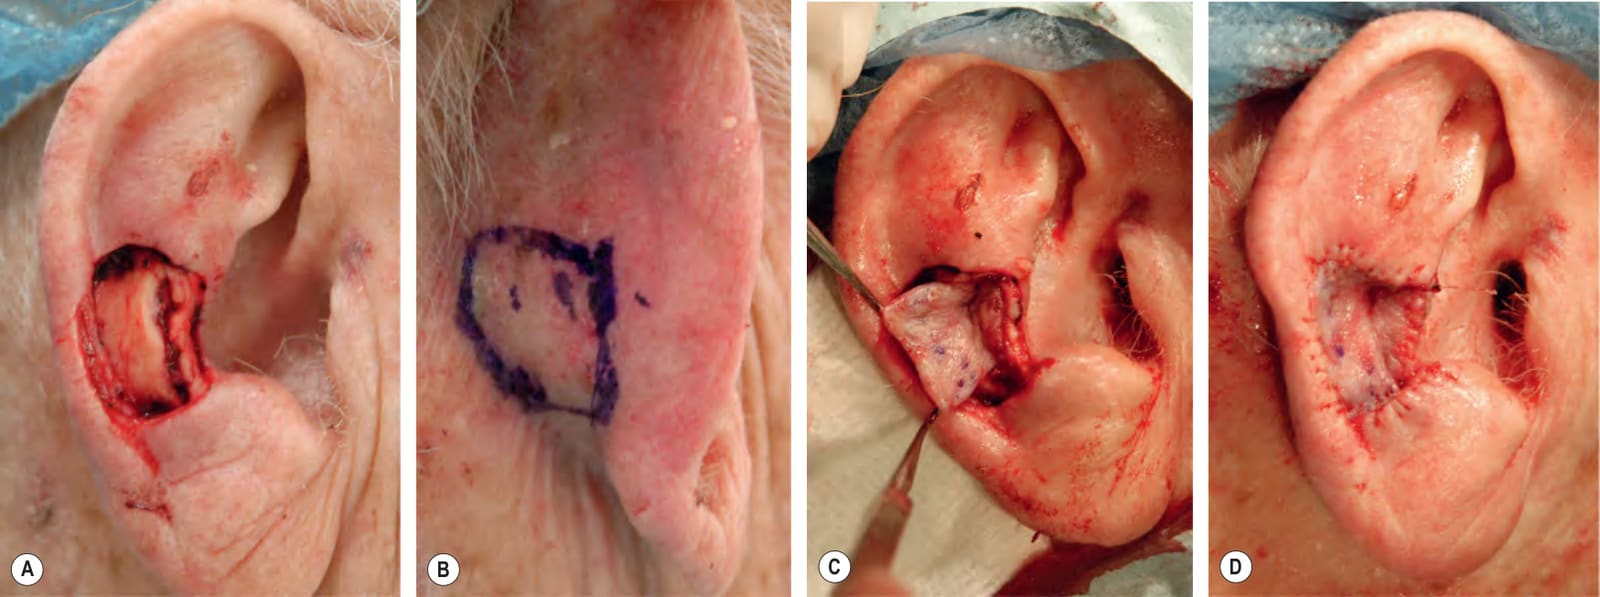
Fig. 147.34 Retroauricular pull-through flap (flip-flop flap).A This flap is ideally suited for large deep defects of the anterior ear, especially when cartilage is lost or compromised. B The donor site is designed for a book page-like flap movement, with the posterior-most portion of the flap sutured into the posterior-most aspect of the defect nearest the helix. C The flap being passed through the cartilage defect is based upon retroauricular subcutaneous and muscular tissue. D Flap sutured into place.
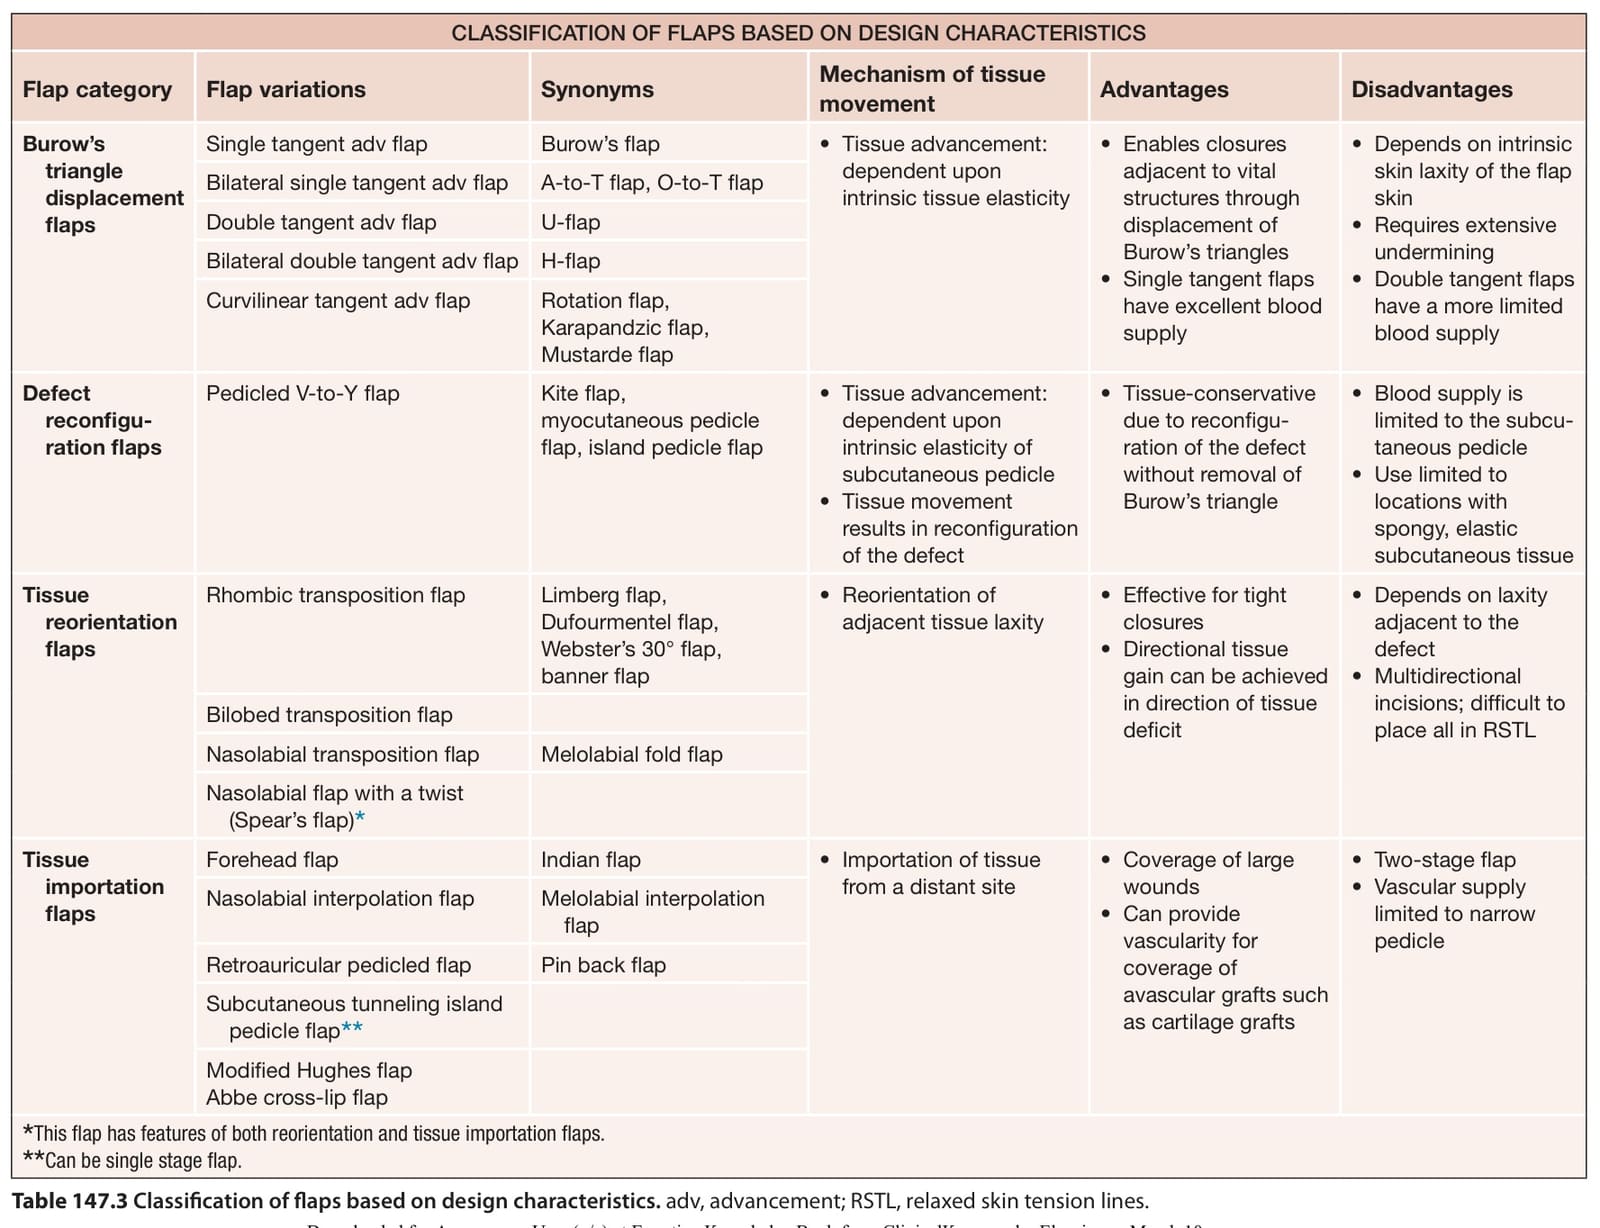
Table 147.3 Classification of flaps based on design characteristics. adv, advancement; RSTL, relaxed skin tension lines.
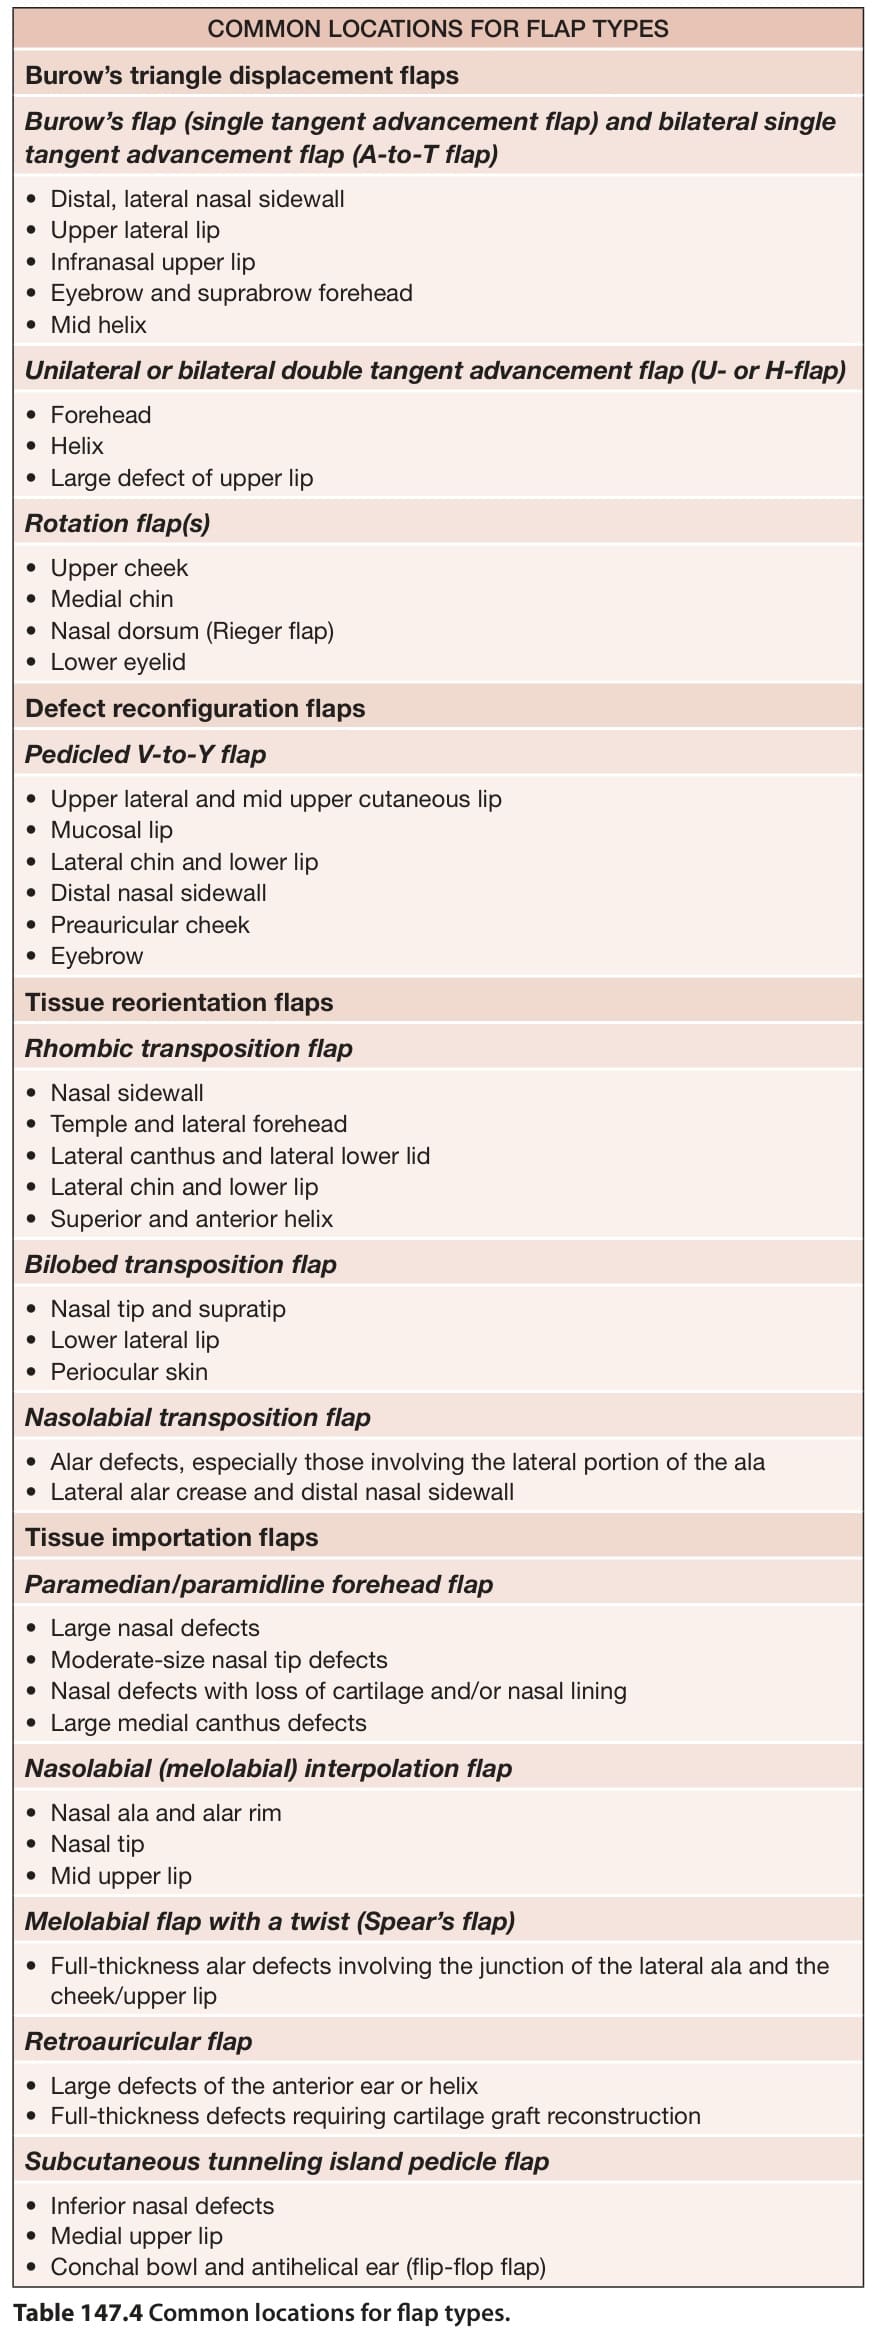
Table 147.4 Common locations for flap types.